时域AI超分
从6.0.0(20) 版本开始,新增支持OpenGL ES协议。
XEngine Kit提供时域AI超分能力,利用相机的抖动获取不同位置的采样信息,融合时域实现超采样率和超分辨率功能,并利用神经网络达到抗锯齿效果,建议超分倍率为[1.25, 2.0]。
业务流程
-
下面是基于GLES图形API平台集成时域AI超分的主要业务流程
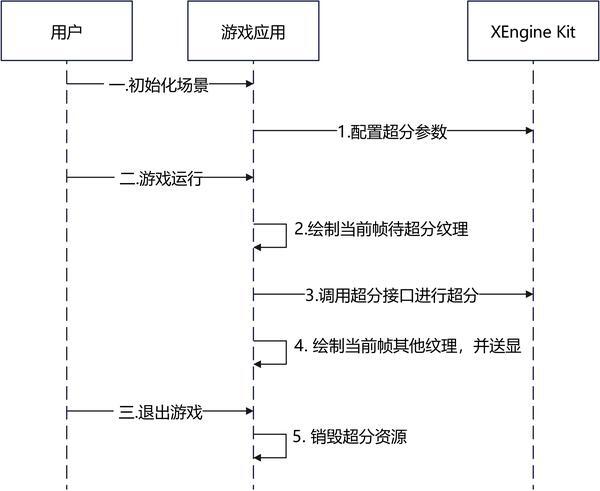
- 用户在进入游戏初始化场景时调用HMS_XEG_GetString接口查询XEngine支持的特性,当查询接口返回支持的特性列表中包含时域AI超分时代表可以使用此特性。
- 此时调用HMS_XEG_TemporalUpscaleParameter接口配置超分参数。
- 当游戏运行时,游戏渲染待超分的当前帧纹理。
- 当待超分纹理渲染完成时,即已经做完了带jitter的主pass渲染,准备好了depth,motion vector,color等输入纹理,此时调用HMS_XEG_RenderTemporalUpscale接口对待超分的纹理超分。
- 当超分渲染完成时,游戏渲染剩下的纹理,如UI等。
- 当前帧已全部渲染完成,进行送显。
- 当游戏退出时,超分资源会自行释放。
-
下面是基于Vulkan图形API平台集成时域AI超分的主要业务流程
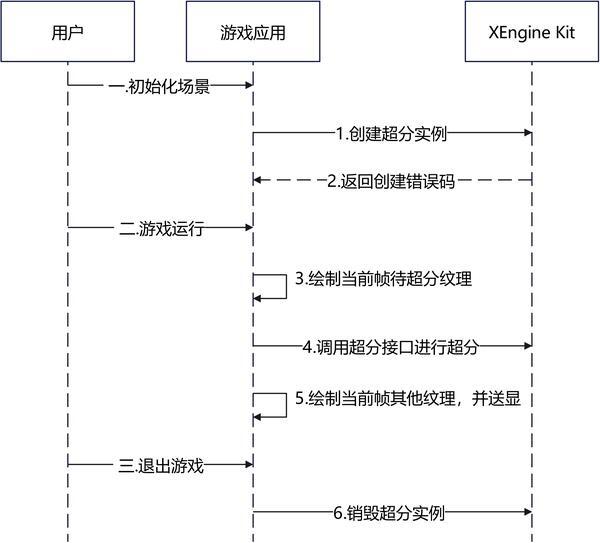
- 用户在进入游戏初始化场景时调用HMS_XEG_EnumerateDeviceExtensionProperties接口查询XEngine支持的特性,当查询接口返回支持的特性列表中包含时域AI超分时代表可以使用此特性。
- 此时调用HMS_XEG_CreateTemporalUpscale接口创建超分实例。
- 当游戏运行时,游戏渲染待超分的当前帧纹理。
- 当待超分纹理渲染完成时,即已经做完了带jitter的主pass渲染,准备好了depth,motion vector,color等输入纹理,此时调用HMS_XEG_CmdRenderTemporalUpscale接口对待超分的纹理超分。
- 当超分渲染完成时,游戏渲染剩下的纹理,如UI等。
- 当前帧已全部渲染完成,进行送显。
- 当游戏退出时,调用HMS_XEG_DestroyTemporalUpscale接口销毁超分实例。
约束与限制
-
支持的设备类型:Phone,从5.1.0(18)版本开始新增支持Tablet、PC/2in1、TV设备。
-
可通过以下方式查询相关扩展特性是否支持:
- 对于OpenGL ES,使用HMS_XEG_GetString扩展特性查询接口进行查询。
- 对于Vulkan,使用HMS_XEG_EnumerateDeviceExtensionProperties扩展特性查询接口进行查询。
如查询结果包含XEG_TEMPORAL_UPSCALE_EXTENSION_NAME,则表示支持该特性,若查询结果未包含,则表示不支持该特性。
接口说明
以下接口为OpenGL ES和Vulkan时域AI超分设置接口,如需使用更丰富的设置和查询接口,具体API说明详见接口文档。
| 接口名 | 描述 |
|---|---|
| const GLubyte * HMS_XEG_GetString (GLenum name) | XEngine OpenGL ES扩展特性查询接口。 |
| GL_APICALL void GL_APIENTRY HMS_XEG_TemporalUpscaleParameter(GLenum pname, const GLvoid *param) | 设置时域AI超分输入参数。 |
| GL_APICALL void GL_APIENTRY HMS_XEG_RenderTemporalUpscale( GLuint inputTexture, GLuint depthTexture, GLuint motionVectorTexture, GLuint dynamicMaskTexture, GLfloat jitterX, GLfloat jitterY ) | 执行时域AI超分渲染命令。 |
| VKAPI_ATTR VkResult VKAPI_CALL HMS_XEG_EnumerateDeviceExtensionProperties (VkPhysicalDevice physicalDevice, uint32_t * pPropertyCount, XEG_ExtensionProperties * pProperties) | XEngine Vulkan扩展特性查询接口。 |
| VKAPI_ATTR VkResult VKAPI_CALL HMS_XEG_CreateTemporalUpscale (VkDevice device, XEG_TemporalUpscaleCreateInfo * pTemporalUpscaleInfo, XEG_TemporalUpscale * pTemporalUpscale) | 创建XEG_TemporalUpscale对象。 |
| VKAPI_ATTR void VKAPI_CALL HMS_XEG_CmdRenderTemporalUpscale (VkCommandBuffer commandBuffer, XEG_TemporalUpscale temporalUpscale, XEG_TemporalUpscaleDescription * pDescription) | 执行时域AI超分渲染命令。 |
| VKAPI_ATTR void VKAPI_CALL HMS_XEG_DestroyTemporalUpscale (XEG_TemporalUpscale temporalUpscale) | 销毁XEG_TemporalUpscale对象。 |
开发步骤
本章以OpenGL ES和Vulkan图像API集成为例,说明XEngine集成操作过程。
配置项目
编译HAP时,Native层so编译需要依赖NDK中的libxengine.so。
-
头文件引用
按需引用XEngine的头文件,如使用OpenGL ES时域AI超分。
#include <cstring>#include <cstdlib>#include <xengine/xeg_gles_extension.h>#include <xengine/xeg_gles_temporal_upscale.h>按需引用XEngine的头文件,如使用Vulkan时域AI超分。
#include <algorithm>#include <string>#include <vector>#include "xengine/xeg_vulkan_temporal_upscale.h"#include "xengine/xeg_vulkan_extension.h" -
编写CMakeLists.txt
按需引用XEngine的CMakeLists,如使用OpenGL ES时域AI超分功能,CMakeLists.txt部分示例代码如下。
find_library(# Sets the name of the path variable.xengine-lib# Specifies the name of the NDK library that you want CMake to locate.xengine)find_library(# Sets the name of the path variable.EGL-lib# Specifies the name of the NDK library that you want CMake to locate.EGL)find_library(# Sets the name of the path variable.GLES-lib# Specifies the name of the NDK library that you want CMake to locate.GLESv3)target_link_libraries(nativerender PUBLIC${EGL-lib} ${GLES-lib} ${xengine-lib})按需引用XEngine的CMakeLists,如使用Vulkan时域AI超分功能,CMakeLists.txt部分示例代码如下,完整示例代码请参见Demo(GPU加速引擎-Vulkan)。
find_library(# Sets the name of the path variable.hilog-lib# Specifies the name of the NDK library that# you want CMake to locate.hilog_ndk.z)find_library(# Sets the name of the path variable.libace-lib# Specifies the name of the NDK library that# you want CMake to locate.ace_ndk.z)find_library(# Sets the name of the path variable.libnapi-lib# Specifies the name of the NDK library that# you want CMake to locate.ace_napi.z)find_library(# Sets the name of the path variable.libuv-lib# Specifies the name of the NDK library that# you want CMake to locate.uv)add_library(libassimp SHARED IMPORTED)set_target_properties(libassimpPROPERTIESIMPORTED_LOCATION${CMAKE_CURRENT_SOURCE_DIR}/libs/arm64-v8a/libassimp.so)find_library(# Sets the name of the path variable.xengine-lib# Specifies the name of the NDK library that# you want CMake to locate.xengine)target_link_libraries(nativerender PUBLIC${hilog-lib} ${libace-lib} ${libnapi-lib} ${libuv-lib} libnative_window.so libc++.a libktx librawfile.z.so libassimp ${xengine-lib})
集成XEngine时域AI超分(OpenGL ES)
使用EGL和OpenGL ES图形API搭建图像渲染管线并集成时域AI超分在Native层实现,渲染结果通过XComponent组件显示到屏幕。
本节阐述OpenGL ES图形API的时域AI超分的使用。
在调用XEngine Kit能力前,需要先通过Syscap查询您的目标设备是否支持SystemCapability.Graphic.XEngine系统能力。
-
调用HMS_XEG_GetString接口,获取XEngine支持的扩展信息,只有在支持XEG_TEMPORAL_UPSCALE_EXTENSION_NAME扩展时才可以使用时域AI超分的相关接口。
// 查询XEngine支持的GLES扩展信息const char* extensions = (const char*)HMS_XEG_GetString(XEG_EXTENSIONS);// 检查是否支持时域AI超分if (!strstr(extensions, XEG_TEMPORAL_UPSCALE_EXTENSION_NAME)) {exit(1); // return error} -
调用HMS_XEG_TemporalUpscaleParameter接口,对时域AI超分的参数赋值。
// m_lowResWidth与m_lowResHeight分别为用户自定义的渲染宽度与渲染高度,此处以800*600分辨率为例uint32_t m_lowResWidth = 800;uint32_t m_lowResHeight = 600;// 设置相机抖动的周期数,此处以8为例GLuint jitterNum = 8;GLsizei inputSize[2] = {static_cast<GLsizei>(m_lowResWidth), static_cast<GLsizei>(m_lowResHeight)};// 设置超分输入纹理的真实宽高HMS_XEG_TemporalUpscaleParameter(XEG_TEMPORAL_UPSCALE_INPUT_SIZE, inputSize);HMS_XEG_TemporalUpscaleParameter(XEG_TEMPORAL_UPSCALE_JITTER_NUM, &jitterNum);// 设置是否存在深度反转,此处为不存在深度反转GLboolean isDepthReversed = GL_FALSE;HMS_XEG_TemporalUpscaleParameter(XEG_TEMPORAL_UPSCALE_DEPTH_REVERSED, &isDepthReversed);// 设置是否重置历史帧数据,true表示重置,false表示不重置。在历史帧未使用超分,并且当前帧开始使用超分的情况下建议设置为trueGLboolean resetHistory = GL_TRUE;HMS_XEG_TemporalUpscaleParameter(XEG_TEMPORAL_UPSCALE_RESET_HISTORY, &resetHistory);// 设置画面偏向当前帧(鬼影少但可能存在闪烁)还是历史帧(鬼影多但是更稳定)的平衡程度。此处以0.5为例GLfloat steadyLevel = 0.5;HMS_XEG_TemporalUpscaleParameter(XEG_TEMPORAL_UPSCALE_STEADY_LEVEL, &steadyLevel); -
调用HMS_XEG_RenderTemporalUpscale接口进行超分,每帧都需要调用。
其中,参数jitterX和jitterY分别为相机在X方向和Y方向的抖动,是一个类似Halton的低差异序列。
本例使用Halton算法计算Jitter值:使用Halton算法生成一个[0, 1]的序列,再减去0.5使序列范围保持在[-0.5, 0.5],最后除以输入图像的分辨率,得到UV坐标下的Jitter值。
-
根据Halton算法生成每帧需要的相机抖动(Jitter)。
// Halton算法示例float GetHaltonSequence(uint32_t index, uint32_t base) {float result = 0.0;float fraction = 1.0 / base;while (index > 0) {result += fraction * (index % base);index /= base;fraction /= base;}return result;}// 当前帧数,需要每帧+1,用于确定当前帧使用的Jitter值,使Jitter值在JitterNum范围内轮转uint64_t frameNum = 0;// jitterX与jitterY分别为相机在X和Y方向上的抖动float jitterX = 0.0;float jitterY = 0.0;// 此处需要保证生成的低差异序列长度与jitterNum保持一致,且在[-0.5, 0.5]的范围内jitterX = GetHaltonSequence((frameNum % jitterNum) + 1, 2) - 0.5;jitterY = GetHaltonSequence((frameNum % jitterNum) + 1, 3) - 0.5;// m_lowResWidth与m_lowResHeight为步骤2中的输入图像的宽度和高度jitterX = jitterX / m_lowResWidth;jitterY = jitterY / m_lowResHeight; -
调用时域AI超分渲染接口。
// 这里表示第一帧使用超分的情况下设置resetHistory为true,否则设置为falseresetHistory = frameNum == 0 ? GL_TRUE : GL_FALSE;HMS_XEG_TemporalUpscaleParameter(XEG_TEMPORAL_UPSCALE_RESET_HISTORY, &resetHistory);// m_upscaleFBO为用户自定义创建的超分后的framebufferunsigned int m_upscaleFBO;unsigned int m_highResWidth;unsigned int m_highResHeight;unsigned int m_lowLightColorTexture;unsigned int m_lowGboDepth;unsigned int m_motionVectorTexture, m_dynamicMaskTexture;glBindFramebuffer(GL_FRAMEBUFFER, m_upscaleFBO);glViewport(0, 0, m_highResWidth, m_highResHeight);glScissor(0, 0, m_highResWidth, m_highResHeight);// m_lowLightColorTexture为超分输入纹理。// m_lowGboDepth为深度纹理。// m_motionVectorTexture为运动矢量图像。运动矢量的计算方式为当前渲染像素的NDC坐标的XY值减去上一帧的NDC坐标的XY值。// m_dynamicMaskTexture为物体的动态遮罩图像,格式需要是GL_RED或其兼容格式。R通道的合法值为0.0、0.2或1.0,其中0.0表示静态物体,0.2表示运动物体如人物,1.0表示特效或半透明物体。// jitterX 相机在X方向上的抖动。// jitterY 相机在Y方向上的抖动。HMS_XEG_RenderTemporalUpscale(m_lowLightColorTexture, m_lowGboDepth, m_motionVectorTexture, m_dynamicMaskTexture,-0.5*jitterX, -0.5*jitterY);
-
集成XEngine时域AI超分(Vulkan)
使用Vulkan图形API搭建图像渲染管线,并集成时域AI超分在Native层实现,渲染结果通过XComponent组件显示到屏幕。
本节阐述Vulkan图形API的时域AI超分使用,详细代码请参见Samplecode。
在调用XEngine Kit能力前,需要先通过Syscap查询您的目标设备是否支持SystemCapability.Graphic.XEngine系统能力。
-
调用HMS_XEG_EnumerateDeviceExtensionProperties接口,获取XEngine支持的扩展信息,只有在支持XEG_TEMPORAL_UPSCALE_EXTENSION_NAME扩展时才可以使用时域AI超分的相关接口。
// physicalDevice为Vulkan物理设备,用户需进行初始化VkPhysicalDevice physicalDevice;// 查询XEngine支持的Vulkan扩展列表std::vector<std::string> supportedExtensions;uint32_t pPropertyCount;HMS_XEG_EnumerateDeviceExtensionProperties(physicalDevice, &pPropertyCount, nullptr);if (pPropertyCount > 0) {std::vector<XEG_ExtensionProperties> pProperties(pPropertyCount);if (HMS_XEG_EnumerateDeviceExtensionProperties(physicalDevice, &pPropertyCount,&pProperties.front()) == VK_SUCCESS) {for (auto ext : pProperties) {supportedExtensions.push_back(ext.extensionName);}}}// 查询是否支持时域AI超分if (std::find(supportedExtensions.begin(), supportedExtensions.end(), XEG_TEMPORAL_UPSCALE_EXTENSION_NAME) ==supportedExtensions.end()) {exit(1); // return error;} -
声明实例句柄。
XEG_TemporalUpscale xegTemporalUpscale; -
调用HMS_XEG_CreateTemporalUpscale接口,创建时域AI超分实例。
// 渲染宽高和超分后宽高均为用户自定义参数,这里将以800*600的分辨率进行1.5倍超分到1200*900的分辨率为例uint32_t lowResWidth = 800;uint32_t lowResHeight = 600;uint32_t highResWidth = 1200;uint32_t highResHeight = 900;const uint32_t jitterNum = 8;// Vulkan逻辑设备,用户需进行初始化VkDevice device;// XEG_TemporalUpscaleCreateInfo为创建XEG_TemporalUpscale对象所需信息XEG_TemporalUpscaleCreateInfo createInfo;// 指定输入图像的大小,即低分辨率图像的尺寸createInfo.inputSize = {lowResWidth, lowResHeight};// 指定输出图像的大小,即高分辨率图像的尺寸createInfo.outputSize = {highResWidth, highResHeight};// 指定输出图像的颜色格式createInfo.outputFormat = VK_FORMAT_R8G8B8A8_UNORM;// jitterNum为相机抖动的周期数createInfo.jitterNum = jitterNum;// 指定了深度值是否反转createInfo.isDepthReversed = true;VkResult res = HMS_XEG_CreateTemporalUpscale(device, &createInfo, &xegTemporalUpscale);if (res != VK_SUCCESS) {exit(1); // return error;} -
调用HMS_XEG_CmdRenderTemporalUpscale接口下发超分,每帧都需要调用。
其中,参数jitterX和jitterY分别为相机在X方向和Y方向的抖动,是一个类似Halton的低差异序列。
本例使用Halton算法计算Jitter值:使用Halton算法生成一个[0, 1]的序列,再减去0.5使序列范围保持在[-0.5, 0.5],最后除以输入图像的分辨率,得到UV坐标下的Jitter值。
-
根据Halton算法生成每帧需要的相机抖动(Jitter)。
// Halton算法示例float GetHaltonSequence(uint32_t index, uint32_t base) {float result = 0.0;float fraction = 1.0 / base;while (index > 0) {result += fraction * (index % base);index /= base;fraction /= base;}return result;} -
调用时域AI超分渲染接口。
// 当前帧数,需要每帧+1,用于确定当前帧使用的Jitter值,使Jitter值在JitterNum范围内轮转uint64_t frameNum = 0;// jitterX与jitterY分别为相机在X和Y方向上的抖动float jitterX = 0.0;float jitterY = 0.0;// 定义XEG_TemporalUpscaleDescription对象xegDescriptionXEG_TemporalUpscaleDescription xegDescription;// inputImageView为用户创建的超分输入图像的VkImageViewVkImageView inputImageView = VK_NULL_HANDLE;// depthImageView为用户创建的深度图像的VkImageViewVkImageView motionVectorImageView= VK_NULL_HANDLE;// motionVectorImageView为用户创建的运动矢量图像的VkImageViewVkImageView depthImageView = VK_NULL_HANDLE;// dynamicMaskImageView为用户创建的物体动态遮罩图像的VkImageViewVkImageView dynamicMaskImageView = VK_NULL_HANDLE;// outputImageView为用户创建的超分输出图像的VkImageViewVkImageView outputImageView = VK_NULL_HANDLE;// commandBuffer为命令缓冲区,用户需进行初始化VkCommandBuffer commandBuffer = VK_NULL_HANDLE;xegDescription.inputImage = inputImageView;xegDescription.depthImage = depthImageView;xegDescription.motionVectorImage = motionVectorImageView;xegDescription.dynamicMaskImage = dynamicMaskImageView;xegDescription.outputImage = outputImageView;// 此处需要保证生成的低差异序列长度与jitterNum保持一致,且在[-0.5, 0.5]的范围内jitterX = GetHaltonSequence((frameNum % jitterNum) + 1, 2) - 0.5;jitterY = GetHaltonSequence((frameNum % jitterNum) + 1, 3) - 0.5;// lowResWidth与lowResHeight为步骤3中的输入图像的宽度和高度jitterX = jitterX / lowResWidth;jitterY = jitterY / lowResHeight;xegDescription.jitterX = -jitterX;xegDescription.jitterY = -jitterY;// resetHistory为选择是否重置历史帧数据,true表示重置,false则表示不重置,此处以true为例xegDescription.resetHistory = (frameNum == 0) ? true : false;// steadyLevel为画面偏向当前帧还是历史帧的平衡程度,取值范围为[0.0, 1.0],此处以平衡程度为0.5为例xegDescription.steadyLevel = 0.5;HMS_XEG_CmdRenderTemporalUpscale(commandBuffer, xegTemporalUpscale, &xegDescription);
-
-
调用HMS_XEG_DestroyTemporalUpscale接口销毁实例。
if (xegTemporalUpscale) {HMS_XEG_DestroyTemporalUpscale(xegTemporalUpscale);}