应用市场推荐
场景介绍
-
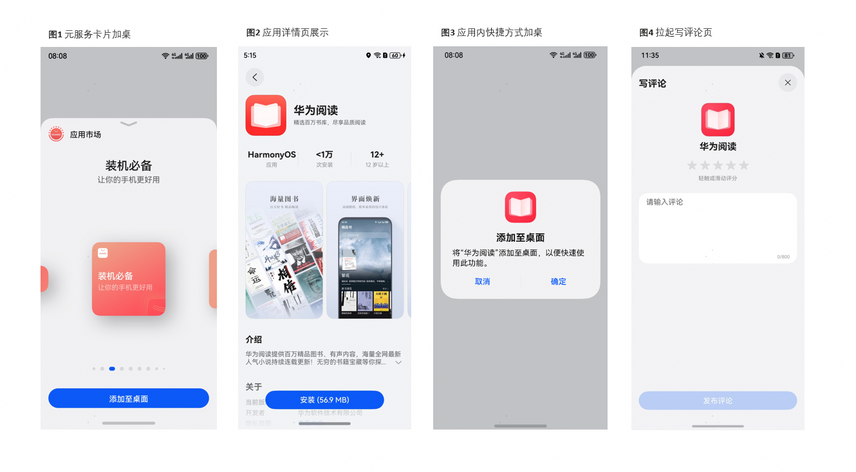
元服务卡片加桌
您可调用应用市场服务提供的元服务加桌loadService接口,加载元服务卡片加桌页面,用户点击“添加至桌面”按钮,将元服务卡片添加至桌面。
-
应用详情页展示
-
您可调用应用市场服务提供的loadProduct接口,直接加载应用市场的应用详情页面,用户可以在页面内点击“安装”按钮完成应用的下载安装;
-
您可使用Deep Linking链接的方式拉起应用市场应用详情页,通过拼接应用市场Deep Linking链接,在应用中调用或网页中点击Deep Linking链接拉起应用详情页,用户可以在页面内点击“安装”按钮完成应用的下载安装;
-
您可使用App Linking链接的方式拉起应用市场应用详情页,通过拼接应用市场App Linking链接,在应用中调用或网页中点击App Linking链接拉起应用详情页,用户可以在页面内点击“安装”按钮完成应用的下载安装。

应用内打开应用市场App,通过应用市场下载推荐应用,推荐使用loadProduct()方式;Web页面打开应用市场App,推荐使用App Linking。
-
-
应用内快捷方式加桌
-
您可调用应用市场服务提供的checkPinShortcutPermitted接口,查询快捷方式加桌是否允许,允许的话则返回鉴权结果及结果的有效期;
-
您调用checkPinShortcutPermitted接口获取到鉴权结果后,并在其有效期内再调用应用市场提供的requestNewPinShortcut接口,创建快捷方式加桌,展示快捷方式加桌的用户确认弹窗,待用户确认后,可将快捷方式添加至桌面。
单个应用最多可添加2个快捷方式。
-
-
应用写评论页展示
- 您可使用Deep Linking链接的方式拉起应用市场写评论页,通过拼接应用市场Deep Linking链接,在应用中调用或网页中点击Deep Linking链接在应用详情页拉起写评论页,用户可以在页面内进行评分与评论;
- 您可使用App Linking链接的方式拉起应用市场写评论页,通过拼接应用市场App Linking链接,在应用中调用或网页中点击App Linking链接在应用详情页拉起写评论页,用户可以在页面内进行评分与评论。
业务流程
元服务卡片加桌&应用详情页展示
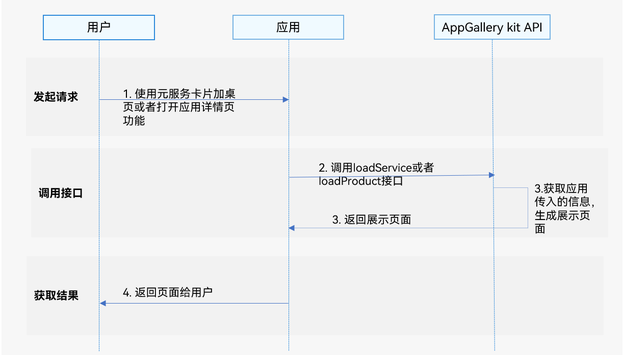
- 用户使用打开应用详情页功能;
- 应用调用AppGallery Kit的loadProduct接口;
- AppGallery Kit API获取应用传入的信息,生成展示页面;
- 展示生成的页面给用户使用。
应用内快捷方式加桌
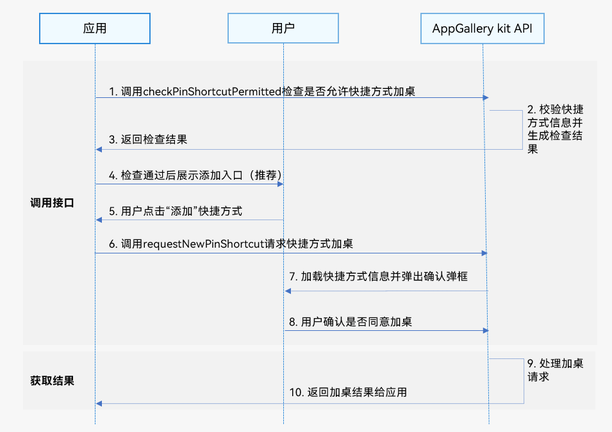
- 应用预先调用checkPinShortcutPermitted接口检查是否允许快捷方式加桌;
- AppGallery Kit获取应用传入的快捷方式信息并生成检查结果;
- AppGallery Kit返回检查结果和有效时间给应用;
- 检查通过后应用给用户展示添加快捷方式入口;
- 用户点击“添加”快捷方式;
- 调用requestNewPinShortcut接口请求创建快捷方式;
- AppGallery Kit加载快捷方式信息并弹出用户确认框;
- 用户确认是否同意加桌;
- 用户同意后,AppGallery Kit处理加桌请求;
- AppGallery Kit返回加桌结果给应用。
通过Deep Linking拉起写评论页
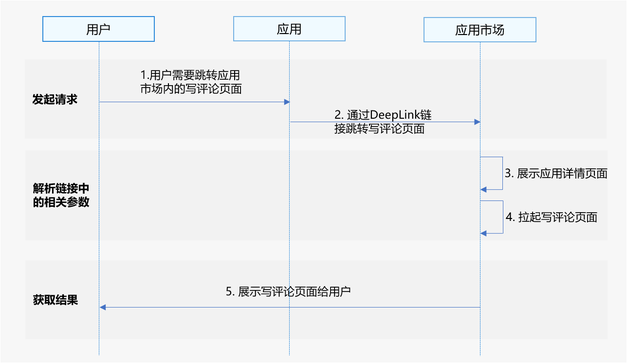
- 用户使用某应用时,存在跳转应用市场内针对该应用进行评分与评论的诉求;
- 应用通过拼接应用市场Deep Linking链接直接跳转写评论页面;
- 应用市场解析Deep Linking链接中的参数,展示应用详情页面(全屏);
- 拉起写评论页面(半模态或浅层窗口);
- 向用户展示写评论页面。
通过App Linking拉起写评论页
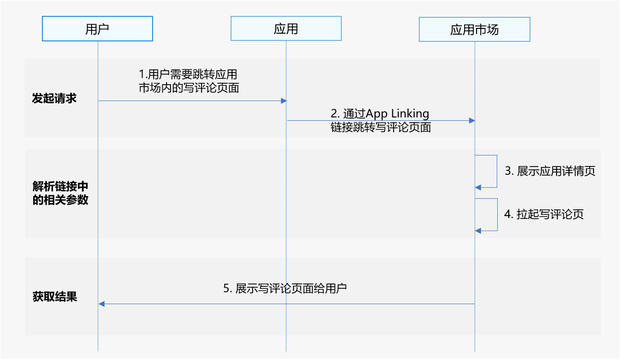
- 用户使用某应用时,存在跳转应用市场内针对该应用进行评分与评论的诉求;
- 应用通过拼接应用市场App Linking链接直接跳转写评论页面;
- 应用市场解析App Linking链接中的参数,展示应用详情页面(全屏);
- 拉起写评论页面(半模态或浅层窗口);
- 向用户展示写评论页面。
约束与限制
- 应用市场推荐服务不支持模拟器,请使用真机调试。在模拟器中使用该服务将会提示:无法获取内容,请点击屏幕重试。
- 应用市场推荐服务支持Phone、Tablet、PC/2in1设备。并且从6.0.2(22)版本开始,新增支持TV设备。
接口说明
应用市场推荐场景提供loadService,loadProduct、checkPinShortcutPermitted、requestNewPinShortcut四个接口,具体API说明详见接口文档。
| 接口名 | 描述 |
|---|---|
| loadService(context: common.UIAbilityContext, want: Want, callback?: ServiceViewCallback): void | 加载元服务加桌页面接口。 |
| loadProduct(context: common.UIAbilityContext, want: Want, callback?: ProductViewCallback): void | 加载应用详情页面接口。 |
| checkPinShortcutPermitted(context: common.UIAbilityContext, shortcutId: string, want: Want, labelResName: string, iconResName: string): Promise<CheckShortcutResult> | 以静态资源方式校验桌面快捷方式。 |
| checkPinShortcutPermitted(context: common.UIAbilityContext, shortcutId: string, want: Want, label: string, foregroundIcon: string, backgroundIcon: string): Promise<CheckShortcutResult> | 以自定义资源方式校验桌面快捷方式。 |
| requestNewPinShortcut(context: common.UIAbilityContext, tid: string): Promise<void> | 创建桌面快捷方式。 |
开发步骤
元服务卡片加桌
-
导入productViewManager模块及相关公共模块。
import { productViewManager } from '@kit.AppGalleryKit';import { hilog } from '@kit.PerformanceAnalysisKit';import type { common, Want } from '@kit.AbilityKit';import { BusinessError } from '@kit.BasicServicesKit'; -
构造元服务卡片参数。
-
第一个参数是获取当前Page页面的UIAbilityContext。
-
第二个参数是构造一个Want类型的对象,在属性中传入要加载的元服务的加桌链接。
-
第三个参数是可选参数对象,可以传入四个属性,onError:回调函数,回调返回的信息为元服务卡片加桌页加载失败的错误信息。onReceive:回调函数,接收元服务卡片加桌结果信息。onAppear:回调函数,当元服务卡片加桌页成功打开时回调。onDisappear:回调函数,当元服务卡片加桌页关闭时回调。
@Entry@Componentstruct LoadServiceView {@State message: string = '拉起应用市场详情页';build() {Row() {Column() {Button(this.message).fontSize(24).fontWeight(FontWeight.Bold).onClick(() => {const uiContext = this.getUIContext().getHostContext() as common.UIAbilityContext;const wantParam: Want = {// 此处填入要加载的元服务的加桌链接uri: 'xxx'}const callback: productViewManager.ServiceViewCallback = {onReceive: (data: productViewManager.ServiceViewReceiveData) => {hilog.info(0x0001, 'TAG', `loadService onReceive.result is ${data.result}, msg is ${data.msg}, formInfo is ${JSON.stringify(data.formInfo)}`);},onError: (error: BusinessError) => {hilog.error(0, 'TAG', `loadService onError.code is ${error.code}, message is ${error.message}`)},onAppear: () => {hilog.info(0, 'TAG', `loadService onAppear.`);},onDisappear: () => {hilog.info(0, 'TAG', `loadService onDisappear.`);}}})}.width('100%')}.height('100%')}}
-
-
调用productViewManager.loadService方法,将步骤2中构造的参数依次传入接口中。
// 调用接口,加载元服务加桌页面productViewManager.loadService(uiContext, wantParam, callback);
应用详情页展示
- 方式一:loadProduct接口调用
-
导入productViewManager模块及相关公共模块。
import { productViewManager } from '@kit.AppGalleryKit';import { hilog } from '@kit.PerformanceAnalysisKit';import type { common, Want } from '@kit.AbilityKit';import { BusinessError } from '@kit.BasicServicesKit'; -
构造应用详情页参数。
-
第一个参数是获取当前Page页面的UIAbilityContext。
-
第二个参数是构造一个Want类型的对象,可以传入两个属性,bundleName:需要加载的应用包名。skExposure:SKExposure类型,向应用归因服务传递登记归因来源信息。
-
第三个参数是可选参数对象,可以传入三个属性,onError:回调函数,回调返回的信息为应用详情页加载失败时的错误信息。onAppear:回调函数,当应用详情页成功打开时回调。onDisappear:回调函数,当应用详情页关闭时回调。
@Entry@Componentstruct LoadProductView {@State message: string = '拉起应用市场详情页';build() {Row() {Column() {Button(this.message).fontSize(24).fontWeight(FontWeight.Bold).onClick(() => {const exposureData: productViewManager.SKExposure = {adTechId: '20****e8',campaignId: '123456',destinationId: '10******',mmpIds: ['2f****5', '2f7***5'],serviceTag: '123***2',nonce: '123***2',timestamp: 1705536488,signature: 'MEQCIEQlmZ****zKBSE8QnhLTIHZZZ****ZpRqRxHss65Ko****JgJKjdrWdkL****juEx2RmFS7da****ZRVZ8RyMyUXg=='};const uiContext = this.getUIContext().getHostContext() as common.UIAbilityContextconst wantParam: Want = {parameters: {// 必填,此处填入要加载的应用包名,例如: bundleName: 'com.huawei.hmsapp.books'bundleName: 'com.xxx',// 可选,向应用归因服务传递登记归因来源数据skExposure: exposureData}}const callback: productViewManager.ProductViewCallback = {onError: (error: BusinessError) => {hilog.error(0, 'TAG',`loadProduct onError.code is ${error.code}, message is ${error.message}`)},onAppear: () => {hilog.info(0, 'TAG', `loadProduct onAppear.`);},onDisappear: () => {hilog.info(0, 'TAG', `loadProduct onDisappear.`);}}}).width('100%')}.height('100%')}}}
-
-
调用loadProduct方法,将步骤2中构造的参数依次传入接口中。
// 调用接口,拉起应用详情页productViewManager.loadProduct(uiContext, wantParam, callback);
-
方式二:Deep Linking方式
构造拼接bundleName的Deep Linking链接,其中bundleName为需要打开的应用包名,其格式为:
uri: 'store://appgallery.huawei.com/app/detail?id=' + bundleName,在应用中调用startAbility方法,拉起应用市场应用详情页:
import { BusinessError } from '@kit.BasicServicesKit';import { hilog } from '@kit.PerformanceAnalysisKit';import type { common, Want } from '@kit.AbilityKit';// 拉起应用市场对应的应用详情页面function startAppGalleryDetailAbility(context: common.UIAbilityContext, bundleName: string): void {let want: Want = {action: 'ohos.want.action.appdetail', // 隐式指定action为ohos.want.action.appdetailuri: 'store://appgallery.huawei.com/app/detail?id=' + bundleName, // bundleName为需要打开应用详情的应用包名};context.startAbility(want).then(() => {hilog.info(0x0001, 'TAG', "Succeeded in starting Ability successfully.")}).catch((error: BusinessError) => {hilog.error(0x0001, 'TAG', `Failed to startAbility.Code: ${error.code}, message is ${error.message}`);});}@Entry@Componentstruct StartAppGalleryDetailAbilityView {@State message: string = '拉起应用市场详情页';build() {Row() {Column() {Button(this.message).fontSize(24).fontWeight(FontWeight.Bold).onClick(() => {const context: common.UIAbilityContext = this.getUIContext().getHostContext() as common.UIAbilityContext;// 按实际需求获取应用的bundleName,例如bundleName: 'com.huawei.hmsapp.books'const bundleName = 'xxxx';startAppGalleryDetailAbility(context, bundleName);})}.width('100%')}.height('100%')}}在网页中打开Deep Linking链接拉起应用市场应用详情页:
<html lang="en"><head><meta charset="UTF-8"></head><body><div><button type="button" onclick="openDeepLink()">拉起应用详情页</button></div></body></html><script>function openDeepLink() {window.open('store://appgallery.huawei.com/app/detail?id=com.xxxx.xxxx')}</script> -
方式三:App Linking方式
构造拼接bundleName的App Linking链接,其中bundleName为需要打开的应用包名,其格式为:
let link: string = 'https://appgallery.huawei.com/app/detail?id=' + bundleName;在应用中调用openLink接口拉起App Linking链接:
import { BusinessError } from '@kit.BasicServicesKit';import { hilog } from '@kit.PerformanceAnalysisKit';import type { common } from '@kit.AbilityKit';@Entry@Componentstruct Index {build() {Button('start app linking', { type: ButtonType.Capsule, stateEffect: true }).width('87%').height('5%').margin({ bottom: '12vp' }).onClick(() => {let context: common.UIAbilityContext = this.getUIContext().getHostContext() as common.UIAbilityContext;// 需要拼接不同的应用包名,用以打开不同的应用详情页,例如:bundleName: 'com.huawei.hmsapp.books'let bundleName: string = 'xxxx';let link: string = 'https://appgallery.huawei.com/app/detail?id=' + bundleName;// 以App Linking优先的方式在应用市场打开指定包名的应用详情页context.openLink(link, { appLinkingOnly: false }).then(() => {hilog.info(0x0001, 'TAG', 'openlink success.');}).catch((error: BusinessError) => {hilog.error(0x0001, 'TAG', `openlink failed. Code: ${error.code}, message is ${error.message}`);});})}}在网页中打开App Linking链接:
<html lang="en"><head><meta charset="UTF-8"><title>跳转示例</title></head><body><a href='https://appgallery.huawei.com/app/detail?id=bundleName'>AppLinking跳转示例</a></body></html>
应用内快捷方式加桌
- 方式一:以静态资源方式创建桌面快捷方式
-
导入productViewManager模块及相关公共模块。
import { productViewManager } from '@kit.AppGalleryKit';import { hilog } from '@kit.PerformanceAnalysisKit';import type { common, Want } from '@kit.AbilityKit';import { BusinessError } from '@kit.BasicServicesKit'; -
构造调用checkPinShortcutPermitted接口校验桌面快捷方式的参数。
- 第一个参数是获取当前Page页面的UIAbilityContext。
- 第二个参数是应用构造的快捷方式ID,取值为长度不超过63字节的字符串。
- 第三个参数是构造一个Want类型的对象,在该参数中传入用户点击快捷方式后被拉起的目标应用的bundleName、moduleName、abilityName等。
- 第四个参数是快捷方式显示在桌面上的名称的label资源索引名称。
- 第五个参数是快捷方式显示在桌面上的图标的icon文件资源索引名称。
const uiContext =this.getUIContext().getHostContext() as common.UIAbilityContext;const shortcutId = "id_test1"; // 对应shortcuts标签中配置的shortcutId, 例如: "shortcutId": "id_test1"const labelResName = "shortcut"; // 对应shortcuts标签中配置的label资源索引名称, 例如: "label": "$string:shortcut"const iconResName = "aa_icon"; // 对应shortcuts标签中配置的icon资源索引名称, 例如: "icon": "$media:aa_icon"const want: Want = { // 对应shortcuts标签中配置的wantbundleName: "com.example.appgallery.kit.demo",moduleName: "entry",abilityName: "EntryAbility",parameters: {testKey: "testValue"}};需提前创建应用静态快捷方式,且第二、三、四、五个参数需要与shortcuts标签中的配置保持一致。
若校验参数发生变化,则每次覆盖生成新的tid,否则返回历史tid以及剩余过期时间expired。
-
调用checkPinShortcutPermitted接口,将步骤2中的参数依次传入接口中,并保存异步返回的结果CheckShortcutResult。
try {let checkShortcutResult: productViewManager.CheckShortcutResult;productViewManager.checkPinShortcutPermitted(uiContext, shortcutId, want, labelResName, iconResName).then((result: productViewManager.CheckShortcutResult) => {hilog.info(0x0001, 'TAG', `checkPinShortcutPermitted success result is ${JSON.stringify(result)}`);checkShortcutResult = result;}).catch((error: BusinessError) => {hilog.error(0x0001, 'TAG',`checkPinShortcutPermitted error. code is ${error.code}, message is ${error.message}`);})} catch (err) {hilog.error(0x0001, 'TAG', `checkPinShortcutPermitted failed, code is ${err.code}, message is ${err.message}`);} -
构造调用requestNewPinShortcut接口创建桌面快捷方式的参数。
- 第一个参数是获取当前Page页面的UIAbilityContext。
- 第二个参数是步骤3中调用接口返回得到的CheckShortcutResult的属性tid的值。
const uiContext = this.getUIContext().getHostContext() as common.UIAbilityContext;const tid = checkShortcutResult.tid; -
调用requestNewPinShortcut接口,将步骤4中的参数依次传入接口中。
try {productViewManager.requestNewPinShortcut(uiContext, tid).then(() => {hilog.info(0x0001, 'TAG', `requestNewPinShortcut success.`);}).catch((error: BusinessError) => {hilog.error(0x0001, 'TAG', `requestNewPinShortcut error. code is ${error.code}, message is ${error.message}`);})} catch (err) {hilog.error(0x0001, 'TAG', `requestNewPinShortcut failed, code is ${err.code}, message is ${err.message}`);}快捷方式加桌成功后,原校验结果tid会失效,再次加桌需重新校验生成新的tid。
为了提升用户体验,推荐预先调用checkPinShortcutPermitted接口,当用户点击加桌后,再调用requestNewPinShortcut接口执行加桌请求。
不建议在用户点击加桌后再连续调用这两个接口执行加桌。
- 方式二:以自定义资源方式创建桌面快捷方式
-
导入productViewManager模块及相关公共模块。
import { productViewManager } from '@kit.AppGalleryKit';import { hilog } from '@kit.PerformanceAnalysisKit';import type { common, Want } from '@kit.AbilityKit';import { BusinessError } from '@kit.BasicServicesKit'; -
构造调用checkPinShortcutPermitted接口构造校验桌面快捷方式的参数。
- 第一个参数是获取当前Page页面的UIAbilityContext。
- 第二个参数是应用构造的快捷方式ID,取值为长度不超过63字节的字符串。
- 第三个参数是构造一个Want类型的对象,在该参数中传入用户点击快捷方式后被拉起的目标应用的bundleName、moduleName、abilityName等。
- 第四个参数是快捷方式显示在桌面名称的文本内容。
- 第五个参数是快捷方式显示在桌面图标的应用沙箱地址,图标最大不超过100KB,格式为png和webp。
- 第六个参数预留,暂不支持,传入空字符串。
const uiContext = this.getUIContext().getHostContext() as common.UIAbilityContext;const shortcutId = `${Date.now()}`;const want: Want = {bundleName: "com.example.appgallery.kit.demo",moduleName: "entry",abilityName: "EntryAbility",parameters: {testKey: "testValue"}}const label = "shortcut";const foregroundIcon = uiContext.filesDir + "/icon.png";const backgroundIcon = "";当前不支持背景层图标,第六个参数backgroundIcon传空字符串。
若校验参数发生变化,则每次覆盖生成新的tid,否则返回历史tid以及剩余过期时间expired。
-
调用checkPinShortcutPermitted接口,将步骤2中的参数依次传入接口中,并保存异步返回的结果CheckShortcutResult。
try {let checkShortcutResult: productViewManager.CheckShortcutResult;productViewManager.checkPinShortcutPermitted(uiContext, shortcutId, want, label, foregroundIcon, backgroundIcon).then((result: productViewManager.CheckShortcutResult) => {hilog.info(0x0001, 'TAG', `checkPinShortcutPermitted success result is ${JSON.stringify(result)}`)checkShortcutResult = result;}).catch((error: BusinessError) => {hilog.error(0x0001, 'TAG',`checkPinShortcutPermitted error. code is ${error.code}, message is ${error.message}`);})} catch (err) {hilog.error(0x0001, 'TAG', `checkPinShortcutPermitted failed, code is ${err.code}, message is ${err.message}`);} -
构造调用requestNewPinShortcut接口创建桌面快捷方式的参数。
- 第一个参数是获取当前Page页面的UIAbilityContext。
- 第二个参数是步骤3中调用接口返回得到的CheckShortcutResult的属性tid的值。
const uiContext = this.getUIContext().getHostContext() as common.UIAbilityContext;const tid = checkShortcutResult.tid; -
调用requestNewPinShortcut接口,将步骤4中的参数依次传入接口中。
try {productViewManager.requestNewPinShortcut(uiContext, tid).then(() => {hilog.info(0x0001, 'TAG', `requestNewPinShortcut success.`);}).catch((error: BusinessError) => {hilog.error(0x0001, 'TAG', `requestNewPinShortcut error. code is ${error.code}, message is ${error.message}`);})} catch (err) {hilog.error(0x0001, 'TAG', `requestNewPinShortcut failed, code is ${err.code}, message is ${err.message}`);}快捷方式加桌成功后,原校验结果tid会失效,再次加桌需重新校验生成新的tid。
为了提升用户体验,推荐预先调用checkPinShortcutPermitted接口,当用户点击加桌后,再调用requestNewPinShortcut接口执行加桌请求。
不建议在用户点击加桌后再连续调用这两个接口执行加桌。
通过Deep Linking拉起写评论页
构造拼接bundleName和action的Deep Linking链接,其中bundleName为需要拉起写评论页的应用包名,action隐式指定为write-review,表示进入详情页后,下一步将拉起写评论页,其格式为:
uri: 'store://appgallery.huawei.com/app/detail?id=' + bundleName + '&action=write-review',
在应用中调用startAbility方法,拉起应用市场应用的写评论页:
import { BusinessError } from '@kit.BasicServicesKit';
import { hilog } from '@kit.PerformanceAnalysisKit';
import type { common, Want } from '@kit.AbilityKit';

// 通过Deep Linking拉起应用市场指定的应用写评论页
function startAppGalleryDetailAbility(context: common.UIAbilityContext, bundleName: string): void {
  let want: Want = {
    action: 'ohos.want.action.appdetail', // 隐式指定action为ohos.want.action.appdetail
    uri: 'store://appgallery.huawei.com/app/detail?id=' + bundleName + '&action=write-review'// bundleName为需要拉起写评论页的应用包名,action隐式指定为write-review,表示进入详情页后,下一步将拉起写评论页。
  };
  context.startAbility(want).then(() => {
    hilog.info(0x0001, 'TAG', "Succeeded in starting Ability successfully.")
  }).catch((error: BusinessError) => {
    hilog.error(0x0001, 'TAG', `Failed to startAbility. Code: ${error.code}, message is ${error.message}`);
  });
}

@Entry
@Component
struct StartAppGalleryDetailAbilityView {
  @State message: string = '通过Deep Linking拉起应用市场写评论页'

  build() {
    Row() {
      Column() {
        Button(this.message)
          .fontSize(24)
          .fontWeight(FontWeight.Bold)
          .onClick(() => {
            const context: common.UIAbilityContext = this.getUIContext().getHostContext() as common.UIAbilityContext;
            // 按实际需求获取应用的bundleName,例如bundleName: 'com.huawei.hmsapp.books'
            const bundleName = 'xxxx';
            startAppGalleryDetailAbility(context, bundleName);
          })
      }
      .width('100%')
    }
    .height('100%')
  }
}
在网页中打开Deep Linking链接拉起应用市场应用的写评论页:
<html lang="en">
  <head>
    <meta charset="UTF-8">
  </head>
  <body>
    <div>
      <button type="button" onclick="openDeepLink()">通过Deep Linking拉起应用市场写评论页</button>
    </div>
  </body>
</html>
<script>
  function openDeepLink() {
    window.open('store://appgallery.huawei.com/app/detail?id=com.xxxx.xxxx&action=write-review')
  }
</script>
通过App Linking拉起写评论页
构造拼接bundleName的App Linking链接,其中bundleName为需要拉起写评论页的应用包名,action隐式指定为write-review,表示进入详情页后,下一步将拉起写评论页,其格式为:
let link: string = 'https://appgallery.huawei.com/app/detail?id=' + bundleName + '&action=write-review';
在应用中调用openLink接口拉起App Linking链接:
import { BusinessError } from '@kit.BasicServicesKit';
import { hilog } from '@kit.PerformanceAnalysisKit';
import type { common } from '@kit.AbilityKit';

@Entry
@Component
struct Index {
  build() {
    Button('start app linking', { type: ButtonType.Capsule, stateEffect: true })
      .width('87%')
      .height('5%')
      .margin({ bottom: '12vp' })
      .onClick(() => {
        let context: common.UIAbilityContext = this.getUIContext().getHostContext() as common.UIAbilityContext;
        // 需要拼接不同的应用包名,用以打开不同的应用写评论页,例如:bundleName: 'com.huawei.hmsapp.books'
        let bundleName: string = 'xxxx';
        let link: string = 'https://appgallery.huawei.com/app/detail?id=' + bundleName + '&action=write-review';
        // 以App Linking优先的方式在应用市场打开指定包名的应用写评论页
        context.openLink(link, { appLinkingOnly: false })
          .then(() => {
            hilog.info(0x0001, 'TAG', 'openlink success.');
          })
          .catch((error: BusinessError) => {
            hilog.error(0x0001, 'TAG', `openlink failed. Code: ${error.code}, message is ${error.message}`);
          });
      })
  }
}
在网页中打开App Linking链接:
<html lang="en">
  <head>
    <meta charset="UTF-8">
    <title>跳转示例</title>
  </head>
  <body>
    <a href='https://appgallery.huawei.com/app/detail?id=bundleName&action=write-review'>通过AppLinking拉起应用市场写评论页</a>
  </body>
</html>