朗读控件
适用场景
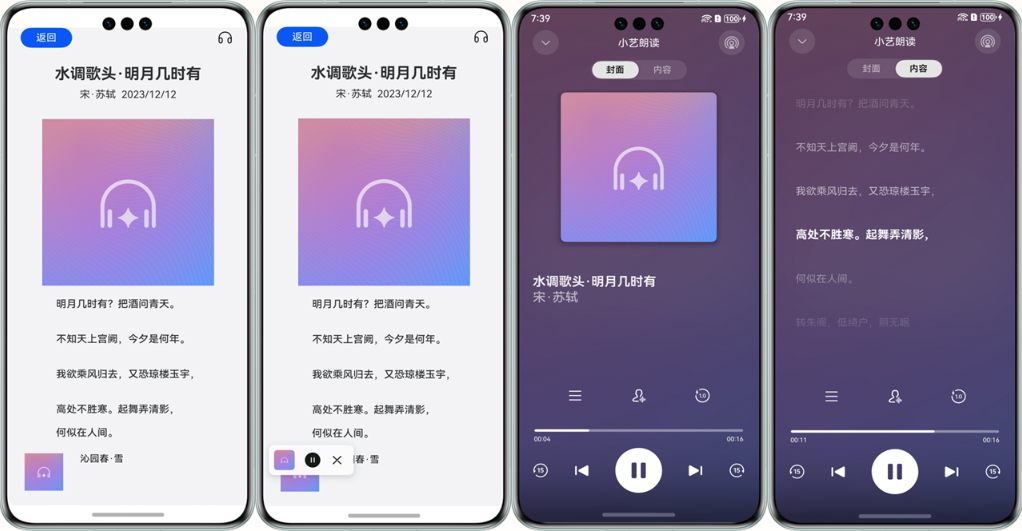
朗读控件应用广泛,例如在用户不方便或者无法查看屏幕文字的时候,为用户朗读新闻,提供资讯。
本章节将向您介绍如何使用朗读组件,效果如下图所示。
接口说明
以下仅列出demo中调用的部分主要接口,具体API说明详见API参考。
| 接口名 | 描述 |
|---|---|
| init(context: common.BaseContext, readParams: ReaderParam): Promise<void> | 初始化TextReader。 |
| start(readInfoList: ReadInfo[], articleId?: string): Promise<void> | 启动TextReader。 |
| on(type: string, callback: function): void | 注册所有事件回调,具体事件类型详见API参考。 |
开发步骤
-
首先从项目根目录进入/src/main/ets/entryability/EntryAbility.ets文件,将WindowManager添加至工程。
import { WindowManager } from '@kit.SpeechKit';import { ConfigurationConstant } from '@kit.AbilityKit'; -
(可选)在onWindowStageCreate(windowStage: window.WindowStage)生命周期方法中,添加setWindowStage方法设置窗口管理器。
onWindowStageCreate(windowStage: window.WindowStage): void {console.info('Ability onWindowStageCreate');WindowManager.setWindowStage(windowStage);windowStage.loadContent('pages/Index', (err, data) => {if (err) {console.error(`Failed to load the content. Code: ${err.code}, message: ${err.message}`);return;}console.info(`Succeeded in loading the content. Data: ${JSON.stringify(data)}.` );});} -
在onCreate()生命周期方法中,设置应用的颜色模式,使控件颜色模式跟应用的颜色模式保持一致。
- 如果应用想要跟随系统切换深浅色模式,请将颜色模式设置为COLOR_MODE_NOT_SET。
- 如果应用想要主动配置颜色模式,请将颜色模式设置为COLOR_MODE_LIGHT(浅色)或者COLOR_MODE_DARK(深色)。
下面以自动跟随系统切换为例。
onCreate(): void {this.context.getApplicationContext().setColorMode(ConfigurationConstant.ColorMode.COLOR_MODE_NOT_SET);} -
从项目根目录进入/src/main/ets/pages/Index.ets文件,在使用朗读控件前,将实现朗读控件和其他相关的类添加至工程。
import { TextReader, TextReaderIcon, ReadStateCode } from '@kit.SpeechKit'; -
简单配置页面的布局,加入听筒图标,并且设置onClick点击事件。
/*** 播放状态*/@State readState: ReadStateCode = ReadStateCode.WAITING;build() {Column() {TextReaderIcon({ readState: this.readState }).margin({ right: 20 }).width(32).height(32).onClick(() => {// 设置点击事件// ...})}} -
初始化朗读控件。
// 用于显示当前页的按钮状态@State isInit: boolean = false;/*** 待加载的文章*/@State readInfoList: TextReader.ReadInfo[] = [];@State selectedReadInfo: TextReader.ReadInfo = this.readInfoList[0];async aboutToAppear() {// ...void this.init();/*** 加载数据*/let readInfoList: TextReader.ReadInfo[] = [{id: '001',title: {text:'水调歌头.明月几时有',isClickable:true},author:{text:'宋.苏轼',isClickable:true},date: {text:'2024/01/01',isClickable:false},bodyInfo: '明月几时有?把酒问青天。'}];this.readInfoList = readInfoList;this.selectedReadInfo = this.readInfoList[0];// ...}/*** 初始化*/async init() {const readerParam: TextReader.ReaderParam = {isVoiceBrandVisible: true,businessBrandInfo: {panelName: '小艺朗读',panelIcon: $r('app.media.startIcon')}}try {let context: Context | undefined = this.getUIContext().getHostContext()if (context) {await TextReader.init(context, readerParam);this.isInit = true;this.setActionListener();}} catch (err) {console.error(`TextReader failed to init. Code: ${err.code}, message: ${err.message}`);}}onStateChanged = (state: TextReader.ReadState) => {if (this.selectedReadInfo?.id === state.id) {this.readState = state.state;} else {this.readState = ReadStateCode.WAITING;}}// 设置操作监听setActionListener() {TextReader.on('stateChange', (state: TextReader.ReadState) => {this.onStateChanged(state);});// 在列表页无更多内容时,会显示加载失败,需要设置requestMore监听,调用loadMore函数以获得正确的显示信息。TextReader.on('requestMore', () => {TextReader.loadMore([], true);})}// 注销监听,根据业务情况在合适的时机调用releaseActionListener() {TextReader.off('stateChange');TextReader.off('requestMore');} -
(可选)在setActionListener方法中设置更多监听,在用户与控件进行交互时触发回调通知开发者。注销监听,监听结束后进行释放。
// 设置监听setActionListener() {TextReader.on('setArticle', async (id: string) => { console.info(`setArticle ${id}`) });TextReader.on('clickArticle', (id: string) => {console.info(`onClickArticle ${id}`) });TextReader.on('clickAuthor', (id: string) => { console.info(`onClickAuthor ${id}`) });TextReader.on('clickNotification', (id: string) => { console.info(`onClickNotification ${id}`) });TextReader.on('showPanel', () => { console.info(`onShowPanel`) });TextReader.on('hidePanel', () => { console.info(`onHidePanel`) });// ...}// 注销监听releaseActionListener() {TextReader.off('setArticle');TextReader.off('clickArticle');TextReader.off('clickAuthor');TextReader.off('clickNotification');TextReader.off('showPanel');TextReader.off('hidePanel');// ...} -
启动朗读控件。
build() {Column() {TextReaderIcon({ readState: this.readState })// ....onClick(() => {try {void TextReader.start(this.readInfoList, this.selectedReadInfo?.id);} catch (err) {console.error(`TextReader failed to start. Code: ${err.code}, message: ${err.message}`);}})}} -
(可选)若要配置长时任务,需要在module.json5配置文件中添加ohos.permission.KEEP_BACKGROUND_RUNNING权限,并且加入backgroundModes选项,然后在readerParam中将keepBackgroundRunning配置为true,确保朗读控件后台播报正常。
// module.json5{"module": {// ..."requestPermissions": [{"name": "ohos.permission.KEEP_BACKGROUND_RUNNING","usedScene": {"abilities": ["FormAbility"],"when": "inuse"}},],"abilities": [{// ..."backgroundModes": ["audioPlayback"],// ...}]}}// Index.etsasync init() {const readerParam: TextReader.ReaderParam = {// ...keepBackgroundRunning: true}} -
(可选)若要在控件使用功能时切换音色,需要在module.json5配置文件中添加ohos.permission.INTERNET和ohos.permission.GET_NETWORK_INFO权限,确保朗读控件可以正常切换音色。
// module.json5
{
  "module": {
    // ...
    "requestPermissions": [
      {
        "name": "ohos.permission.INTERNET",
        "reason": "$string:reason",
        "usedScene": {"abilities": []}
      },
      {
        "name": "ohos.permission.GET_NETWORK_INFO",
        "reason": "$string:reason",
        "usedScene": {"abilities": []}
      },
    ],
  }
}
开发实例
EntryAbility.ets
import { AbilityConstant, ConfigurationConstant, UIAbility, Want } from '@kit.AbilityKit';
import { window } from '@kit.ArkUI';
import { WindowManager } from '@kit.SpeechKit';

export default class EntryAbility extends UIAbility {
  onCreate(want: Want, launchParam: AbilityConstant.LaunchParam): void {
    try {
      this.context.getApplicationContext().setColorMode(ConfigurationConstant.ColorMode.COLOR_MODE_NOT_SET);
    } catch (err) {
      console.error(`error code: ${err.code}, message: ${err.message}.`)
    }
    console.info('Ability onCreate');
  }

  onDestroy(): void {
    console.info('Ability onDestroy');
  }

  onWindowStageCreate(windowStage: window.WindowStage): void {
    console.info('Ability onWindowStageCreate');
    WindowManager.setWindowStage(windowStage);

    windowStage.loadContent('pages/Index', (err, data) => {
      if (err.code) {
        console.error(`Failed to load the content. Code: ${err.code}, message: ${err.message}`);
        return;
      }
      console.info(`Succeeded in loading the content. Data: ${JSON.stringify(data)}.` );
    });
  }

  onWindowStageDestroy(): void {
    console.info('Ability onWindowStageDestroy');
  }

  onForeground(): void {
    console.info('Ability onForeground');
  }

  onBackground(): void {
    console.info('Ability onBackground');
  }
}
Index.ets
import { TextReader, TextReaderIcon, ReadStateCode } from '@kit.SpeechKit';

@Entry
@Component
struct Index {

  /**
   * 待加载的文章
   */
  @State readInfoList: TextReader.ReadInfo[] = [];
  @State selectedReadInfo: TextReader.ReadInfo = this.readInfoList[0];

  /**
   * 播放状态
   */
  @State readState: ReadStateCode = ReadStateCode.WAITING;

  /**
   * 用于显示当前页的按钮状态
   */
  @State isInit: boolean = false;

  aboutToAppear(){
    /**
     * 加载数据
     */
    let readInfoList: TextReader.ReadInfo[] = [{
      id: '001',
      title: {
        text:'水调歌头.明月几时有',
        isClickable:true
      },
      author:{
        text:'宋.苏轼',
        isClickable:true
      },
      date: {
        text:'2024/01/01',
        isClickable:false
      },
      bodyInfo: '明月几时有?把酒问青天。'
    }];
    this.readInfoList = readInfoList;
    this.selectedReadInfo = this.readInfoList[0];
    void this.init();
  }

  /**
   * 初始化
   */
  async init() {
    const readerParam: TextReader.ReaderParam = {
      isVoiceBrandVisible: true,
      businessBrandInfo: {
        panelName: '小艺朗读',
        panelIcon: $r('app.media.startIcon')
      }
    }
    try {
      let context: Context | undefined = this.getUIContext().getHostContext()
      if (context) {
        await TextReader.init(context, readerParam);
        this.isInit = true;
        this.setActionListener();
      }
    } catch (err) {
      console.error(`TextReader failed to init. Code: ${err.code}, message: ${err.message}`);
    }
  }

  // 设置操作监听
  setActionListener() {
    TextReader.on('stateChange', (state: TextReader.ReadState) => {
      this.onStateChanged(state);
    });

    TextReader.on('requestMore', () => {
      TextReader.loadMore([], true);
    })
  }

  onStateChanged = (state: TextReader.ReadState) => {
    if (this.selectedReadInfo?.id === state.id) {
      this.readState = state.state;
    } else {
      this.readState = ReadStateCode.WAITING;
    }
  }

  build() {
    Column() {
      TextReaderIcon({ readState: this.readState })
        .margin({ right: 20 })
        .width(32)
        .height(32)
        .onClick(() => {
          try {
            void TextReader.start(this.readInfoList, this.selectedReadInfo?.id);
          } catch (err) {
            console.error(`TextReader failed to start. Code: ${err.code}, message: ${err.message}`);
          }
        })
    }
    .height('100%')
  }
}
2in1适配步骤
2in1设备除了适配开发步骤,还需执行以下步骤。如果开发者按照上述开发步骤来适配2in1,将会出现无法拉起播放面板的情况。
-
在/src/main/ets/entryability下新建一个ability,用来承载2in1主窗,导入相关依赖。
import { TextReader, WindowManager } from '@kit.SpeechKit';import { commonEventManager } from '@kit.BasicServicesKit'; -
在新ability中声明一个应用全局的状态变量isReadyToStart,并且通过AppStorage管理此状态变量。
private link: SubscribedAbstractProperty<boolean>= AppStorage.link('isReadyToStart'); -
在Index.ets的aboutToAppear生命周期方法中,创建全局的状态变量isReadyToStart。
aboutToAppear() {AppStorage.setOrCreate('isReadyToStart', false);// ...其他配置} -
配置WindowStage。说明:从6.0.0(20)开始使用以下逻辑实现。对于5.1.1(19)及之前版本,使用getContext(this)接口实现。
- 在新ability的onWindowStageCreate生命周期方法中,发送onLoadSubAbility事件。
- 通过WindowManager.setWindowStage(windowStage)来设置新ability的windowStage。
- 在onWindowStageCreate中将isReadyToStart设为true。
onWindowStageCreate(windowStage: window.WindowStage): void {// Main window is created, set main page for this abilityWindowManager.setWindowStage(windowStage)let eventData: emitter.EventData = {data: {'state': 'publish'}}emitter.emit("onLoadSubAbility", eventData);this.link.set(true);} -
在新ability的onWindowStageDestroy生命周期方法中,将isReadyToStart设为false,同时隐藏面板并停止播放。
async onWindowStageDestroy(): Promise<void> {try {TextReader.hidePanel();await TextReader.stop();this.link.set(false);}catch (e) {console.error(`onWindowStageDestroy fail , msg: ${e}`)}} -
在entryability中,onCreate方法需要用eventHub设置'onShowPanel'回调,用来创造新的ability;onShowPanel回调中,首先构造want,然后通过context.startAbility接口创建新的ability。
import { AbilityConstant, Want } from '@kit.AbilityKit';import { common } from "@kit.AbilityKit";import { BusinessError } from "@kit.BasicServicesKit";onCreate(want: Want, launchParam: AbilityConstant.LaunchParam): void {// ...其他配置let eventHub = this.context.eventHub;eventHub.on('onShowPanel', this.onShowPanel);}onShowPanel = () => {let context: common.UIAbilityContext = this.context;let want: Want = {deviceId: '',bundleName: 'com.example.speechkit', // 需替换成实际应用包名abilityName: 'SubAbility',parameters: {info: 'From EntryAbility onShowPanel'}}context?.startAbility(want).then(() => {console.info('Succeeded in starting ability');}).catch((e: BusinessError) => {console.error(`Failed to start ability. Code is ${e.code}, message is ${e.message}`);})} -
在调用start之前根据设备类型进行判断,如果是2in1需要首先发送'onShowPanel'事件构造ability。
import { deviceInfo } from '@kit.BasicServicesKit';if (deviceInfo.deviceType === '2in1') {let context = this.getUIContext().getHostContext();context?.eventHub.emit('onShowPanel');}try {TextReader.showPanel();} catch (err) {console.error(`error code: ${err.code}, message: ${err.message}.`)} -
在module.json5中添加ability配置项,max和min的值需要保持一致,固定窗口的大小。
{"name": "SubAbility", // UIAbility组件的名称"srcEntry": "./ets/entryability/SubAbility.ets", // UIAbility组件的代码路径"description": "$string:SubAbility_desc", // UIAbility组件的描述信息"icon": "$media:icon", // UIAbility组件的图标"label": "$string:EntryAbility_label", // UIAbility组件的标签"startWindowIcon": "$media:icon", // UIAbility组件启动页面图标资源文件的索引"startWindowBackground": "$color:start_window_background", // UIAbility组件启动页面背景颜色资源文件的索引"supportWindowMode": ['floating'], // 窗口支持悬浮窗显示"maxWindowWidth": 1158, // 最大窗口宽度"minWindowWidth": 1158, // 最小窗口宽度"maxWindowHeight": 772, // 最大窗口高度"minWindowHeight": 772, // 最小窗口高度}