识别图像数据
基本概念
图像数据识码能力支持对相机预览流数据中的码图进行扫描识别,并获取信息。
场景介绍
图像数据识码能力支持对相机预览流数据中的条形码、二维码、MULTIFUNCTIONAL CODE进行识别,并获得码类型、码值、码位置、相机变焦比等信息。该能力可用于一图单码和一图多码的识别,比如条形码、付款码等。
业务流程
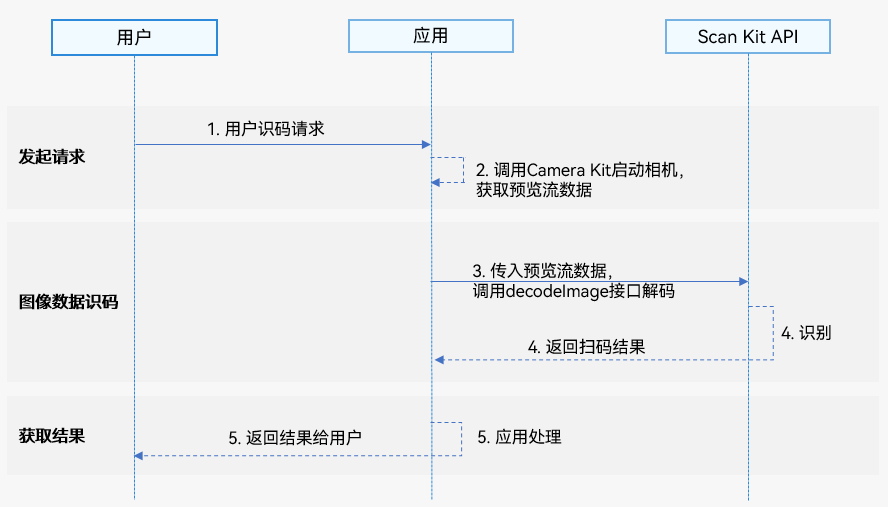
- 用户向应用发起识码请求。
- 应用通过调用Camera Kit启动相机,获取预览流数据。
- 应用通过调用Scan Kit的decodeImage接口识别码图。
- Scan Kit通过回调返回识别结果。
- 应用向用户返回扫码结果。
接口说明
识别图像数据中的码图,以Promise形式返回识别结果。具体API说明详见接口文档。
| 接口名 | 描述 |
|---|---|
| decodeImage(image: ByteImage, options?: scanBarcode.ScanOptions): Promise<DetectResult> | 启动图像识码,通过传入ByteImage类型的图像数据信息,使用Promise异步回调返回识码结果。 |
开发步骤
图像数据识码能力支持对相机预览流数据中的条形码、二维码、MULTIFUNCTIONAL CODE进行识别,并返回码类型、码值、码位置(码图最小外接矩形左上角和右下角的坐标,QR码支持返回四个点坐标)、相机变焦比等信息。
为了方便开发者接入,我们提供了详细的样例工程供参考,推荐参考示例工程接入。
以下示例为调用detectBarcode.decodeImage接口获取码图信息。
-
导入图像识码接口和相关接口模块,该模块提供了图像识码参数和方法,导入方法如下。
import { detectBarcode, scanBarcode, scanCore } from '@kit.ScanKit';import { BusinessError } from '@kit.BasicServicesKit';import { camera } from '@kit.CameraKit';import { image } from '@kit.ImageKit';import { hilog } from '@kit.PerformanceAnalysisKit'; -
使用Camera Kit启动相机能力,实现双路预览功能,具体实现详见双路预览。
-
通过ImageReceiver实时获取预览图像数据,详见双路预览,调用detectBarcode.decodeImage接口解析图像数据。请在识别完成后再释放图像数据。
// 从ImageReceiver获取imgComponent: image.Component,预览流设置的宽高: width, heightfunction decodeImageBuffer(imgComponent: image.Component, width: number, height: number) {let byteImg: detectBarcode.ByteImage = {byteBuffer: imgComponent.byteBuffer,// 相机预览流数据旋转90°width: height,height: width,format: detectBarcode.ImageFormat.NV21};let options: scanBarcode.ScanOptions = {scanTypes: [scanCore.ScanType.ALL],enableMultiMode: true,enableAlbum: false};try {detectBarcode.decodeImage(byteImg, options).then((data: detectBarcode.DetectResult) => {hilog.info(0x0001, '[Scan Sample]',`Succeeded in getting DetectResult by promise with options, result is ${JSON.stringify(data)}`);}).catch((err: BusinessError) => {hilog.error(0x0001, '[Scan Sample]',`Failed to get DetectResult by promise with options. Code: ${err.code}, message: ${err.message}`);})} catch (err) {hilog.error(0x0001, '[Scan Sample]', `Failed to detectBarcode. Code: ${err.code}, message: ${err.message}`);}} -
detectBarcode.DetectResult中返回的cornerPoints可参考以下说明使用。
-
因为屏幕自然方向和摄像头传感器方向不同,所以cornerPoints四个点的坐标需按屏幕自然方向对应的坐标系转换。四个点的对应转换逻辑如下(假设创建的相机预览流宽高为1080 * 1920)。
- 右下角(x, y):(1080 - cornerPoints[0].y, cornerPoints[0].x)
- 左下角(x, y):(1080 - cornerPoints[1].y, cornerPoints[1].x)
- 左上角(x, y):(1080 - cornerPoints[2].y, cornerPoints[2].x)
- 右上角(x, y):(1080 - cornerPoints[3].y, cornerPoints[3].x)
-
当创建的相机预览流宽高和实际预览组件XComponent的宽高不一致时,cornerPoints四个点的坐标需按缩放比例转换。例如相机预览流宽高为1080 * 1920,XComponent的宽高为width * height,则坐标缩放比例ratio为:width / 1080, 最终转换后的坐标为(x * ratio, y * ratio)。
-
模拟器开发
暂不支持模拟器开发,调用接口会返回错误信息“Emulator is not supported.”