实名信息验证/授权场景
场景介绍
从5.1.1(19)版本开始,新增支持实名信息验证/授权场景。
例如应用/元服务登录、注册或账户认证等操作,开发者需要验证或获取用户实名信息时可接入实名信息验证/授权能力。
支持商户模型:不涉及
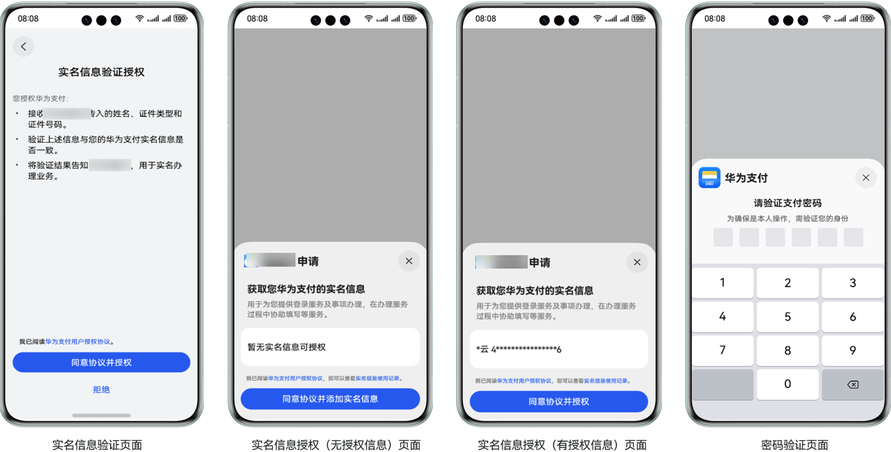
实名信息验证授权页面展示:
接入流程
华为支付实名信息验证授权接入流程如下:
| 步骤 | 说明 |
|---|---|
| 开发准备 | 请先完成开发准备后再进行下面的开发接入。 - 端侧应用配置 - 用户信息验证授权接入准备 |
| 接入实名信息验证/授权 | 根据实名信息验证/授权场景开发步骤完成接入。 |
业务流程
开发者通过接入Payment Kit实名信息验证授权能力,可以简便快捷地实现用户实名信息验证或获取用户授权后的实名信息(可二选一)。具体接入流程如下:
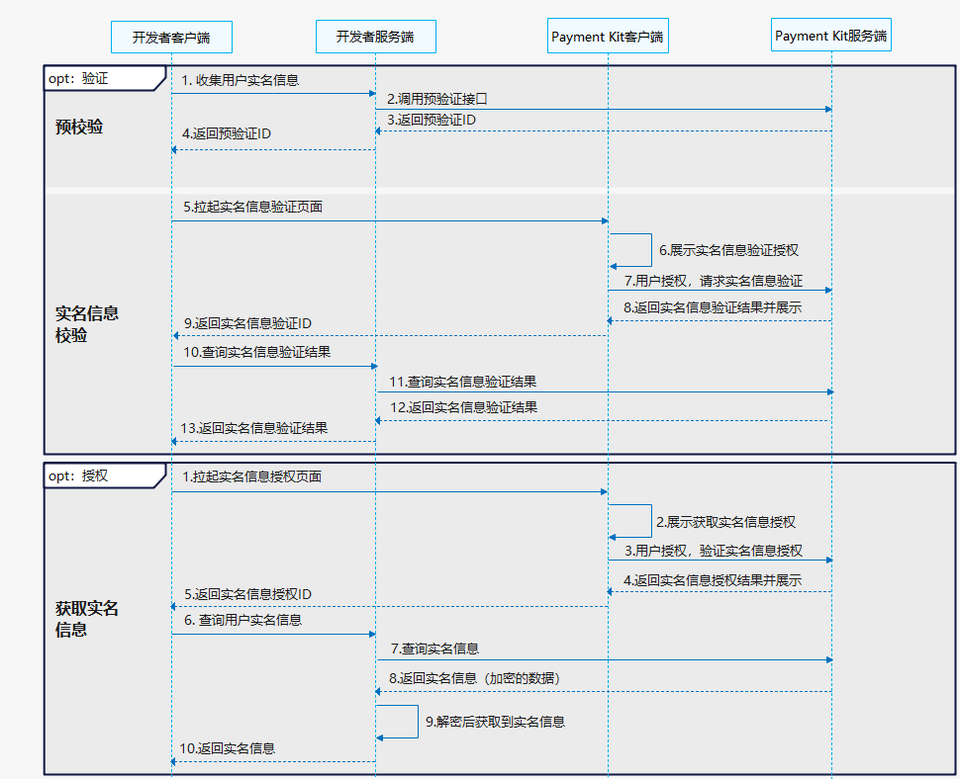
实名信息验证
- 开发者客户端收集用户实名信息请求开发者服务端发起实名信息预验证。
- 开发者服务端请求Payment Kit服务端实名信息预验证接口获取预验证ID(preVerifyId)。
- Payment Kit服务端返回预验证ID给开发者服务端。
- 开发者服务端返回预验证信息给开发者客户端。
- 开发者客户端使用预验证ID调用startRealNameVerification接口拉起实名信息验证页面。
- Payment Kit客户端展示验证信息。
- 用户同意授权实名信息校验,Payment Kit客户端请求Payment Kit服务端处理校验。
- Payment Kit服务端完成校验处理并返回校验结果给Payment Kit客户端展示给用户。
- Payment Kit客户端同步返回实名信息验证ID给开发者客户端。
- 开发者客户端使用实名信息校验ID请求开发者服务端查询实名信息校验结果。
- 开发者服务端请求Payment Kit服务端实名信息验证结果查询接口查询验证结果。
- Payment Kit服务端返回实名信息验证结果给开发者服务端。
- 开发者服务端将实名信息验证结果返回给开发者客户端,开发者客户端根据验证结果进行下一步业务处理。
实名信息授权
- 开发者客户端如需要获取用户实名信息,可调用startRealNameAuth接口拉起实名信息授权页面。
- Payment Kit客户端给用户展示实名信息授权页面。
- 用户同意获取实名信息授权,Payment Kit客户端请求Payment Kit服务端校验授权处理
- Payment Kit服务端完成校验处理并返回授权校验结果给Payment Kit客户端展示给用户。
- Payment Kit客户端同步返回实名信息授权ID给开发者客户端。
- 开发者客户端使用实名信息授权ID请求开发者服务端查询实名信息。
- 开发者服务端请求Payment Kit服务端实名信息授权结果查询接口查询用户实名信息授权结果及用户信息。
- Payment Kit服务端会使用开发者上传的公钥证书进行隐私信息加密后返回给开发者服务端。
- 开发者服务端使用配对的私钥证书进行解密后获取到用户实名信息。
- 开发者服务端将用户实名信息返回给开发者客户端,开发者客户端根据业务需要,进行下一步处理。
接口说明
拉起用户实名信息验证授权页面接口。具体API说明详见接口文档。
| 接口名 | 描述 |
|---|---|
| startRealNameVerification(context: common.UIAbilityContext | common.UIExtensionContext, preVerifyId: string): Promise<string>; |
| startRealNameAuth(context: common.UIAbilityContext | common.UIExtensionContext): Promise<string>; |
开发步骤
实名信息验证
-
发起实名信息预验证(服务器开发)
为保证API接口请求的安全性和可靠性需要获取应用级凭证,构建PayDevAuth作为开放API接口请求头后再发起请求。PayDevAuth定义示例代码如下:
@Datapublic class PayDevAuth {// 应用IDprivate String clientId;// 应用级tokenprivate String accessToken;private String traceId;private Long time;// 开发者加密公钥ID。用于华为对接口响应敏感字段加密private String developerEncKeyId;// 华为加密公钥ID。用于开发者对接口请求敏感字段加密private String petalpayEncKeyId;// 开发者验签公钥ID。用于华为对开发者加签的请求报文验签private String developerSignKeyId;// 华为验签公钥ID。用于开发者对华为加签的响应报文验签private String petalpaySignKeyId;private String headerSign;private String bodySign;}构建请求头信息示例代码如下:
// 获取accessTokenprivate String getaccessToken(String clientId, String clientSecret) {HashMap<String, String> params = new HashMap<>();params.put("grant_type", "client_credentials");params.put("client_id", clientId);params.put("client_secret", clientSecret);Map<String, String> headers = new HashMap<>();headers.put("Content-Type", "application/x-www-form-urlencoded");// restfulClient为http请求客户端对象,请自行实现相关对象及方法的处理逻辑。ResponseEntity<Map> atRspResponseEntity = restfulClient.postForEntity("https://oauth-login.cloud.huawei.com/oauth2/v3/token", params, null, headers, Map.class);return (String) atRspResponseEntity.getBody().get("access_token");}// 构建PayDevAuth请求头private String buildPayMercAuth(HashMap<String, String> body) {// 对body进行排序拼接String bodyStr = SignStringUtil.signString(body);// 构建 PayDevAuth 请求头PayDevAuth payDevAuth = new PayDevAuth();payDevAuth.setTraceId("tid" + System.currentTimeMillis());payDevAuth.setTime(System.currentTimeMillis());// 获取accessTokenpayDevAuth.setAccessToken(getAccessToken("clientId", "clientSecret"));// 获取签名priKeyString priKey = "";// 请求体签名String bodySign = Sm2Utils.sign(Objects.requireNonNull(priKey, "The signing private key can’t null"), bodyStr);payDevAuth.setBodySign(bodySign);// 请求头签名String headerStr = ToStringUtil.signString(payDevAuth);String headerSign = Sm2Utils.sign(priKey, headerStr);payDevAuth.setHeaderSign(headerSign);return JsonUtils.obj2Json(payDevAuth);}请求实名信息预验证接口获取预验证ID后返回给端侧拉起实名信息验证页面。参考以下示例代码:

人脸核身实人验证场景中,credentialIdNo、realName入参需要使用SM2加密。
public String getPreVerifyId(String clientId, String clientSecret, String credentialIdNo, String realName, String openId)throws NoSuchAlgorithmException {HashMap<String, String> body = new HashMap<>();body.put("credentialType", "01");// 人脸核身实人验证场景body.put("credentialIdNo", getHashStr(credentialIdNo));body.put("realName", getHashStr(realName));body.put("openId", openId);HashMap<String, String> header = new HashMap<>();header.put("Content-Type", "application/json;charset=UTF-8");header.put("payDevAuth", buildPayMercAuth(body));// restfulClient为http请求客户端对象,请自行实现postForEntity请求方法。ResponseEntity<Map> responseEntity = restfulClient.postForEntity("https://petalpay-developer.cloud.huawei.com.cn/api/v1/realname/verification/preverify", null, body, header, Map.class);return (String) responseEntity.getBody().get("preVerifyId");}public String getHashStr(String input) throws NoSuchAlgorithmException {byte[] encodedhash = MessageDigest.getInstance("SHA-256").digest(input.getBytes(java.nio.charset.StandardCharsets.UTF_8));StringBuilder hexString = new StringBuilder();for (byte b : encodedhash) {String hex = Integer.toHexString(0xff & b);if (hex.length() == 1) {hexString.append('0');}hexString.append(hex);}return hexString.toString();} -
拉起实名信息验证(端侧开发)
开发者客户端使用后端服务返回的预验证ID作为参数调用startRealNameVerification接口拉起用户实名信息验证页面。当接口通过.then()方法返回时,则表示当前接口请求成功,通过.catch()方法返回表示接口请求失败。当此次请求有异常时,可通过error.code获取错误码,错误码相关信息请参见错误码。示例代码如下:
import { BusinessError } from '@kit.BasicServicesKit';import { realNameService } from '@kit.PaymentKit';import { common } from '@kit.AbilityKit';@Entry@Componentstruct Index {context: common.UIAbilityContext = this.getUIContext().getHostContext() as common.UIAbilityContext;requestStartVerifyRealNameInfoPromise() {// use your own preVerifyIdlet preVerifyId = '';realNameService.startRealNameVerification(this.context, preVerifyId).then((verifyResultId: string) => {// verify successconsole.info(`succeeded in verifying, verifyResultId: ${verifyResultId}`);}).catch((error: BusinessError) => {// failed to verifyconsole.error(`failed to verify, error.code: ${error.code}, error.message: ${error.message}`);});}build() {Column() {Button('requestStartVerifyRealNameInfoPromise').type(ButtonType.Capsule).width('50%').margin(20).onClick(() => {this.requestStartVerifyRealNameInfoPromise();})}.width('100%').height('100%')}} -
查询实名信息验证结果(服务器开发)
请求实名信息验证结果查询接口获取实名信息验证结果返回给客户端。
实名信息授权
-
拉起实名信息授权(端侧开发)
开发者客户端调用startRealNameAuth接口拉起用户实名信息授权页面。当接口通过.then()方法返回时,则表示当前接口请求成功,通过.catch()方法返回表示接口请求失败。当此次请求有异常时,可通过error.code获取错误码,错误码相关信息请参见错误码。示例代码如下:
import { BusinessError } from '@kit.BasicServicesKit';import { realNameService } from '@kit.PaymentKit';import { common } from '@kit.AbilityKit';@Entry@Componentstruct Index {context: common.UIAbilityContext = this.getUIContext().getHostContext() as common.UIAbilityContext;requestStartRealNameAuthPromise() {realNameService.startRealNameAuth(this.context).then((realNameAuthId: string) => {// authorize successconsole.info(`succeeded in authorizing, realNameAuthId: ${realNameAuthId}`);}).catch((error: BusinessError) => {// failed to authoriseconsole.error(`failed to authorise, error.code: ${error.code}, error.message: ${error.message}`);});}build() {Column() {Button('requestStartRealNameAuthPromise').type(ButtonType.Capsule).width('50%').margin(20).onClick(() => {this.requestStartRealNameAuthPromise();})}.width('100%').height('100%')}} -
查询实名信息授权结果(服务器开发)
请求实名信息授权结果查询接口获取实名信息并使用publicKeyId配对的SM2私钥证书进行实名信息解密,根据业务需要返回给客户端。