为通知添加行为意图
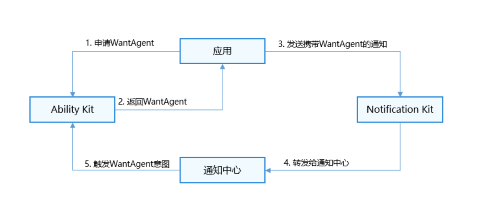
应用向Ability Kit申请WantAgent,并将WantAgent封装至通知中。当发布通知时,用户便可以通过点击通知栏中的消息或按钮,拉起目标应用组件或发布公共事件。
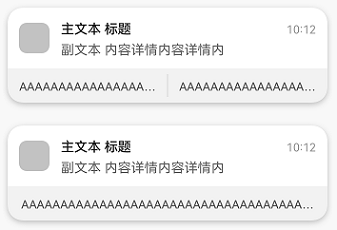
携带了actionButtons的通知示意图如下。
运行机制
接口说明
| 接口名 | 描述 |
|---|---|
| publish(request: NotificationRequest): Promise<void> | 发布通知。 |
| getWantAgent(info: WantAgentInfo, callback: AsyncCallback<WantAgent>): void | 创建WantAgent。 |
开发步骤
-
导入模块。
import { notificationManager } from '@kit.NotificationKit';import { wantAgent, WantAgent } from '@kit.AbilityKit';import { BusinessError } from '@kit.BasicServicesKit';import { hilog } from '@kit.PerformanceAnalysisKit';const TAG: string = '[PublishOperation]';const DOMAIN_NUMBER: number = 0xFF00; -
创建WantAgentInfo信息。
场景一:创建拉起UIAbility的WantAgent的WantAgentInfo信息。
let wantAgentObj: WantAgent | null = null; // 用于保存创建成功的wantAgent对象,后续使用其完成触发的动作。// 通过WantAgentInfo的operationType设置动作类型let wantAgentInfo: wantAgent.WantAgentInfo = {wants: [{deviceId: '',bundleName: 'com.sample.eventnotification', // 需要替换为对应的bundleName。abilityName: 'EntryAbility', // 需要替换为对应的abilityName。action: '',entities: [],uri: '',parameters: {}}],actionType: wantAgent.OperationType.START_ABILITY,requestCode: 0,actionFlags: [wantAgent.WantAgentFlags.CONSTANT_FLAG]};场景二:创建发布公共事件的WantAgent的WantAgentInfo信息。
let wantAgentObj: WantAgent | null = null; // 用于保存创建成功的WantAgent对象,后续使用其完成触发的动作。// 通过WantAgentInfo的operationType设置动作类型let wantAgentInfo: wantAgent.WantAgentInfo = {wants: [{action: 'event_name', // 设置事件名parameters: {},}],actionType: wantAgent.OperationType.SEND_COMMON_EVENT,requestCode: 0,actionFlags: [wantAgent.WantAgentFlags.CONSTANT_FLAG],}; -
调用getWantAgent()方法进行创建WantAgent。
// 创建WantAgentwantAgent.getWantAgent(wantAgentInfo, (err: BusinessError, data: WantAgent) => {if (err) {hilog.error(DOMAIN_NUMBER, TAG,`Failed to get want agent. Code is ${err.code}, message is ${err.message}`);return;}hilog.info(DOMAIN_NUMBER, TAG, 'Succeeded in getting want agent.');wantAgentObj = data;// ...}); -
构造NotificationRequest对象,并发布携带WantAgent的通知。

- 如果封装WantAgent至通知消息中,可以点击通知触发WantAgent。当通知消息存在actionButtons时,点击通知会先显示actionButtons,再次点击通知触发WantAgent。
- 如果封装WantAgent至通知按钮中,点击通知后,该通知下方会出现通知按钮,可以点击按钮触发WantAgent。
// 构造NotificationActionButton对象let actionButton: notificationManager.NotificationActionButton = {title: 'open_the_app',// wantAgentObj使用前需要保证已被赋值(即步骤3执行完成)// 通知按钮的WantAgentwantAgent: wantAgentObj!};// 构造NotificationRequest对象let notificationRequest: notificationManager.NotificationRequest = {content: {notificationContentType: notificationManager.ContentType.NOTIFICATION_CONTENT_BASIC_TEXT,normal: {title: 'one_button_notify',text: 'Click on this notification twice to open the app',additionalText: 'Test_AdditionalText',},},id: 6,// 通知消息的WantAgentwantAgent: wantAgentObj!,// 通知按钮actionButtons: [actionButton],};notificationManager.publish(notificationRequest, (err: BusinessError) => {if (err) {hilog.error(DOMAIN_NUMBER, TAG,`Failed to publish notification. Code is ${err.code}, message is ${err.message}`);return;}hilog.info(DOMAIN_NUMBER, TAG, 'Succeeded in publishing notification.');});