多目标识别
适用场景
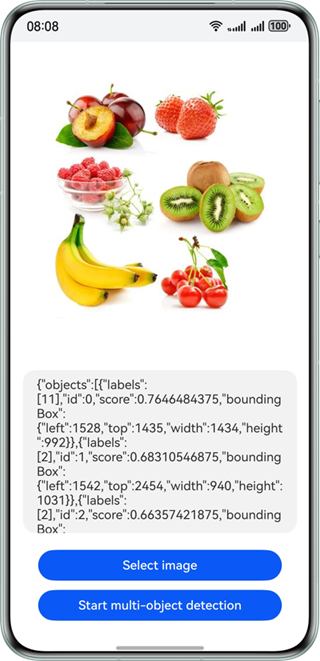
可同时检测出给定图片中的各种物体,包括风景、动物、植物、建筑、人脸、表格、文本等位置,并框选出物体。
效果如下图所示:
约束与限制
该能力当前不支持模拟器。
| AI能力 | 约束 |
|---|---|
| 多目标识别 | - 输入图像具有合适成像的质量(建议720p以上),100px<高度<10000px,100px<宽度<10000px,高宽比例建议5:1以下(高度小于宽度的5倍),接近手机屏幕高宽比例为宜。 - 图片中的物体占比需要大于0.1%。 |
开发步骤
-
在使用多目标识别时,将实现多目标识别相关的类添加至工程。
import { image } from '@kit.ImageKit';import { hilog } from '@kit.PerformanceAnalysisKit';import { BusinessError } from '@kit.BasicServicesKit';import { fileIo } from '@kit.CoreFileKit';import { objectDetection, visionBase } from '@kit.CoreVisionKit';import { photoAccessHelper } from '@kit.MediaLibraryKit'; -
简单配置页面的布局,并在Button组件添加点击事件,拉起图库,选择图片。
Button('选择图片').type(ButtonType.Capsule).fontColor(Color.White).alignSelf(ItemAlign.Center).width('80%').margin(10).onClick(() => {// 拉起图库,获取图片资源void this.selectImage();}) -
通过图库获取图片资源,将图片转换为PixelMap。
private async selectImage() {let uri = await this.openPhoto()if (uri === undefined) {hilog.error(0x0000, 'objectDetectSample', "Failed to define uri.");}this.loadImage(uri)}private async openPhoto(): Promise<string> {return new Promise<string>((resolve, reject) => {let photoPicker: photoAccessHelper.PhotoViewPicker = new photoAccessHelper.PhotoViewPicker();photoPicker.select({MIMEType: photoAccessHelper.PhotoViewMIMETypes.IMAGE_TYPE, maxSelectNumber: 1}).then(res => {resolve(res.photoUris[0])}).catch((err: BusinessError) => {hilog.error(0x0000, 'objectDetectSample', `Failed to get photo image uri. code: ${err.code}, message: ${err.message}`);reject('')})})}private loadImage(name: string) {setTimeout(async () => {let fileSource = await fileIo.open(name, fileIo.OpenMode.READ_ONLY);this.imageSource = image.createImageSource(fileSource.fd);this.chooseImage = await this.imageSource.createPixelMap();}, 100)} -
实例化Request对象,并传入待检测图片的PixelMap,调用多目标识别的实现多目标识别功能。
// 调用多目标检测接口let request: visionBase.Request = {inputData: { pixelMap: this.chooseImage }};let data: objectDetection.ObjectDetectionResponse = await (await objectDetection.ObjectDetector.create()).process(request); -
(可选)如果需要将结果展示在界面上,可以使用下列代码。
let objectJson = JSON.stringify(data);hilog.info(0x0000, 'objectDetectSample', `Succeeded in object detection: ${objectJson}`);this.dataValues = objectJson;
开发实例
Index.ets
import { image } from '@kit.ImageKit';
import { hilog } from '@kit.PerformanceAnalysisKit';
import { BusinessError } from '@kit.BasicServicesKit';
import { fileIo } from '@kit.CoreFileKit';
import { objectDetection, visionBase } from '@kit.CoreVisionKit';
import { photoAccessHelper } from '@kit.MediaLibraryKit';
@Entry
@Component
struct Index {
private imageSource: image.ImageSource | undefined = undefined;
@State chooseImage: PixelMap | undefined = undefined
@State dataValues: string = ''
build() {
Column() {
Image(this.chooseImage)
.objectFit(ImageFit.Fill)
.height('60%')
Text(this.dataValues)
.copyOption(CopyOptions.LocalDevice)
.height('15%')
.margin(10)
.width('60%')
Button('选择图片')
.type(ButtonType.Capsule)
.fontColor(Color.White)
.alignSelf(ItemAlign.Center)
.width('80%')
.margin(10)
.onClick(() => {
// 拉起图库
void this.selectImage()
})
Button('开始多目标识别')
.type(ButtonType.Capsule)
.fontColor(Color.White)
.alignSelf(ItemAlign.Center)
.width('80%')
.margin(10)
.onClick(() => {
// 调用封装的异步识别函数
void this.handleMultiObjectDetection();
})
}
.width('100%')
.height('100%')
.justifyContent(FlexAlign.Center)
}
// 封装多目标识别的异步逻辑
private async handleMultiObjectDetection() {
if(!this.chooseImage) {
hilog.error(0x0000, 'objectDetectSample', `Failed to choose image.`);
return;
}
let request: visionBase.Request = {
inputData: { pixelMap: this.chooseImage }
};
try {
let data: objectDetection.ObjectDetectionResponse =
await (await objectDetection.ObjectDetector.create()).process(request);
let objectJson = JSON.stringify(data);
hilog.info(0x0000, 'objectDetectSample', `Succeeded in object detection: ${objectJson}`);
this.dataValues = objectJson;
} catch (error) {
hilog.error(0x0000, 'objectDetectSample', `Failed to get result. Error: ${error}`);
}
}
private async selectImage() {
try {
let uri = await this.openPhoto();
if (uri === undefined) {
hilog.error(0x0000, 'objectDetectSample', "Failed to define uri.");
return;
}
this.loadImage(uri);
} catch (err) {
hilog.error(0x0000, 'objectDetectSample', `Failed to get photo image uri. code: ${err.code}, message: ${err.message}`);
}
}
private async openPhoto(): Promise<string> {
return new Promise<string>((resolve, reject) => {
let photoPicker: photoAccessHelper.PhotoViewPicker = new photoAccessHelper.PhotoViewPicker();
photoPicker.select({
MIMEType: photoAccessHelper.PhotoViewMIMETypes.IMAGE_TYPE, maxSelectNumber: 1
}).then(res => {
resolve(res.photoUris[0]);
}).catch((err: BusinessError) => {
hilog.error(0x0000, 'objectDetectSample', `Failed to get photo image uri. code: ${err.code}, message: ${err.message}`);
reject(err);
})
})
}
private loadImage(name: string) {
setTimeout(async () => {
try {
let fileSource = await fileIo.open(name, fileIo.OpenMode.READ_ONLY);
this.imageSource = image.createImageSource(fileSource.fd);
this.chooseImage = await this.imageSource.createPixelMap();
await fileIo.close(fileSource);
} catch (error) {
hilog.error(0x0000, 'objectDetectSample', `Failed to open file. Error: ${error}`);
}
}, 100)
}
}