适配相机旋转角度(ArkTS)
屏幕处于不同的屏幕状态时,原始图像需旋转不同的角度,以确保图像在合适的方向显示,效果如图所示。
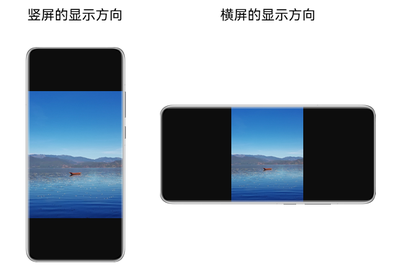
本开发指导将指导开发者在预览、拍照、录像等不同场景下,如何适配相机的旋转角度。
-
在拍照、录像时,图像旋转角度与设备重力方向(即设备旋转角度)相关。
详细的API参考说明,请参考Camera API文档。
创建会话
-
导入相机等相关模块。
import { camera } from '@kit.CameraKit';import { BusinessError } from '@kit.BasicServicesKit'; -
创建Session会话。
相机使用预览等功能前,均需创建相机会话,调用CameraManager中的createSession方法创建一个会话,创建会话时需指定创建SceneMode为NORMAL_PHOTO或NORMAL_VIDEO,创建的session处于拍照或者录像模式。
function createPhotoSession(cameraManager: camera.CameraManager): camera.Session | undefined {let session: camera.Session | undefined = undefined;try {session = cameraManager.createSession(camera.SceneMode.NORMAL_PHOTO) as camera.PhotoSession;} catch (error) {let err = error as BusinessError;console.error(`Failed to create the session instance. error: ${err}`);}return session;}function createVideoSession(cameraManager: camera.CameraManager): camera.Session | undefined {let session: camera.Session | undefined = undefined;try {session = cameraManager.createSession(camera.SceneMode.NORMAL_VIDEO) as camera.VideoSession;} catch (error) {let err = error as BusinessError;console.error(`Failed to create the session instance. error: ${err}`);}return session;}
预览
完成会话创建后,开发者可根据实际需求,配置输出流。
-
调用PreviewOutput中的getPreviewRotation接口,获取预览旋转角度。
displayRotation:显示设备的屏幕旋转角度,可通过display.getDefaultDisplaySync获取Display对象并读取其rotation属性值,并将对应角度填入。
例:Display.rotation = 1,表示显示设备屏幕顺时针旋转为90°,此处displayRotation填入90。
import { display } from '@kit.ArkUI';let initDisplayRotation = display.getDefaultDisplaySync().rotation;let imageRotation = initDisplayRotation * camera.ImageRotation.ROTATION_90;该接口需要在session调用commitConfig完成配流后调用,如果存在异步执行的情况,previewOutput未添加到session里或者已调用的session.release,导致两者关系未绑定,此时调用getPreviewRotation,则会调用失败,并抛出错误码CameraErrorCode.SERVICE_FATAL_ERROR。
function getPreviewRotation(previewOutput: camera.PreviewOutput, imageRotation : camera.ImageRotation): camera.ImageRotation {let previewRotation: camera.ImageRotation = camera.ImageRotation.ROTATION_0;try {previewRotation = previewOutput.getPreviewRotation(imageRotation);console.info(`Preview rotation is: ${previewRotation}`);} catch (error) {// 失败返回错误码error.code并处理let err = error as BusinessError;console.error(`The previewOutput.getPreviewRotation call failed. error code: ${err.code}`);}return previewRotation;} -
调用PreviewOutput中的setPreviewRotation,设置图像的预览旋转角度。
该接口需要在session调用commitConfig完成配流后调用,如果多次调用,以最新调用设置的图像预览旋转角度为准。
- previewRotation:预览旋转角度,取上一步getPreviewRotation的返回值。
- isDisplayLocked:可选入参,默认为false。当设置为false,即屏幕方向未锁定,预览旋转角度将根据相机镜头角度+屏幕显示旋转角度的值计算;当设置为true,Surface旋转锁定,不跟随窗口变化,旋转角度仅取相机镜头角度计算。
function setPreviewRotation(previewOutput: camera.PreviewOutput, previewRotation : camera.ImageRotation, isDisplayLocked: boolean): void {try {previewOutput.setPreviewRotation(previewRotation, isDisplayLocked);} catch (error) {// 失败返回错误码error.code并处理let err = error as BusinessError;console.error(`The previewOutput.setPreviewRotation call failed. error code: ${err.code}`);}}
预览流旋转接口适配场景及示例:
-
在会话配置过程中调用预览旋转接口,即:使用commitConfig接口提交相关配置后调用,建议在Start起流前调用。
// previewOutput是创建的预览输出try {let initDisplayRotation = display.getDefaultDisplaySync().rotation;let initPreviewRotation = previewOutput.getPreviewRotation(initDisplayRotation * camera.ImageRotation.ROTATION_90);previewOutput.setPreviewRotation(initPreviewRotation, false);} catch (error) {// 失败返回错误码error.code并处理let err = error as BusinessError;console.error(`PreviewRotation call failed. error code: ${err.code}`);} -
应用使用相机时,通过监听Display对象变化,感知窗口当前状态,如当前相机窗口发生旋转时,需对预览流进行角度修正。推荐在会话配置中完成调用预览旋转接口后,直接创建监听。
import { display } from '@kit.ArkUI';// previewOutput是创建的预览输出display.off('change');display.on('change', () => {try {let displayRotation = display.getDefaultDisplaySync().rotation;let imageRotation = displayRotation * camera.ImageRotation.ROTATION_90;let previewRotation = previewOutput.getPreviewRotation(imageRotation);previewOutput.setPreviewRotation(previewRotation, false);} catch (error) {// 失败返回错误码error.code并处理let err = error as BusinessError;console.error(`display change PreviewRotation call failed. error code: ${err.code}`);}});
拍照
完成会话创建后,开发者可根据实际需求,配置输出流。
-
调用PhotoOutput中的getPhotoRotation可以获取到拍照旋转角度。
该接口需要在session调用commitConfig完成配流后调用。
deviceDegree:设备旋转角度。拍照的旋转角度与重力方向(即设备旋转角度)相关,获取方式请见计算设备旋转角度。
function getPhotoRotation(photoOutput: camera.PhotoOutput, deviceDegree: number): camera.ImageRotation {let photoRotation: camera.ImageRotation = camera.ImageRotation.ROTATION_0;try {photoRotation = photoOutput.getPhotoRotation(deviceDegree);console.info(`Photo rotation is: ${photoRotation}`);} catch (error) {// 失败返回错误码error.code并处理let err = error as BusinessError;console.error(`The photoOutput.getPhotoRotation call failed. error code: ${err.code}`);}return photoRotation;} -
应用将拍照角度写入PhotoCaptureSetting.rotation。
-
其余参数的配置及拍照,可参考拍照开发指导。
录像
完成会话创建后,开发者可根据实际需求,配置输出流。
-
调用VideoOutput中的getVideoRotation可以获取到录像的旋转角度。
该接口需要在session调用commitConfig完成配流后调用。
deviceDegree:设备旋转角度。录像的旋转角度与重力方向(即设备旋转角度)相关,获取方式请见计算设备旋转角度。
function getVideoRotation(videoOutput: camera.VideoOutput, deviceDegree: number): camera.ImageRotation {let videoRotation: camera.ImageRotation = camera.ImageRotation.ROTATION_0;try {videoRotation = videoOutput.getVideoRotation(deviceDegree);console.info(`Video rotation is: ${videoRotation}`);} catch (error) {// 失败返回错误码error.code并处理let err = error as BusinessError;console.error(`The videoOutput.getVideoRotation call failed. error code: ${err.code}`);}return videoRotation;} -
在AVRecorder.prepare后使用updateRotation设置录像角度。
-
其余参数的配置及启动录像,可参考录像开发指导。
录像流旋转接口适配示例代码:
import { camera } from '@kit.CameraKit';
import { media } from '@kit.MediaKit';
import { BusinessError } from '@kit.BasicServicesKit';
async function getVideoRotationAndUpdate(videoOutput: camera.VideoOutput, deviceDegree: number, avRecorder: media.AVRecorder) {
let videoRotation: camera.ImageRotation = camera.ImageRotation.ROTATION_0;
try {
videoRotation = videoOutput.getVideoRotation(deviceDegree);
console.info(`Video rotation is: ${videoRotation}`);
if (avRecorder.state === 'prepared') {
await avRecorder.updateRotation(videoRotation);
}
} catch (error) {
// 失败返回错误码error.code并处理
let err = error as BusinessError;
console.error(`getVideoRotationAndUpdate call failed. error code: ${err.code}`);
}
}
计算设备旋转角度
当前可通过调用once(type: SensorId.GRAVITY, callback: Callback<GravityResponse>)获取一次重力传感器在x、y、z三个方向上的数据,计算得出设备旋转角度deviceDegree,示例如下所示。
如果无法获得重力传感器数据,需要申请重力传感器权限ohos.permission.ACCELEROMETER。权限申请请参考声明权限,如何获取传感器数据请参考传感器开发指导。
import { Decimal } from '@kit.ArkTS';
import { sensor } from '@kit.SensorServiceKit';
import { BusinessError } from '@kit.BasicServicesKit';
let isSupported: boolean = false;
let getDeviceDegree: number = -1;
function getRealData(data: sensor.GravityResponse): number {
let getDeviceDegree: number = 0;
let x = data.x;
let y = data.y;
let z = data.z;
if ((x * x + y * y) * 3 < z * z) {
return getDeviceDegree;
} else {
try {
let sd: Decimal = Decimal.atan2(y, -x);
let sc: Decimal = Decimal.round(Number(sd) / 3.141592653589 * 180);
getDeviceDegree = 90 - Number(sc);
getDeviceDegree = getDeviceDegree >= 0 ? getDeviceDegree % 360 : getDeviceDegree % 360 + 360;
} catch (error) {
let err = error as BusinessError;
console.error(`decimal failed, error: ${err.code}`);
}
}
return getDeviceDegree;
}
async function getGravity() : Promise<number> {
let data: sensor.Sensor[];
try {
data = await sensor.getSensorList();
} catch (error) {
let err = error as BusinessError;
console.error(`getSensorList failed, error: ${err.code}`);
return -1; // 异常场景下返回默认值
}
for (let i = 0; i < data.length; i++) {
if (data[i].sensorId === sensor.SensorId.GRAVITY) {
isSupported = true;
break;
}
}
try {
if (isSupported === true) {
const promise: Promise<number> = new Promise((resolve) => {
sensor.once(sensor.SensorId.GRAVITY, (data: sensor.GravityResponse) => {
resolve(getRealData(data));
});
})
return promise;
} else {
const promise: Promise<number> = new Promise((resolve) => {
sensor.once(sensor.SensorId.ACCELEROMETER, (data: sensor.AccelerometerResponse) => {
resolve(getRealData(data as sensor.GravityResponse));
});
})
return promise;
}
} catch (error) {
let err = error as BusinessError;
console.error(`gePromise failed, error: ${err.code}`);
return -1; // 异常场景下返回默认值
}
}
// 获取当前设备旋转角度
async function getCurrentDeviceDegree() : Promise<number> {
getDeviceDegree = await getGravity(); // 调用使用await
return getDeviceDegree;
}
视频通话送远端场景
两个设备之间进行视频通话,存在设备间持握方向不一致问题,建议在本端将画面转正,再通过网络发送到对端,画面转正参考自绘制场景预览角度的归一化处理。
实现相机无损出图
在部分折叠屏设备上,不同折叠状态下的设备自然方向会发生改变,导致不同折叠状态下真实的相机镜头安装角度不同。为了屏蔽不同设备间的差异,使得不同折叠状态下的相机镜头安装角度一致,系统会自动调整部分折叠状态下的相机采集图像方向(通过旋转裁切的方式)和相机镜头安装角度,因此会存在视场角(Field of View, FOV)损失,可能会导致相机预览、拍照、录像可见范围降低,因此如果需要实现相机无损出图,可以通过usePhysicalCameraOrientation接口来实现相机无损出图。具体方式如下:
设备是否支持无损出图,首先需要确认设备的相机镜头安装角度是否可变,可以通过isPhysicalCameraOrientationVariable接口查询。
-
当相机镜头安装角度不可变时,不同折叠状态下的相机出图均为无损出图。
-
当相机镜头安装角度可变时:
- 如应用需要实现相机无损出图,由于相机镜头安装角度与相机旋转相关,需要应用完成相机旋转的适配后,通过getPhysicalCameraOrientation接口获取设备当前折叠状态下真实的相机镜头安装角度,并通过usePhysicalCameraOrientation接口实现相机无损出图(相机镜头安装角度不可变时使用usePhysicalCameraOrientation将会返回7400102错误码,未适配相机旋转时使用相机无损出图会导致预览、拍照、录像旋转异常),推荐在createCameraInput后直接使用usePhysicalCameraOrientation接口实现相机无损出图。
示例代码如下:
import { camera } from '@kit.CameraKit';
function enablePhysicalCameraOrientation(cameraInput: camera.CameraInput) {
// 查询设备的相机镜头安装角度是否可变
let isVarialbe: boolean = cameraInput.isPhysicalCameraOrientationVariable();
if (isVarialbe) {
// 获取设备当前折叠状态下真实的相机镜头安装角度
let physicalOrientation: number = cameraInput.getPhysicalCameraOrientation();
console.info(`physical Orientation is ${physicalOrientation}`);
// 选择是否使用真实的相机镜头安装角度, 以实现无损出图
let isUsed: boolean = true;
cameraInput.usePhysicalCameraOrientation(isUsed);
}
}
常见问题
指定XComponent的大小,防止旋转后图像拉伸变形
图像显示出现拉伸或压缩等变形,是因为图像分辨率与XComponent的宽高比不匹配。以应用层下发的1920*1080(16:9)竖屏和横屏为例,器件出图均是按照4:3比例出一张RAW图,在此基础上,根据应用层下发的16:9比例进行裁切,提供数据给应用层。因此,无论手机持握方向如何变化,应用层接收的数据始终是16:9比例的图片。具体图示如下:
| 设备和镜头方向 | 处理过程示意图 | XComponent布局 |
|---|---|---|
| 设备条件: 手机竖屏、充电口向下。 使用后置相机拍摄。 可得: - 后置相机镜头角度 = 90° - 屏幕旋转角度 = 0°,Display.rotation = 0 - 图像预览旋转角度 = 0°+90° = 90° | 出图与最终成像有90度夹角,布局宽高与图像宽高交换。 | |
| 设备条件: 手机横屏、充电口向右。 使用后置相机拍摄。 可得: - 后置相机镜头角度 = 90° - 屏幕旋转角度 = 270°,Display.rotation = 3 - 图像预览旋转角度 = 270°+90° = 360° = 0° | 出图与最终成像有0度夹角,布局与图像宽高比一致。 |
从上图可以看出,当手机从竖屏转换为横屏时,图像始终保持16:9的输出比例,但镜头与屏幕显示方向之间的夹角从90度变为0度。如果布局保持9:16不变,那么16:9的图像数据放置在9:16的空间内显示,会导致图像形变。因此,为确保图像显示正常,横屏时需要将布局的宽高比调整为16:9。
首先,将XComponent的宽度和高度作为状态变量进行监听,通过Window.on('windowSizeChange')监听窗口的变化,根据屏幕旋转角度(Display.rotation )与相机镜头角度(CameraDevice.cameraOrientation)之间的角度来确定布局的宽高比,以确保布局能跟随窗口实时调整。
具体的实现方法如下,在需要进行横竖屏切换的页面中,通常建议在aboutToAppear中执行窗口变化的监听。
import { bundleManager } from '@kit.AbilityKit';
import { display } from '@kit.ArkUI';
import { common } from '@kit.AbilityKit';
import { BusinessError, deviceInfo } from '@kit.BasicServicesKit';
// ....
let previewOutput : camera.PreviewOutput; // 根据具体使用场景创建的预览输出流
let cameraDevice : camera.CameraDevice; // 根据使用诉求选择符合的相机设备
@Entry
@Component
struct Index {
@State mXComponentWidth: number = 1280;
@State mXComponentHeight: number = 720;
@State mRotate: number = 0;
@State mConfigRatio: number = 16 / 9;
private targetVersion: number = 0;
private mWindowHeight = 0;
private mWindowWidth = 0;
private windowClass = (this.getUIContext().getHostContext() as common.UIAbilityContext).windowStage.getMainWindowSync();
getBundleInfoForSelf() { // 获取应用的编译版本
let bundleFlags = bundleManager.BundleFlag.GET_BUNDLE_INFO_WITH_APPLICATION | bundleManager.BundleFlag.GET_BUNDLE_INFO_WITH_METADATA;
try {
bundleManager.getBundleInfoForSelf(bundleFlags).then((data) => {
console.info(`getBundleInfoForSelf successfully. Data: ${data.targetVersion}`);
this.targetVersion = data.targetVersion;
}).catch((err: BusinessError) => {
console.error(`getBundleInfoForSelf failed ${err}`);
});
} catch (err) {
let message = (err as BusinessError).message;
console.error(`getBundleInfoForSelf failed ${message}`);
}
}
isIsolateForSpecialType(): boolean { // 兼容平板API14之前的设备
return deviceInfo.deviceType == "tablet" && this.targetVersion <= 50000013;
}
aboutToAppear(): void {
this.updateXComponentSize();
this.getBundleInfoForSelf();
this.windowClass.on('windowSizeChange', (size) => {
this.mWindowWidth = size.width;
this.mWindowHeight = size.height;
this.updateXComponentSize();
});
let rotation : number = 0;
try {
rotation = display.getDefaultDisplaySync().rotation;
this.mRotate = rotation * camera.ImageRotation.ROTATION_90;
} catch (error) {
const err = error as BusinessError;
console.error(`Failed to get display rotation: ${err.code}, ${err.message}`);
this.mRotate = 0;
}
display.on('change', () => {
if (this.mRotate!= rotation * camera.ImageRotation.ROTATION_90) {
this.mRotate= rotation * camera.ImageRotation.ROTATION_90; // 获取屏幕旋转角度
this.updateXComponentSize();
let imageRotation = this.getImageRotation();
if (!imageRotation) {
console.error(`current get image rotation is undefined`);
return;
}
let previewRotation = previewOutput.getPreviewRotation(imageRotation); // previewOutput是创建的预览流
previewOutput.setPreviewRotation(previewRotation, false);
}
});
}
getImageRotation() : camera.ImageRotation | undefined {
let displayRotation : number= 0;
try {
displayRotation = display.getDefaultDisplaySync().rotation
} catch (error) {
const err = error as BusinessError;
console.error(`Failed to get display rotation: ${err.code}, ${err.message}`);
return undefined;
}
let imageRotation = displayRotation * camera.ImageRotation.ROTATION_90;
return imageRotation;
}
updateXComponentSize(): void {
let angleDiff = (this.mRotate+ cameraDevice?.cameraOrientation) % 360;
if (this.isIsolateForSpecialType()) { // 如果设备为平板设备,且使用的API版本<14,应进入此逻辑。
if (angleDiff === 90 || angleDiff=== 270) {
this.mXComponentWidth = this.mConfigRatio * this.mWindowHeight;
this.mXComponentHeight = this.mWindowHeight;
} else {
this.mXComponentWidth = this.mWindowWidth;
this.mXComponentHeight = this.mConfigRatio * this.mWindowWidth; // 1920 *1080
}
} else { // 如果使用API版本≥14,或是API14以下的非平板设备,应进入此逻辑。
if (angleDiff === 90 || angleDiff=== 270) {
this.mXComponentWidth = this.mWindowWidth;
this.mXComponentHeight = this.mConfigRatio * this.mWindowWidth; // 1920 *1080
} else {
this.mXComponentWidth = this.mConfigRatio * this.mWindowHeight;
this.mXComponentHeight = this.mWindowHeight;
}
}
}
async aboutToDisAppear(): Promise<void> {
display.off('change');
this.windowClass.off('windowSizeChange');
// 解注册
}
build() {
// 根据使用诉求补充界面处理逻辑。
}
}
除了指定XComponent的宽高外,还可以通过设置XComponent的renderFit来实现图片的自适应大小显示、居中裁剪显示等效果。具体详情请参考RenderFit介绍。
自绘制场景预览角度的归一化处理
在自绘制场景中,对于后置摄像头,可以通过调用getPreviewRotation获取旋转角度,将图像转正;对于前置摄像头,由于存在水平镜像和垂直镜像的差异,为了简化操作,需先对前置摄像头的图像角度进行归一化处理后,再将图像转正,并根据业务需求决定是否进行镜像处理。
pixelMap处理方式:
import { camera } from '@kit.CameraKit';
import { BusinessError } from '@kit.BasicServicesKit';
import { image } from '@kit.ImageKit';
import { display } from '@kit.ArkUI';
let previewOutputReceiver: camera.PreviewOutput | undefined = undefined; // 回调流定义
let curCameraPosition = camera.CameraPosition.CAMERA_POSITION_FRONT; // 相机设备的位置定义,此处以前置为例。
// .....
function onImageArrival(receiver: image.ImageReceiver): void {
receiver.on('imageArrival', () => { // imageRecevier回调
// 获取图像
receiver.readNextImage((err: BusinessError, nextImage: image.Image) => {
if (err || nextImage === undefined) {
console.error('readNextImage failed');
return;
}
// 解析图像内容
nextImage.getComponent(image.ComponentType.JPEG, async (err: BusinessError, imgComponent: image.Component) => {
if (err || imgComponent === undefined) {
console.error('getComponent failed');
}
if (imgComponent.byteBuffer) {
let width = nextImage.size.width; // 获取图片的宽
let height = nextImage.size.height; // 获取图片的高
let stride = imgComponent.rowStride; // 获取图片的stride
// stride与width一致
if (stride == width) {
let pixelMap = await image.createPixelMap(imgComponent.byteBuffer, {
size: { height: height, width: width },
srcPixelFormat: image.PixelMapFormat.NV21, // 此处以NV21为例
})
updatePixelMap(pixelMap);
} else {
// stride与width不一致
const dstBufferSize = width * height * 1.5 // 以NV21为例(YUV_420_SP格式的图片)YUV_420_SP内存计算公式:长x宽+(长x宽)/2
const dstArr = new Uint8Array(dstBufferSize)
for (let j = 0; j < height * 1.5; j++) {
const srcBuf = new Uint8Array(imgComponent.byteBuffer, j * stride, width)
dstArr.set(srcBuf, j * width)
}
let pixelMap = await image.createPixelMap(dstArr.buffer, {
size: { height: height, width: width },
srcPixelFormat: image.PixelMapFormat.NV21, // 此处以NV21为例
});
updatePixelMap(pixelMap);
}
} else {
console.error('byteBuffer is null');
}
// 确保当前buffer没有在使用的情况下,可进行资源释放。
// 如果对buffer进行异步操作,需要在异步操作结束后再释放该资源(nextImage.release())。
nextImage.release();
console.info('image process done');
})
})
})
}
async function  updatePixelMap(pixelMap: image.PixelMap): Promise<void> {
  let rotation : number = 0;
  try {
    rotation = display.getDefaultDisplaySync().rotation * camera.ImageRotation.ROTATION_90;
  } catch (error) {
    const err = error as BusinessError;
    console.error(`Failed to get display rotation: ${err.code}, ${err.message}`);
    return;
  }
  let angle = previewOutputReceiver?.getPreviewRotation(rotation);
  if (angle === undefined) {
    return;
  }
  // 在display.on中对该previewOutput设置过setPreviewRotation,此处可以不执行。
  previewOutputReceiver?.setPreviewRotation(angle);
  if (curCameraPosition === camera.CameraPosition.CAMERA_POSITION_FRONT) {
    if (rotation ===90 || rotation === 270) {
      angle = (angle + 180 ) % 360;
    }
    await pixelMap.rotate(angle);
    await pixelMap.flip(true, false);
  } else {
    await pixelMap.rotate(angle);
  }
}
适配一多设备
为了适配一多设备,主要分为以下几步:
-
根据屏幕比例选择合适的预览分辨率。
-
根据确定的预览分辨率,通过宽/高得到新的比例。
-
根据上一步的比例计算XComponent宽高,可参考指定XComponent的大小,防止旋转后图像拉伸变形,将mConfigRatio应用于布局宽高的计算。

在适配折叠屏设备时,每次折叠屏镜头变化都需要重新获取屏幕比例。
let mConfigRatio: number = 16 / 9; // 设置分辨率比例初始值,此处以16:9宽高比为例。
let reConfigType : number = 720;
let previewProfileObj: camera.Profile = {
  format: 1003,
  size: {
    width: 1280,
    height: 720
  }
};
// 根据屏幕初步计算比例,长边/短边
function getConfigRation(cameraDevice: camera.CameraDevice, cameraManager: camera.CameraManager) : number {
  let previewProfile = getSurfaceSize(cameraDevice, mConfigRatio, cameraManager); // 获取最接近的分辨率
  if (previewProfile === undefined || previewProfile.size === undefined) {
    return 0;
  }
  mConfigRatio = previewProfile.size.width / previewProfile.size.height; // 以新的比例重新计算显示宽高
  return mConfigRatio;
}

// 获取最接近屏幕的分辨率
function getSurfaceSize(cameraDevice: camera.CameraDevice, configRatio: number, cameraManager: camera.CameraManager): camera.Profile | undefined {
  console.info(`previewProfiles is ${configRatio}`);
  let cameraOutputCapability =
    cameraManager.getSupportedOutputCapability(cameraDevice, camera.SceneMode.NORMAL_PHOTO); // 此处以NORMAL_PHOTO为例
  return getPreviewProfile(cameraOutputCapability, configRatio);
}
function getPreviewProfile(cameraOutputCapability: camera.CameraOutputCapability, configRatio: number): camera.Profile | undefined {
  let previewProfiles = cameraOutputCapability.previewProfiles;
  if (previewProfiles.length < 1) {
    return undefined;
  }
  console.info(`previewProfiles this.foramt: ${previewProfileObj.format} configRatio = ${configRatio}`);
  let optimalSize: camera.Profile|undefined;
  let minDiff = Number.MAX_VALUE;
  // 计算屏幕的宽高比
  for (let i = 0; i < previewProfiles.length; i++) {
    if (previewProfiles[i].format !== previewProfileObj.format) {
      continue;
    }
    let ratio = previewProfiles[i].size.width / previewProfiles[i].size.height; // 1088*1080
    // 检查宽高比是否匹配
    if (Math.abs(ratio - configRatio) > 0.2) continue; // 0.2的误差可自行调整
    // 选择最接近的分辨率
    if (Math.abs(previewProfiles[i].size.height - reConfigType) < minDiff) {
      optimalSize = previewProfiles[i];
      minDiff = Math.abs(previewProfiles[i].size.height - reConfigType);
    }
  }

  // 如果没有找到合适的分辨率,选择第一个
  if (optimalSize === undefined) {
    minDiff = Number.MAX_VALUE;
    for (let i = 0; i < previewProfiles.length; i++) {
      if (previewProfiles[i].format !== previewProfileObj.format) {
        continue;
      }
      if (Math.abs(previewProfiles[i].size.height - reConfigType) < minDiff) { // 720
        optimalSize = previewProfiles[i];
        minDiff = Math.abs(previewProfiles[i].size.height - reConfigType);
      }
    }
  }
  return optimalSize;
}
拍照无法镜像
通过设置PhotoCaptureSetting中的mirror属性改变拍照镜像。
// this.photoOutput是拍照输出output, this.getDeviceDegree是重力角度
let photoSettings: camera.PhotoCaptureSetting = {
  quality: camera.QualityLevel.QUALITY_LEVEL_HIGH,
  mirror: this.photoOutput?.isMirrorSupported() // 设置拍照镜像,true表示镜像,false表示非镜像
};
// ... 省略获取代码
this.photoRotation = getPhotoRotation(this.photoOutput!!,this.getDeviceDegree)
photoSettings.rotation = this.photoRotation // 指定拍照旋转角度