自定义绘制修改器 (DrawModifier)
概述
当某些组件本身的绘制内容不满足需求时,可使用组件自定义绘制功能,在原有组件基础上部分绘制、或者全部自行绘制,以达到预期效果。例如:独特的按钮形状、文字和图像混合的图标等。组件自定义绘制提供了自定义绘制修改器DrawModifier,来实现更自由的组件绘制。
使用DrawModifier接口
declare class DrawModifier {

  drawBehind?(drawContext: DrawContext): void;

  drawContent?(drawContext: DrawContext): void;

  drawFront?(drawContext: DrawContext): void;

  drawForeground?(drawContext: DrawContext): void;

  drawOverlay(drawContext: DrawContext): void;

  invalidate(): void;
}
DrawModifier可设置遮罩层前景(drawOverlay)、前景(drawForeground)、内容前景(drawFront)、内容(drawContent)和内容背景(drawBehind)的绘制方法,开发者需要重载这些方法,并通过Canvas的接口进行自定义绘制。自定义绘制层级图如下所示。
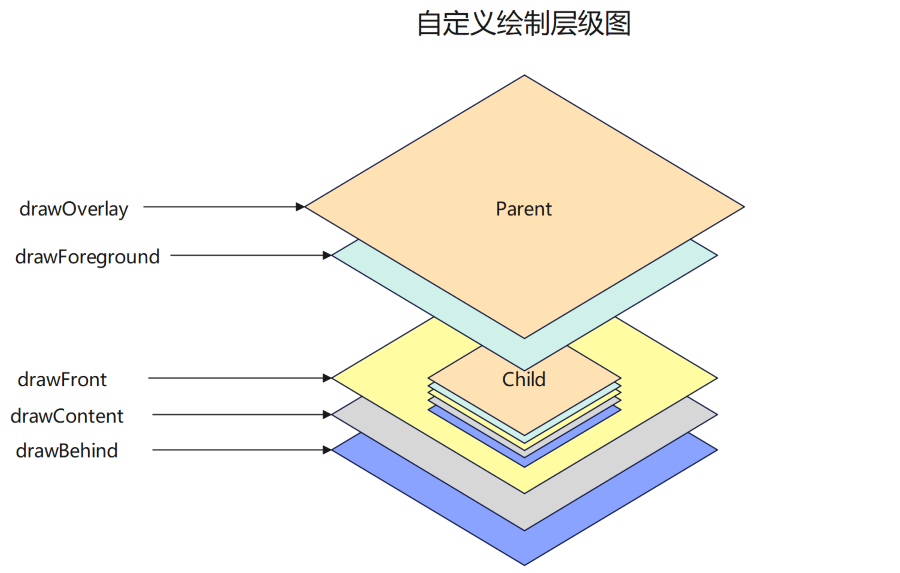
DrawModifier还提供主动触发重绘的方法invalidate,该接口开发者无需也无法重载,调用会触发所绑定组件的重绘。
![]()
- 每个DrawModifier实例只能设置到一个组件上,禁止进行重复设置。
- drawContent方法会替换组件原本的内容绘制函数。
- drawForeground方法从API version 20开始支持。
- drawOverlay方法从API version 23开始支持。
- NDK的自定义绘制能力和示例请参考自定义绘制。
通过drawFront、drawContent、drawBehind进行自定义绘制
通过drawFront、drawContent、drawBehind接口,在内容前景、内容和内容背景三个层级上对Text组件进行了自定义绘制,从而按需改变组件的绘制效果。
import { drawing } from '@kit.ArkGraphics2D';
import { AnimatorResult } from '@kit.ArkUI';
import { hilog } from '@kit.PerformanceAnalysisKit';
const LOG_PRINT_DOMAIN: number = 0xFF00;
const PREFIX: string = '[Sample]'
class MyFullDrawModifier extends DrawModifier {
public scaleX: number = 1;
public scaleY: number = 1;
public uiContext: UIContext;
constructor(uiContext: UIContext) {
super();
this.uiContext = uiContext;
}
// 重载drawBehind方法,实现自定义绘制内容背景。
drawBehind(context: DrawContext): void {
const brush = new drawing.Brush();
brush.setColor({
alpha: 255,
red: 161,
green: 10,
blue: 33
});
context.canvas.attachBrush(brush);
const halfWidth = context.size.width / 2;
const halfHeight = context.size.height / 2;
context.canvas.drawRect({
left: this.uiContext.vp2px(halfWidth - 50 * this.scaleX),
top: this.uiContext.vp2px(halfHeight - 50 * this.scaleY),
right: this.uiContext.vp2px(halfWidth + 50 * this.scaleX),
bottom: this.uiContext.vp2px(halfHeight + 50 * this.scaleY)
});
}
// 重载drawContent方法,实现自定义绘制内容。
drawContent(context: DrawContext): void {
const brush = new drawing.Brush();
brush.setColor({
alpha: 255,
red: 23,
green: 169,
blue: 141
});
context.canvas.attachBrush(brush);
const halfWidth = context.size.width / 2;
const halfHeight = context.size.height / 2;
context.canvas.drawRect({
left: this.uiContext.vp2px(halfWidth - 30 * this.scaleX),
top: this.uiContext.vp2px(halfHeight - 30 * this.scaleY),
right: this.uiContext.vp2px(halfWidth + 30 * this.scaleX),
bottom: this.uiContext.vp2px(halfHeight + 30 * this.scaleY)
});
}
// 重载drawFront方法,实现自定义绘制内容前景。
drawFront(context: DrawContext): void {
const brush = new drawing.Brush();
brush.setColor({
alpha: 255,
red: 39,
green: 135,
blue: 217
});
context.canvas.attachBrush(brush);
const halfWidth = context.size.width / 2;
const halfHeight = context.size.height / 2;
const radiusScale = (this.scaleX + this.scaleY) / 2;
context.canvas.drawCircle(this.uiContext.vp2px(halfWidth), this.uiContext.vp2px(halfHeight),
this.uiContext.vp2px(20 * radiusScale));
}
}
class MyFrontDrawModifier extends DrawModifier {
public scaleX: number = 1;
public scaleY: number = 1;
public uiContext: UIContext;
constructor(uiContext: UIContext) {
super();
this.uiContext = uiContext;
}
// 重载drawFront方法,实现自定义绘制内容前景。
drawFront(context: DrawContext): void {
const brush = new drawing.Brush();
brush.setColor({
alpha: 255,
red: 39,
green: 135,
blue: 217
});
context.canvas.attachBrush(brush);
const halfWidth = context.size.width / 2;
const halfHeight = context.size.height / 2;
const radiusScale = (this.scaleX + this.scaleY) / 2;
context.canvas.drawCircle(this.uiContext.vp2px(halfWidth), this.uiContext.vp2px(halfHeight),
this.uiContext.vp2px(20 * radiusScale));
}
}
@Entry
@Component
struct DrawModifierExample {
// 将自定义绘制前景的类实例化,传入UIContext实例。
private fullModifier: MyFullDrawModifier = new MyFullDrawModifier(this.getUIContext());
private frontModifier: MyFrontDrawModifier = new MyFrontDrawModifier(this.getUIContext());
private drawAnimator: AnimatorResult | undefined = undefined;
@State modifier: DrawModifier = new MyFrontDrawModifier(this.getUIContext());
private count = 0;
create() {
// 设置绘制动画
let self = this;
this.drawAnimator = this.getUIContext().createAnimator({
duration: 1000,
easing: 'ease',
delay: 0,
fill: 'forwards',
direction: 'normal',
iterations: 1,
begin: 0,
end: 2
});
this.drawAnimator.onFrame = (value: number) => {
hilog.info(LOG_PRINT_DOMAIN, PREFIX, 'frame value = %{public}', value);
const tempModifier = self.modifier as MyFullDrawModifier | MyFrontDrawModifier;
tempModifier.scaleX = Math.abs(value - 1);
tempModifier.scaleY = Math.abs(value - 1);
self.modifier.invalidate();
};
}
build() {
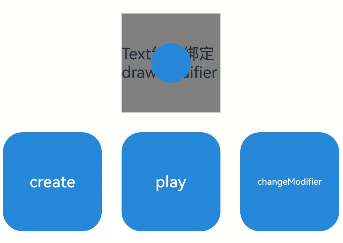
Column() {
Row() {
// $r('app.string.Modifier')需要替换为开发者所需的资源文件
Text($r('app.string.Modifier'))
.width(100)
.height(100)
.margin(10)
.backgroundColor(Color.Gray)
.onClick(() => {
// 修改当前绘制大小
const tempModifier = this.modifier as MyFullDrawModifier | MyFrontDrawModifier;
tempModifier.scaleX -= 0.1;
tempModifier.scaleY -= 0.1;
})
// 调用此接口并传入自定义绘制的类实例,即可实现自定义绘制。
.drawModifier(this.modifier)
}
Row() {
Button('create')
.width(100)
.height(100)
.margin(10)
.backgroundColor(0xFF2787D9)
.onClick(() => {
// 创建动画
this.create();
})
Button('play')
.id('play')
.width(100)
.height(100)
.margin(10)
.backgroundColor(0xFF2787D9)
.onClick(() => {
// 播放动画
if (this.drawAnimator) {
this.drawAnimator.play();
}
})
Button('changeModifier')
.width(100)
.height(100)
.margin(10)
.backgroundColor(0xFF2787D9)
.onClick(() => {
// 切换modifier
this.count += 1;
if (this.count % 2 === 1) {
hilog.info(LOG_PRINT_DOMAIN, PREFIX, 'change to full modifier');
this.modifier = this.fullModifier;
} else {
hilog.info(LOG_PRINT_DOMAIN, PREFIX, 'change to front modifier');
this.modifier = this.frontModifier;
}
})
}
}
.width('100%')
.height('100%')
}
}
通过drawForeground进行自定义绘制
通过drawForeground接口,在组件前景层级上对Column组件进行了自定义绘制,从而改变组件前景的绘制效果。
import { drawing } from '@kit.ArkGraphics2D';

class MyForegroundDrawModifier extends DrawModifier {
  public scaleX: number = 3;
  public scaleY: number = 3;
  public uiContext: UIContext;

  constructor(uiContext: UIContext) {
    super();
    this.uiContext = uiContext;
  }

  // 重载drawForeground方法,实现自定义绘制前景。
  drawForeground(context: DrawContext): void {
    const brush = new drawing.Brush();
    brush.setColor({
      alpha: 255,
      red: 0,
      green: 50,
      blue: 100
    });
    context.canvas.attachBrush(brush);
    const halfWidth = context.size.width / 2;
    const halfHeight = context.size.height / 2;
    context.canvas.drawRect({
      left: this.uiContext.vp2px(halfWidth - 30 * this.scaleX),
      top: this.uiContext.vp2px(halfHeight - 30 * this.scaleY),
      right: this.uiContext.vp2px(halfWidth + 30 * this.scaleX),
      bottom: this.uiContext.vp2px(halfHeight + 30 * this.scaleY)
    });
  }
}

@Entry
@Component
struct DrawModifierExample {
  // 将自定义绘制前景的类实例化,传入UIContext实例。
  private foregroundModifier: MyForegroundDrawModifier = new MyForegroundDrawModifier(this.getUIContext());

  build() {
    Column() {
      // $r('app.string.TestNode')需要替换为开发者所需的资源文件。
      Text($r('app.string.TestNode'))
        .fontSize(36)
        .width('100%')
        .height('100%')
        .textAlign(TextAlign.Center)
    }
    .margin(50)
    .width(280)
    .height(300)
    .backgroundColor(0x87CEEB)
    // 调用此接口并传入自定义绘制前景的类实例,即可实现自定义绘制前景。
    .drawModifier(this.foregroundModifier)
  }
}

调整自定义绘制Canvas的变换矩阵
从API version 12开始,通过重写DrawModifier中的drawContent方法,可以替换组件原本的内容绘制函数。
通过concatMatrix可以调整自定义绘制画布的变换矩阵。
![]()
- getTotalMatrix获取的是用来记录绘制指令的临时canvas的变换矩阵。
- 如果开发者希望这个画布进行一个预期的变换,应该使用concatMatrix而不是setMatrix,因为setMatrix会覆盖原本真实canvas上存在的变换矩阵。
ArkTS接口调用示例:
import { DrawContext } from '@kit.ArkUI';
import { drawing } from '@kit.ArkGraphics2D';

function drawImage(canvas: DrawingCanvas) {
  let matrix = new drawing.Matrix();
  matrix.setTranslation(100, 100);
  canvas.concatMatrix(matrix);
  const pen = new drawing.Pen();
  pen.setStrokeWidth(5);
  pen.setColor({
    alpha: 255,
    red: 0,
    green: 0,
    blue: 255
  });
  canvas.attachPen(pen);
  const brush = new drawing.Brush();
  brush.setColor({
    alpha: 255,
    red: 0,
    green: 0,
    blue: 255
  });
  canvas.attachBrush(brush);
  canvas.drawRect({
    left: 10,
    top: 10,
    right: 110,
    bottom: 60
  });
  canvas.detachPen();
}

function drawImage1(canvas: DrawingCanvas) {
  let matrix = new drawing.Matrix();
  matrix.setTranslation(100, 100);

  // 1. getTotalMatrix获取的是用来记录绘制指令的临时canvas的变换矩阵
  // 2. 如果开发者希望这个画布进行一个预期的变换,应该使用concatMatrix而不是setMatrix,因为setMatrix会覆盖原本真实canvas上存在的变换矩阵
  canvas.getTotalMatrix();
  canvas.setMatrix(matrix);
  const pen = new drawing.Pen();
  pen.setStrokeWidth(5);
  pen.setColor({
    alpha: 255,
    red: 0,
    green: 0,
    blue: 255
  });
  canvas.attachPen(pen);
  const brush = new drawing.Brush();
  brush.setColor({
    alpha: 255,
    red: 0,
    green: 0,
    blue: 255
  });
  canvas.attachBrush(brush);
  canvas.drawRect({
    left: 10,
    top: 10,
    right: 110,
    bottom: 60
  });
  canvas.detachPen();
}

class MyDrawModifier1 extends DrawModifier {
  drawContent(drawContext: DrawContext): void {
    drawImage1(drawContext.canvas)
  }
}

class MyDrawModifier extends DrawModifier {
  drawContent(drawContext: DrawContext): void {
    drawImage(drawContext.canvas)
  }
}

@Entry
@Component
struct Index {
  myDrawModifier: MyDrawModifier = new MyDrawModifier();
  myDrawModifier1: MyDrawModifier = new MyDrawModifier1();

  build() {
    Row() {
      Column() {
        Stack().width(300).height(300).drawModifier(this.myDrawModifier).position({ x: 10, y: 10 })
      }
      .borderWidth(1)
      .height(200)
      .width('45%')

      Column() {
        Stack().width(300).height(300).drawModifier(this.myDrawModifier1).position({ x: 10, y: 10 })
      }
      .borderWidth(1)
      .height(200)
      .width('45%')
    }.height('100%')
    .width('100%').position({ x: 10, y: 10 })

  }
}
