使用画布绘制自定义图形 (Canvas)
Canvas提供画布组件,用于自定义绘制图形,开发者使用CanvasRenderingContext2D对象和OffscreenCanvasRenderingContext2D对象在Canvas组件上进行绘制,绘制对象可以是基础形状、文本、图片等。
使用画布组件绘制自定义图形
可以由以下三种形式在画布绘制自定义图形:
- 使用CanvasRenderingContext2D对象在Canvas画布上绘制。
@Entry
@Component
struct CanvasExample1 {
  // 用来配置CanvasRenderingContext2D对象的参数,包括是否开启抗锯齿,true表明开启抗锯齿。
  private settings: RenderingContextSettings = new RenderingContextSettings(true);
  // 用来创建CanvasRenderingContext2D对象,通过在canvas中调用CanvasRenderingContext2D对象来绘制。
  private context: CanvasRenderingContext2D = new CanvasRenderingContext2D(this.settings);

  build() {
    Flex({ direction: FlexDirection.Column, alignItems: ItemAlign.Center, justifyContent: FlexAlign.Center }) {
      // 在canvas中调用CanvasRenderingContext2D对象。
      Canvas(this.context)
        .width('100%')
        .height('100%')
        .backgroundColor('#F5DC62')
        .onReady(() => {
          // 可以在这里绘制内容。
          this.context.strokeRect(50, 50, 200, 150);
        })
    }
    .width('100%')
    .height('100%')
  }
}

-
离屏绘制是指将需要绘制的内容先绘制在缓存区,再将其转换成图片,一次性绘制到Canvas上,加快了绘制速度。过程为:
- 通过transferToImageBitmap方法将离屏画布最近渲染的图像创建为一个ImageBitmap对象。
- 通过CanvasRenderingContext2D对象的transferFromImageBitmap方法显示给定的ImageBitmap对象。
具体使用参考OffscreenCanvasRenderingContext2D对象。
@Entry
@Component
struct CanvasExample2 {
  // 用来配置CanvasRenderingContext2D对象和OffscreenCanvasRenderingContext2D对象的参数,包括是否开启抗锯齿。true表明开启抗锯齿
  private settings: RenderingContextSettings = new RenderingContextSettings(true);
  private context: CanvasRenderingContext2D = new CanvasRenderingContext2D(this.settings);
  // 用来创建OffscreenCanvas对象,width为离屏画布的宽度,height为离屏画布的高度。通过在canvas中调用OffscreenCanvasRenderingContext2D对象来绘制。
  private offCanvas: OffscreenCanvas = new OffscreenCanvas(600, 600);

  build() {
    Flex({ direction: FlexDirection.Column, alignItems: ItemAlign.Center, justifyContent: FlexAlign.Center }) {
      Canvas(this.context)
        .width('100%')
        .height('100%')
        .backgroundColor('#F5DC62')
        .onReady(() => {
          let offContext = this.offCanvas.getContext('2d', this.settings);
          // 可以在这里绘制内容
          offContext.strokeRect(50, 50, 200, 150);
          // 将离屏绘制渲染的图像在普通画布上显示
          let image = this.offCanvas.transferToImageBitmap();
          this.context.transferFromImageBitmap(image);
        })
    }
    .width('100%')
    .height('100%')
  }
}
![]()
在画布组件中,通过CanvasRenderingContext2D对象和OffscreenCanvasRenderingContext2D对象在Canvas组件上进行绘制时调用的接口相同,另外,接口参数如无特别说明,单位均为vp。
- 在Canvas上加载Lottie动画时,需要先按照如下方式下载Lottie。
import lottie from '@ohos/lottie'
具体接口请参考lottie。
初始化画布组件
onReady(event: () => void)是Canvas组件初始化完成时的事件回调,调用该事件后,可获取Canvas组件的确定宽高,进一步使用CanvasRenderingContext2D对象和OffscreenCanvasRenderingContext2D对象调用相关API进行图形绘制。
Canvas(this.context)
  .width('100%')
  .height('100%')
  .backgroundColor('#F5DC62')
  .onReady(() => {
    this.context.fillStyle = '#0097D4';
    this.context.fillRect(50, 50, 100, 100);
  })

画布组件绘制方式
在Canvas组件的事件回调onReady()被调用之后,开发者可以直接使用Canvas组件进行绘制。或者可以脱离Canvas组件和onReady()生命周期,单独定义Path2D对象构造理想的路径,并在onReady()调用之后使用Canvas组件进行绘制。
- 通过CanvasRenderingContext2D对象直接调用相关API进行绘制。
Canvas(this.context)
  .width('100%')
  .height('100%')
  .backgroundColor('#F5DC62')
  .onReady(() => {
    this.context.beginPath();
    this.context.moveTo(50, 50);
    this.context.lineTo(280, 160);
    this.context.stroke();
  })

- 先单独定义path2D对象构造理想的路径,再通过调用CanvasRenderingContext2D对象和OffscreenCanvasRenderingContext2D对象的stroke接口或者fill接口进行绘制,具体使用可以参考Path2D对象。
Canvas(this.context2)
  .width('100%')
  .height('100%')
  .backgroundColor('#F5DC62')
  .onReady(() => {
    let region = new Path2D();
    region.arc(100, 75, 50, 0, 6.28);
    this.context2.stroke(region);
  })

画布组件常用方法
OffscreenCanvasRenderingContext2D对象和CanvasRenderingContext2D对象提供了大量的属性和方法,可以用来绘制文本、图形,处理像素等,是Canvas组件的核心。常用接口有fill(对封闭路径进行填充)、clip(设置当前路径为剪切路径)、stroke(进行边框绘制操作)等等,同时提供了fillStyle(指定绘制的填充色)、globalAlpha(设置透明度)与strokeStyle(设置描边的颜色)等属性修改绘制内容的样式。将通过以下几个方面简单介绍画布组件常见使用方法:
Canvas(this.context)
  .width('100%')
  .height('100%')
  .backgroundColor('#F5DC62')
  .onReady(() => {
    // 绘制矩形
    this.context.beginPath();
    this.context.rect(100, 50, 100, 100);
    this.context.stroke();
    // 绘制圆形
    this.context.beginPath();
    this.context.arc(150, 250, 50, 0, 6.28);
    this.context.stroke();
    // 绘制椭圆
    this.context.beginPath();
    this.context.ellipse(150, 450, 50, 100, Math.PI * 0.25, Math.PI * 0, Math.PI * 2);
    this.context.stroke();
  })

-
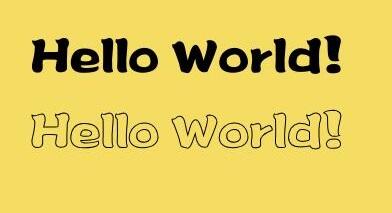
绘制文本。
可以通过fillText(文本填充)、strokeText(文本描边)等接口进行文本绘制,示例中设置了font为50像素高加粗的"sans-serif"字体,然后调用fillText方法在(50, 100)处绘制文本"Hello World!",设置strokeStyle为红色,lineWidth为2,font为50像素高加粗的"sans-serif"字体,然后调用strokeText方法在(50, 150)处绘制文本"Hello World!"的轮廓。
Canvas(this.context)
  .width('100%')
  .height('100%')
  .backgroundColor('#F5DC62')
  .onReady(() => {
    // 文本填充
    this.context.font = '50px bolder sans-serif';
    this.context.fillText('Hello World!', 50, 100);
    // 文本描边
    this.context.strokeStyle = '#ff0000';
    this.context.lineWidth = 2;
    this.context.font = '50px bolder sans-serif';
    this.context.strokeText('Hello World!', 50, 150);
  })

-
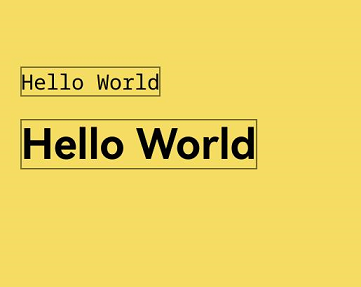
绘制文本边框。
可以通过measureText(文本测量)计算绘制文本的宽度和高度,使用测量的宽度和高度作为边框的尺寸。在示例中,设置textBaseline为'top',font为30像素的"monospace"字体,通过measureText测量出文本的宽度和高度,然后调用fillText方法在(20, 100)处绘制文本"Hello World!",并调用strokeRect方法在同一位置使用测量的宽度和高度绘制相应尺寸的边框。接着,设置font为60像素的粗体"sans-serif"字体,再次通过measureText测量文本的宽度和高度,接着调用fillText方法在(20, 150)处绘制文本"Hello World!",并调用strokeRect方法在同一位置使用测量的宽度和高度绘制对应尺寸的边框。
// xxx.ets
@Entry
@Component
struct CanvasComponentTextBorder {
  drawText: string = 'Hello World'
  private settings: RenderingContextSettings = new RenderingContextSettings(true);
  private context: CanvasRenderingContext2D = new CanvasRenderingContext2D(this.settings);

  build() {
    Flex({ direction: FlexDirection.Column, alignItems: ItemAlign.Center, justifyContent: FlexAlign.Center }) {
      Canvas(this.context)
        .width('100%')
        .height('100%')
        .backgroundColor('#F5DC62')
        .onReady(() => {
          // 文本的水平对齐方式为'top'
          this.context.textBaseline = 'top';
          // 文本字号为30px,字体系列为monospace
          this.context.font = '30px monospace';
          let textWidth = this.context.measureText(this.drawText).width;
          let textHeight = this.context.measureText(this.drawText).height;
          this.context.fillText(this.drawText, 20, 100);
          this.context.strokeRect(20, 100, textWidth, textHeight);
          // 文本字体粗细为粗体,字号为60px,字体系列为sans-serif
          this.context.font = 'bold 60px sans-serif';
          textWidth = this.context.measureText(this.drawText).width;
          textHeight = this.context.measureText(this.drawText).height;
          this.context.fillText(this.drawText, 20, 150);
          this.context.strokeRect(20, 150, textWidth, textHeight);
        })
    }
    .width('100%')
    .height('100%')
  }
}
-
使用自定义字体绘制文本。
从API version 20开始,可以通过getGlobalInstance获取应用全局字体管理器的实例,然后使用loadFontSync接口从设置的路径中加载自定义字体并通过font(设置文本绘制中的字体样式)接口设置文本绘制中的字体样式,接着通过fillText(绘制填充类文本)、strokeText(绘制描边类文本)等接口进行文本绘制。
import { text } from '@kit.ArkGraphics2D';

@Entry
@Component
struct CustomFont {
  private settings: RenderingContextSettings = new RenderingContextSettings(true);
  private context: CanvasRenderingContext2D = new CanvasRenderingContext2D(this.settings);

  build() {
    Flex({ direction: FlexDirection.Column, alignItems: ItemAlign.Center, justifyContent: FlexAlign.Center }) {
      Canvas(this.context)
        .width('100%')
        .height('100%')
        .backgroundColor('#F5DC62')
        .onReady(() => {
          // 加载自定义字体
          let fontCollection = text.FontCollection.getGlobalInstance();
          fontCollection.loadFontSync('customFont', $rawfile('customFont.ttf'));
          this.context.font = '30vp customFont';
          this.context.fillText('Hello World!', 20, 50);
          this.context.strokeText('Hello World!', 20, 100);
        })
    }
    .width('100%')
    .height('100%')
  }
}
-
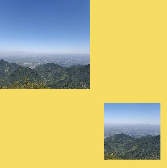
绘制图片和图像像素信息处理。
可以通过drawImage(图像绘制)、putImageData(使用ImageData数据填充新的矩形区域)等接口绘制图片,通过createImageData(创建新的ImageData 对象)、getPixelMap(以当前canvas指定区域内的像素创建PixelMap对象)、getImageData(以当前canvas指定区域内的像素创建ImageData对象)等接口进行图像像素信息处理。
@Entry
@Component
struct CanvasComponentDrawingPictureAndImagePixel {
  private settings: RenderingContextSettings = new RenderingContextSettings(true);
  private context: CanvasRenderingContext2D = new CanvasRenderingContext2D(this.settings);
  private offCanvas: OffscreenCanvas = new OffscreenCanvas(600, 600);
  // "/common/images/image.png"需要替换为开发者所需的图像资源文件
  private img: ImageBitmap = new ImageBitmap('/common/images/image.png');

  build() {
    Flex({ direction: FlexDirection.Column, alignItems: ItemAlign.Center, justifyContent: FlexAlign.Center }) {
      Canvas(this.context)
        .width('100%')
        .height('100%')
        .backgroundColor('#F5DC62')
        .onReady(() => {
          let offContext = this.offCanvas.getContext('2d', this.settings);
          // 使用drawImage接口将图片画在(0,0)为起点,宽高130的区域
          offContext.drawImage(this.img, 0, 0, 130, 130);
          // 使用getImageData接口,获得canvas组件区域中,(50,50)为起点,宽高130范围内的绘制内容
          let imageData = offContext.getImageData(50, 50, 130, 130);
          // 使用putImageData接口将得到的ImageData画在起点为(150, 150)的区域中
          offContext.putImageData(imageData, 150, 150);
          // 将离屏绘制的内容画到canvas组件上
          let image = this.offCanvas.transferToImageBitmap();
          this.context.transferFromImageBitmap(image);
        })
    }
    .width('100%')
    .height('100%')
  }
}
-
其他方法。
Canvas中还提供其他类型的方法。渐变(CanvasGradient对象)相关的方法:createLinearGradient(创建一个线性渐变色)、createRadialGradient(创建一个径向渐变色)等。
Canvas(this.context)
  .width('100%')
  .height('100%')
  .backgroundColor('#F5DC62')
  .onReady(() => {
    // 创建一个径向渐变色的CanvasGradient对象
    let grad = this.context.createRadialGradient(200, 200, 50, 200, 200, 200);
    // 为CanvasGradient对象设置渐变断点值,包括偏移和颜色
    grad.addColorStop(0.0, '#E87361');
    grad.addColorStop(0.5, '#FFFFF0');
    grad.addColorStop(1.0, '#BDDB69');
    // 用CanvasGradient对象填充矩形
    this.context.fillStyle = grad;
    this.context.fillRect(0, 0, 400, 400);
  })

使用状态变量驱动画布刷新
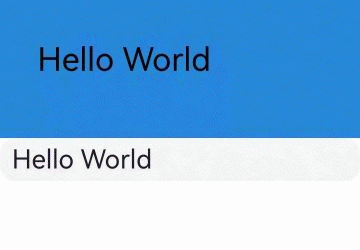
可以使用状态变量来驱动Canvas刷新,将变化的数据通过@Watch监听,并绑定自定义的draw()方法。当数据刷新时,@Watch绑定的方法会执行绘制逻辑,使Canvas刷新。
@Entry
@Component
struct CanvasContentUpdate {
  private settings: RenderingContextSettings = new RenderingContextSettings(true);
  private context: CanvasRenderingContext2D = new CanvasRenderingContext2D(this.settings);
  @State @Watch('draw')content: string = 'Hello World';

  draw() {
    this.context.clearRect(0, 0, 400, 200); // 清空Canvas的内容
    this.context.fillText(this.content, 50, 100); // 重新绘制
  }

  build() {
    Column() {
      Canvas(this.context)
        .width('100%')
        .height('25%')
        .backgroundColor('rgb(39, 135, 217)')
        .onReady(() => {
          this.context.font = '65px sans-serif';
          this.context.fillText(this.content, 50, 100);
        })
      TextInput({
        text:$$this.content // 修改文本输入框里的内容时,状态变量的更新会驱动Canvas刷新
      })
        .fontSize(35)
    }
    .width('100%')
    .height('100%')
  }
}
控制在画布组件不可见时不进行绘制
可以使用以下两种方式监听Canvas组件可见性,避免不可见时仍在无效绘制。
-
从API version 13开始,使用setOnVisibleAreaApproximateChange接口监听Canvas组件可见性。
import { ColorMetrics } from '@kit.ArkUI';@Entry@Componentstruct Page {private canvasContext: CanvasRenderingContext2D = new CanvasRenderingContext2D()private timerId: number = -1;drawRandomCircle(): void {let center: [number, number] = [Math.random() * 200 + 50, Math.random() * 200 + 50]let radius: number = Math.random() * 20 + 10let color: ColorMetrics =ColorMetrics.rgba(Math.floor(Math.random() * 255), Math.floor(Math.random() * 255),Math.floor(Math.random() * 255))// 清空原先内容与画布状态this.canvasContext.reset()// 开始绘制this.canvasContext.fillStyle = color.colorlet path: Path2D = new Path2D()path.ellipse(center[0], center[1], radius, radius, 0, 0, Math.PI * 2)this.canvasContext.fill(path)}build() {Flex({ direction: FlexDirection.Column, alignItems: ItemAlign.Center, justifyContent: FlexAlign.Center }) {Canvas(this.canvasContext).width(300).height(300).onReady(() => {let frameNode = this.canvasContext.canvas;frameNode.commonEvent.setOnVisibleAreaApproximateChange({ ratios: [0.0] },(isVisible: boolean, currentRatio: number) => {// canvas不可见if (!isVisible && currentRatio <= 0) {clearInterval(this.timerId)this.timerId = -2}// canvas可见if (isVisible) {if (this.timerId == -2) {this.timerId = setInterval(() => {this.drawRandomCircle()}, 500)}}})})Button("draw sth").onClick(() => {if (this.timerId < 0) {this.timerId = setInterval(() => {this.drawRandomCircle()}, 500)}})}.width('100%').height('100%')}}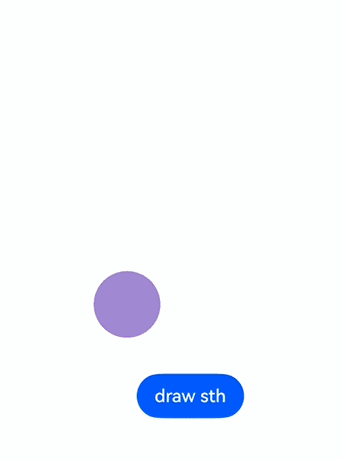
-
从API version 17开始,使用onVisibleAreaApproximateChange接口监听Canvas组件可见性。
import { ColorMetrics } from '@kit.ArkUI';@Entry@Componentstruct Page {private canvasContext: CanvasRenderingContext2D = new CanvasRenderingContext2D()private timerId: number = -1;drawRandomCircle(): void {let center: [number, number] = [Math.random() * 200 + 50, Math.random() * 200 + 50]let radius: number = Math.random() * 20 + 10let color: ColorMetrics =ColorMetrics.rgba(Math.floor(Math.random() * 255), Math.floor(Math.random() * 255),Math.floor(Math.random() * 255))// 清空原先内容与画布状态this.canvasContext.reset()// 开始绘制this.canvasContext.fillStyle = color.colorlet path: Path2D = new Path2D()path.ellipse(center[0], center[1], radius, radius, 0, 0, Math.PI * 2)this.canvasContext.fill(path)}build() {Flex({ direction: FlexDirection.Column, alignItems: ItemAlign.Center, justifyContent: FlexAlign.Center }) {Canvas(this.canvasContext).width(300).height(300).onVisibleAreaApproximateChange({ ratios: [0.0] },(isVisible: boolean, currentRatio: number) => {// canvas不可见if (!isVisible && currentRatio <= 0) {clearInterval(this.timerId)this.timerId = -2}// canvas可见if (isVisible) {if (this.timerId == -2) {this.timerId = setInterval(() => {this.drawRandomCircle()}, 500)}}})Button("draw sth").onClick(() => {if (this.timerId < 0) {this.timerId = setInterval(() => {this.drawRandomCircle()}, 500)}})}.width('100%').height('100%')}}
场景示例
- 绘制规则基础形状。
@Entry
@Component
struct ClearRect {
  private settings: RenderingContextSettings = new RenderingContextSettings(true);
  private context: CanvasRenderingContext2D = new CanvasRenderingContext2D(this.settings);

  build() {
    Flex({ direction: FlexDirection.Column, alignItems: ItemAlign.Center, justifyContent: FlexAlign.Center }) {
      Canvas(this.context)
        .width('100%')
        .height('100%')
        .backgroundColor('#F5DC62')
        .onReady(() => {
          // 设定填充样式,填充颜色设为蓝色
          this.context.fillStyle = '#0097D4';
          // 以(50, 50)为左上顶点,画一个宽高200的矩形
          this.context.fillRect(50, 50, 200, 200);
          // 以(70, 70)为左上顶点,清除宽150高100的区域
          this.context.clearRect(70, 70, 150, 100);
        })
    }
    .width('100%')
    .height('100%')
  }
}

- 绘制不规则图形。
@Entry
@Component
struct Path2d {
  private settings: RenderingContextSettings = new RenderingContextSettings(true);
  private context: CanvasRenderingContext2D = new CanvasRenderingContext2D(this.settings);

  build() {
    Row() {
      Column() {
        Canvas(this.context)
          .width('100%')
          .height('100%')
          .backgroundColor('#F5DC62')
          .onReady(() => {
            // 使用Path2D的接口构造一个五边形
            let path = new Path2D();
            path.moveTo(150, 50);
            path.lineTo(50, 150);
            path.lineTo(100, 250);
            path.lineTo(200, 250);
            path.lineTo(250, 150);
            path.closePath();
            // 设定填充色为蓝色
            this.context.fillStyle = '#0097D4';
            // 使用填充的方式,将Path2D描述的五边形绘制在canvas组件内部
            this.context.fill(path);
          })
      }
      .width('100%')
    }
    .height('100%')
  }
}

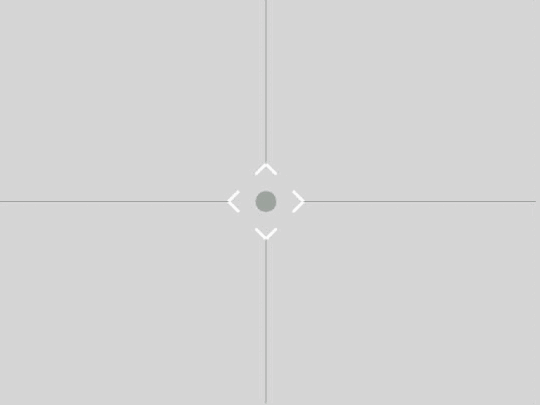
-
绘制可拖动的光标。
可以通过beginPath、moveTo、lineTo和arc方法设置光标的位置,使用stroke和fill方法绘制光标,将是否按下和位置变化通过@Watch监听,并绑定自定义的drawCursor()方法。当拖动光标时,@Watch绑定的方法会执行绘制逻辑,计算并更新光标的颜色和位置。
@Entry
@Component
struct CursorMoving {
  // 监听是否按下,刷新光标颜色
  @State @Watch('drawCursor') isTouchDown: boolean = false;
  // 监听位置变化,刷新页面
  @State @Watch('drawCursor') cursorPosition: RectPosition = {
    x: 0,
    y: 0,
    width: 0,
    height: 0,
  };
  private settings: RenderingContextSettings = new RenderingContextSettings(true);
  private canvasContext: CanvasRenderingContext2D = new CanvasRenderingContext2D(this.settings);
  private sw: number = 360; // Canvas固定宽度
  private sh: number = 270; // Canvas固定高度
  private cursorWH: number = 50; // 光标区域宽高
  private dashedLineW: number = 7; // 光标宽高
  private arcRadius: number = 6; // 光标中心圆半径
  private isReadyMove: boolean = false;
  private touchPosition: Position = {
    x: 0,
    y: 0,
  };
  private cursorCenterPosition: Position = {
    x: 0,
    y: 0,
  };

  build() {
    Column() {
      // 绘制光标
      Canvas(this.canvasContext)
        .width(this.sw)
        .height(this.sh)
        .backgroundColor('#D5D5D5')
        .onReady(() => {
          this.cursorPosition.x = (this.sw - this.cursorWH) / 2;
          this.cursorPosition.y = (this.sh - this.cursorWH) / 2;
          this.cursorPosition.width = this.cursorWH;
          this.cursorPosition.height = this.cursorWH;
          this.cursorCenterPosition = {
            x: this.cursorPosition.x + this.cursorPosition.width / 2,
            y: this.cursorPosition.y + this.cursorPosition.height / 2
          };
          this.drawCursor();
        })
        .onTouch(event => {
          if (event.type === TouchType.Down) {
            this.isReadyMove = this.isTouchCursorArea(event.touches[0]);
            if (this.isReadyMove) {
              this.isTouchDown = true;
            }

            this.touchPosition = {
              x: event.touches[0].displayX,
              y: event.touches[0].displayY
            };
          } else if (event.type === TouchType.Move) {
            if (this.isReadyMove) {
              let moveX = event.changedTouches[0].displayX - this.touchPosition.x;
              let moveY = event.changedTouches[0].displayY - this.touchPosition.y;
              this.touchPosition = {
                x: event.changedTouches[0].displayX,
                y: event.changedTouches[0].displayY
              };
              this.cursorPosition.x += moveX;
              this.cursorPosition.y += moveY;

              this.cursorCenterPosition = {
                x: this.cursorPosition.x + this.cursorPosition.width / 2,
                y: this.cursorPosition.y + this.cursorPosition.height / 2
              };
              // 光标区域中心点位置限制
              if (this.cursorCenterPosition.x < 0) {
                this.cursorPosition.x = -this.cursorPosition.width / 2;
              }
              if (this.cursorCenterPosition.y < 0) {
                this.cursorPosition.y = -this.cursorPosition.height / 2;
              }
              if (this.cursorCenterPosition.x > this.sw) {
                this.cursorPosition.x = this.sw - this.cursorPosition.width / 2;
              }
              if (this.cursorCenterPosition.y > this.sh) {
                this.cursorPosition.y = this.sh - this.cursorPosition.height / 2;
              }
            }
          } else {
            this.isTouchDown = false;
          }
        });
    }
    .height('100%')
    .width('100%')
    .justifyContent(FlexAlign.Center)
  }

  // 绘制裁剪框
  drawCursor() {
    // 算出菱形四个点
    let positionL: Position = { x: this.cursorPosition.x, y: this.cursorPosition.y + this.cursorPosition.height / 2 };
    let positionT: Position = { x: this.cursorPosition.x + this.cursorPosition.width / 2, y: this.cursorPosition.y };
    let positionR: Position = {
      x: this.cursorPosition.x + this.cursorPosition.width,
      y: this.cursorPosition.y + this.cursorPosition.height / 2
    };
    let positionB: Position = {
      x: this.cursorPosition.x + this.cursorPosition.width / 2,
      y: this.cursorPosition.y + this.cursorPosition.height
    };
    let lineWidth = 2;
    this.canvasContext.clearRect(0, 0, this.sw, this.sh);
    this.canvasContext.lineWidth = lineWidth;
    this.canvasContext.strokeStyle = this.isTouchDown ? '#ff1a5cae' : '#ffffffff';

    // 画出四角
    this.canvasContext.beginPath();
    this.canvasContext.moveTo(positionL.x + this.dashedLineW, positionL.y - this.dashedLineW);
    this.canvasContext.lineTo(positionL.x, positionL.y);
    this.canvasContext.lineTo(positionL.x + this.dashedLineW, positionL.y + this.dashedLineW);

    this.canvasContext.moveTo(positionT.x - this.dashedLineW, positionT.y + this.dashedLineW);
    this.canvasContext.lineTo(positionT.x, positionT.y);
    this.canvasContext.lineTo(positionT.x + this.dashedLineW, positionT.y + this.dashedLineW);

    this.canvasContext.moveTo(positionR.x - this.dashedLineW, positionR.y - this.dashedLineW);
    this.canvasContext.lineTo(positionR.x, positionR.y);
    this.canvasContext.lineTo(positionR.x - this.dashedLineW, positionR.y + this.dashedLineW);

    this.canvasContext.moveTo(positionB.x - this.dashedLineW, positionB.y - this.dashedLineW);
    this.canvasContext.lineTo(positionB.x, positionB.y);
    this.canvasContext.lineTo(positionB.x + this.dashedLineW, positionB.y - this.dashedLineW);

    this.canvasContext.stroke();

    // 画出中心圆
    this.canvasContext.beginPath();
    this.canvasContext.strokeStyle = this.isTouchDown ? '#ff1a5cae' : '#ff9ba59b';
    this.canvasContext.fillStyle = this.isTouchDown ? '#ff1a5cae' : '#ff9ba59b';
    this.canvasContext.arc(this.cursorPosition.x + this.cursorPosition.width / 2,
      this.cursorPosition.y + this.cursorPosition.width / 2, this.arcRadius, 0, 2 * Math.PI);
    this.canvasContext.fill();
    this.canvasContext.stroke();

    // 画出四条线
    this.canvasContext.beginPath();
    this.canvasContext.lineWidth = 0.7;
    this.canvasContext.moveTo(positionL.x, positionL.y);
    this.canvasContext.lineTo(0, positionL.y);

    this.canvasContext.moveTo(positionT.x, positionT.y);
    this.canvasContext.lineTo(positionT.x, 0);

    this.canvasContext.moveTo(positionR.x, positionR.y);
    this.canvasContext.lineTo(this.sw, positionR.y);

    this.canvasContext.moveTo(positionB.x, positionB.y);
    this.canvasContext.lineTo(positionB.x, this.sh);

    this.canvasContext.stroke();
  }

  // 判断点击位置是否在棱形中
  isTouchCursorArea(touch: TouchObject) {
    let tempLength = Math.sqrt((touch.x - this.cursorCenterPosition.x) * (touch.x - this.cursorCenterPosition.x) +
      (touch.y - this.cursorCenterPosition.y) * (touch.y - this.cursorCenterPosition.y));
    if (tempLength < (this.cursorWH / 2 / 1.414)) {
      return true;
    }
    return false;
  }
}

export interface RectPosition {
  x: number;
  y: number;
  height: number;
  width: number;
};

export interface Position {
  x: number;
  y: number;
};