菜单控制(Menu)
Menu是菜单接口,一般用于鼠标右键弹窗、点击弹窗等。具体用法请参考菜单控制。
使用bindContextMenu并设置预览图,菜单弹出时有蒙层,此时为模态。
使用bindMenu或bindContextMenu未设置预览图时,菜单弹出无蒙层,此时为非模态。
创建默认样式的菜单
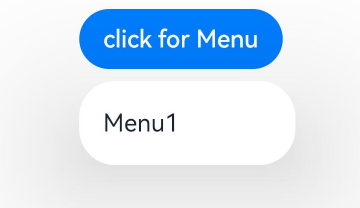
菜单需要调用bindMenu接口来实现。bindMenu响应绑定组件的点击事件,绑定组件后手势点击对应组件后即可弹出。
Button('click for Menu')
  .bindMenu([
    {
      value: 'Menu1',
      action: () => {
        hilog.info(0xFF00, 'DialogProject', 'handle Menu1 select');
      }
    }
  ])
创建自定义样式的菜单
当默认样式不满足开发需求时,可使用@Builder自定义菜单内容,通过bindMenu接口进行菜单的自定义。
使用@Builder自定义菜单内容
import { hilog } from '@kit.PerformanceAnalysisKit';
class Tmp {
// 请将$r('app.media.view_list_filled')替换为实际资源文件
public iconStr2: ResourceStr = $r('app.media.view_list_filled');
set(val: Resource) {
this.iconStr2 = val;
}
}
@Entry
@Component
export struct BuilderCustomMenuExample {
@State select: boolean = true;
// 请将$r('app.media.view_list_filled')替换为实际资源文件
private iconStr: ResourceStr = $r('app.media.view_list_filled');
private iconStr2: ResourceStr = $r('app.media.view_list_filled');
// 请将$r('app.string.copy')替换为实际资源文件,在本示例中该资源文件的value值为"复制"
private copy: ResourceStr = $r('app.string.copy');
// 请将$r('app.string.paste')替换为实际资源文件,在本示例中该资源文件的value值为"粘贴"
private paste: ResourceStr = $r('app.string.paste');
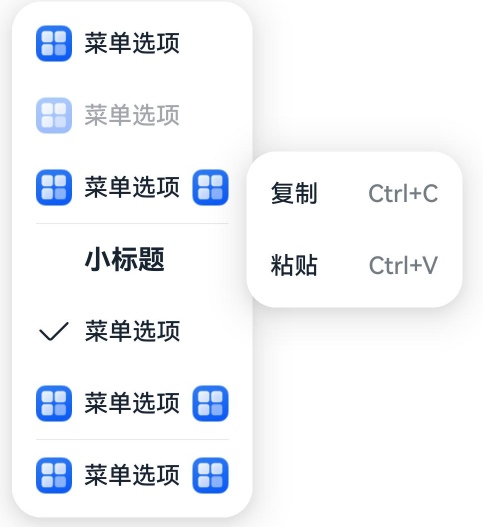
@Builder
SubMenu() {
Menu() {
MenuItem({ content: this.copy, labelInfo: 'Ctrl+C' })
MenuItem({ content: this.paste, labelInfo: 'Ctrl+V' })
}
}
@Builder
MyMenu() {
Menu() {
// 请将$r('app.string.menu_selection')替换为实际资源文件,在本示例中该资源文件的value值为"菜单选项"
// 请将$r('app.media.icon')替换为实际资源文件
// 请将$r('app.media.arrow_right_filled')替换为实际资源文件
MenuItem({ startIcon: $r('app.media.icon'), content: $r('app.string.menu_selection') })
MenuItem({ startIcon: $r('app.media.icon'), content: $r('app.string.menu_selection') }).enabled(false)
MenuItem({
startIcon: this.iconStr,
content: $r('app.string.menu_selection'),
endIcon: $r('app.media.arrow_right_filled'),
// 当builder参数进行配置时,表示与menuItem项绑定了子菜单。鼠标hover在该菜单项时,会显示子菜单。
builder: this.SubMenu
})
// 请将$r('app.string.menu_subtitle')替换为实际资源文件,在本示例中该资源文件的value值为"小标题"
MenuItemGroup({ header: $r('app.string.menu_subtitle') }) {
// 请将$r('app.string.menu_selection')替换为实际资源文件,在本示例中该资源文件的value值为"菜单选项"
MenuItem({ content: $r('app.string.menu_selection') })
.selectIcon(true)
.selected(this.select)
.onChange((selected) => {
hilog.info(0xFF00, 'DialogProject', 'menuItem select' + selected);
let str: Tmp = new Tmp();
str.set($r('app.media.icon'));
})
// 请将$r('app.string.menu_selection')替换为实际资源文件,在本示例中该资源文件的value值为"菜单选项"
// 请将$r('app.media.view_list_filled')替换为实际资源文件
// 请将$r('app.media.arrow_right_filled')替换为实际资源文件
MenuItem({
startIcon: $r('app.media.view_list_filled'),
content: $r('app.string.menu_selection'),
endIcon: $r('app.media.arrow_right_filled'),
builder: this.SubMenu
})
}
// 请将$r('app.string.menu_selection')替换为实际资源文件,在本示例中该资源文件的value值为"菜单选项"
// 请将$r('app.media.arrow_right_filled')替换为实际资源文件
MenuItem({
startIcon: this.iconStr2,
content: $r('app.string.menu_selection'),
endIcon: $r('app.media.arrow_right_filled')
})
}
}
build() {
// ...
}
}
使用bindMenu属性绑定组件
Button('click for Menu')
  .bindMenu(this.MyMenu)
创建支持右键或长按的菜单
通过bindContextMenu接口自定义菜单,设置菜单弹出的触发方式,触发方式为右键或长按。使用bindContextMenu弹出的菜单项是在独立子窗口内的,可显示在应用窗口外部。
-
使用@Builder自定义菜单内容,与上文写法相同。
-
确认菜单的弹出方式,并使用bindContextMenu属性绑定组件。示例中为右键弹出菜单。
Button('Right-click for Menu').bindContextMenu(this.MyMenu, ResponseType.RightClick)
菜单弹出时振动效果
菜单从API version 18开始支持振动效果。菜单弹出时,默认不振动。若希望菜单弹出时有振动效果,可以通过ContextMenuOptions的hapticFeedbackMode属性,设置菜单弹出时的振动模式。
-
只有一级菜单可配置弹出时振动效果。
-
仅当应用具备ohos.permission.VIBRATE权限,且用户启用了触感反馈时才会生效。开启触控反馈时,需要在工程的module.json5中配置声明权限的requestPermissions字段开启振动权限,配置如下:
"requestPermissions": [{"name": "ohos.permission.VIBRATE",}],
Button('click for Menu')
  .id('click for Menu')
  .bindMenu(this.MyMenu, { hapticFeedbackMode: HapticFeedbackMode.ENABLED})
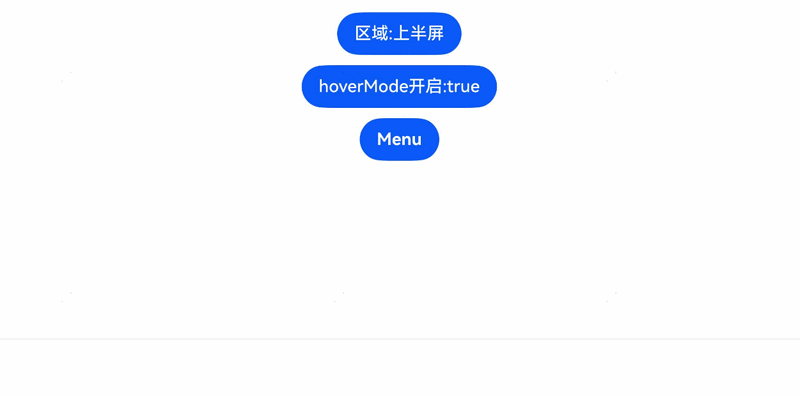
菜单支持避让中轴
从API version 18起,菜单支持中轴避让功能。从API version 20开始,在2in1设备上默认启用(仅在窗口处于瀑布模式时产生避让)。开发者可通过ContextMenuOptions中的enableHoverMode属性,控制菜单是否启用中轴避让。
![]()
- 如果菜单的点击位置在中轴区域,则菜单不会避让。
- 2in1设备上需同时满足窗口处于瀑布模式才会产生避让。
@Entry
@Component
export struct SupportAvoidCentralAxisMenuExample {
  @State message: string = 'Hello World';
  // 请在resources\base\element\string.json文件中配置name为'xxx',value为非空字符串的资源
  @State upScreen: string =
    this.getUIContext().getHostContext()?.resourceManager.getStringByNameSync('Upper_half_screen') as string;
  @State middleAxle: string =
    this.getUIContext().getHostContext()?.resourceManager.getStringByNameSync('Middle_axle') as string;
  @State lowerScreen: string =
    this.getUIContext().getHostContext()?.resourceManager.getStringByNameSync('Lower_half_screen') as string;
  @State zone: string =
    this.getUIContext().getHostContext()?.resourceManager.getStringByNameSync('zone') as string;
  @State hoverModeStart: string =
    this.getUIContext().getHostContext()?.resourceManager.getStringByNameSync('hoverMode_start') as string;
  // 请将$r('app.media.startIcon')替换为实际资源文件
  private iconStr: Resource = $r('app.media.startIcon');
  @State index: number = 0;
  @State arrayStr: Array<string> = [this.upScreen, this.middleAxle, this.lowerScreen];
  @State enableHoverMode: boolean | undefined = true;
  @State showInSubwindow: boolean = false;

  @Builder
  MyMenu1() {
    Menu() {
      // 请将$r('app.string.menu_selection')替换为实际资源文件,在本示例中该资源文件的value值为"菜单选项"
      MenuItem({ startIcon: this.iconStr, content: $r('app.string.menu_selection') })
      MenuItem({ startIcon: this.iconStr, content: $r('app.string.menu_selection') })
      MenuItem({ startIcon: this.iconStr, content: $r('app.string.menu_selection') })
      MenuItem({ startIcon: this.iconStr, content: $r('app.string.menu_selection') })
    }
  }

  @State isShow: boolean = false;

  build() {
    NavDestination() {
      Column({ space: 5 }) {
        Button(this.zone + this.arrayStr[this.index])
          .onClick(() => {
            if (this.index < 2) {
              this.index++
            } else {
              this.index = 0
            }
          })

        Button(this.hoverModeStart + this.enableHoverMode)
          .id('hoverMode_start')
          .onClick(() => {
            if (this.enableHoverMode === undefined) {
              this.enableHoverMode = true
            } else if (this.enableHoverMode === true) {
              this.enableHoverMode = false
            } else {
              this.enableHoverMode = undefined
            }
          })
        Button('Menu')
          .fontWeight(FontWeight.Bold)
          .bindMenu(this.MyMenu1(), {
            enableHoverMode: this.enableHoverMode,
            showInSubWindow: this.showInSubwindow
          })
      }
      .height('100%')
      .width('100%')
    }
    // ...
  }
}
控制子窗菜单的事件透传
当菜单在子窗口中弹出时,默认情况下,菜单周围的事件会传递至所在窗口。从API version 20开始,开发者可通过ContextMenuOptions的modalMode属性设置子菜单弹出时的模态模式,以控制菜单周围事件是否传递。将modalMode设置为ModalMode.TARGET_WINDOW时,菜单周围的事件将不再传递,菜单下方的控件也不会响应事件。
@Entry
@Component
export struct EventTransSubWindowMenuExample {
  build() {
    NavDestination() {
      Column() {
      }
      .id('click')
      .bindContextMenu(this.contextMenuBuilder, ResponseType.RightClick, {
        modalMode: ModalMode.TARGET_WINDOW
      })
      .onClick(() => {
        this.getUIContext().getPromptAction().showToast({
          message: 'Clicked!'
        })
      })
      .width('100%')
      .height('100%')
    }
    // ...
  }

  @Builder
  bindMenuBuilder() {
    Menu() {
      MenuItem({ content: 'bindMenu item' }) {

      }
    }
  }

  @Builder
  contextMenuBuilder() {
    Menu() {
      MenuItem({ content: 'contextMenu item' }) {

      }
    }
  }
}
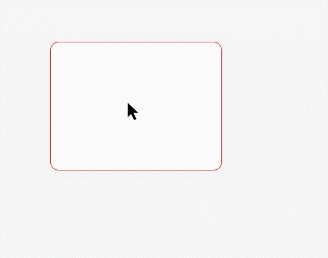
基于绑定组件指定位置弹出菜单
菜单从API version 20开始支持基于绑定组件在指定位置弹出。通过设置水平与垂直偏移量,控制菜单相对于绑定组件左上角的弹出位置。与单独使用offset接口不同,此方法可使菜单覆盖显示在绑定组件上。需要指定弹出位置时,可使用ContextMenuOptions的anchorPosition属性进行设置。
![]()
- 当菜单处于预览状态时,设定的定位偏移量将无法生效。
- 预设的placement对齐参数将不再生效。
- 叠加offset参数的偏移量,最终确定菜单的精确显示位置。
- 当水平与垂直偏移量均设为负值时,菜单以绑定组件左下角为基准点进行显示。
- 当水平或垂直偏移量存在负值时,组件将以绑定组件的左上角为定位基准点,通过叠加偏移量参数实现反向偏移。
@Entry
@Component
export struct BindComponentMenuExample {
  @Builder
  MenuBuilder() {
    Column() {
      Menu() {
        MenuItemGroup() {
          // 请将$r('app.media.app_icon')替换为实际资源文件
          MenuItem({ startIcon: $r('app.media.app_icon'), content: 'Select Mixed Menu 1', labelInfo: '' })
          MenuItem({ startIcon: $r('app.media.app_icon'), content: 'Select Mixed Menu 2', labelInfo: '' })
          MenuItem({ startIcon: $r('app.media.app_icon'), content: 'Select Mixed Menu 3', labelInfo: '' })
        }
      }
    }
  }

  build() {
    NavDestination() {
      Column() {
        Text()
          .borderRadius(10)
          .width(200)
          .height(150)
          .borderWidth(1)
          .backgroundColor(Color.White)
          .borderColor(Color.Red)
          .margin({ top: 200, left: 125 })
          .bindContextMenu(this.MenuBuilder, ResponseType.RightClick, {
            anchorPosition: { x: 45, y: 50 },
          })
      }
      .alignItems(HorizontalAlign.Start)
      .width('100%')
      .height('100%')
      .backgroundColor('#F5F5F5')
    }
    // ...
  }
}