@State装饰器:组件内状态
被状态变量装饰器装饰的变量称为状态变量,使普通变量具备状态属性。当状态变量改变时,会触发其直接绑定的UI组件渲染更新。
在状态变量相关装饰器中,@State是最基础的装饰器,也是大部分状态变量的数据源。
在阅读@State文档前,建议开发者对状态管理框架有基本的了解。建议提前阅读:状态管理概述。最佳实践请参考状态管理最佳实践。常见问题请参考状态管理常见问题。
![]()
从API version 9开始,该装饰器支持在ArkTS卡片中使用。
从API version 11开始,该装饰器支持在元服务中使用。
概述
@State装饰的变量与声明式范式中的其他被装饰变量一样,是私有的,只能从组件内部访问,在声明时必须指定其类型并完成本地初始化;若需从父组件初始化,也可选择使用命名参数机制完成赋值。
@State装饰的变量拥有以下特性:
- @State装饰的变量生命周期与其所属自定义组件的生命周期相同。
装饰器使用规则说明
| @State变量装饰器 | 说明 |
|---|---|
| 装饰器参数 | 无 |
| 同步类型 | 不与父组件中任何类型的变量同步。 |
| 允许装饰的变量类型 | object、class、string、number、boolean、enum类型,以及这些类型的数组。 API version 10开始支持Date类型。 API version 11及以上支持Map、Set类型、undefined和null类型、ArkUI框架定义的联合类型Length、ResourceStr、ResourceColor类型以及这些类型的联合类型,示例见@State支持联合类型实例。 支持类型的场景见观察变化。 |
| 不允许装饰的变量类型 | 不支持装饰Function类型。 |
| 被装饰变量的初始值 | 必须本地初始化。 |
变量的传递/访问规则说明
| 传递/访问 | 说明 |
|---|---|
| 从父组件初始化 | 可以从父组件或本地初始化。 父组件传入非undefined值时覆盖本地初始值,否则使用@State的本地初始值。 支持父组件中的常规变量以及装饰器装饰的状态变量:@State、@Link、@Prop、@Provide、@Consume、@ObjectLink、@StorageLink、@StorageProp、@LocalStorageLink和@LocalStorageProp,初始化@State。需要注意:父组件传入的外部变量对@State初始化时,仅作为初始值,后续变量的变化不会同步至@State。 |
| 用于初始化子组件 | @State装饰的变量支持初始化子组件的常规变量、@State、@Link、@Prop、@Provide。 |
| 是否支持组件外访问 | 不支持,只能在组件内访问。 |
图1 初始化规则图示

观察变化和行为表现
并不是状态变量的所有更改都会引起UI的刷新,只有可以被框架观察到的修改才会引起UI刷新。本小节将介绍什么样的修改才能被观察到,以及观察到变化后,框架是怎么引起UI刷新的,即框架的行为表现是什么。
观察变化
-
当装饰的数据类型为boolean、string、number类型时,可以观察到数值的变化。
// 简单类型@State count: number = 0;// 可以观察到值的变化this.count = 1; -
当装饰的数据类型为class或Object时,可以观察到自身的赋值和属性赋值的变化,即Object.keys(observedObject)返回的所有属性。示例如下:
声明Person和Model类。
class Person {public value: string;constructor(value: string) {this.value = value;}}class Model {public value: string;public name: Person;constructor(value: string, person: Person) {this.value = value;this.name = person;}}@State装饰的类型是Model。
// class类型@State title: Model = new Model('Hello', new Person('World'));对@State装饰变量的赋值。
// class类型赋值this.title = new Model('Hi', new Person('ArkUI'));对@State装饰变量的属性赋值。
// class属性的赋值this.title.value = 'Hi';对嵌套对象的属性直接赋值无法被框架观察到,因此不会触发UI刷新。
// 嵌套的属性赋值观察不到this.title.name.value = 'ArkUI'; -
当装饰的对象是Array时,可以观察到Array整体的赋值及数组元素的赋值,同时可以通过调用Array的接口push, pop, shift, unshift, splice, copyWithin, fill, reverse, sort更新Array中的数据。数组项中嵌套的属性赋值无法观察。详见装饰Array类型变量。
-
当装饰的对象是Date时,可以观察到Date的赋值,以及通过调用Date的接口setFullYear, setMonth, setDate, setHours, setMinutes, setSeconds, setMilliseconds, setTime, setUTCFullYear, setUTCMonth, setUTCDate, setUTCHours, setUTCMinutes, setUTCSeconds, setUTCMilliseconds更新Date的属性,详见装饰Date类型变量。
-
当装饰的变量是Map时,可以观察到Map整体的赋值,以及通过调用Map的接口set, clear, delete更新Map的值。详见装饰Map类型变量。
-
当装饰的变量是Set时,可以观察到Set整体的赋值,以及通过调用Set的接口add, clear, delete更新Set的值。详见装饰Set类型变量。
框架行为
- 当状态变量改变时,查询依赖该状态变量的组件。
- 执行依赖该状态变量的组件更新方法,实现组件更新渲染。
限制条件
-
@State装饰的变量必须初始化,否则编译期会报错。
// 错误写法,编译报错@State count: number;// 正确写法@State count: number = 10; -
@State不支持装饰Function类型的变量,API version 23之前,框架会抛出运行时错误。
从API version 23开始,添加对@State装饰Function类型变量的校验,编译期会报错。
-
父组件传入undefined时,@State装饰的变量仍使用本地默认值进行初始化。
@Entry@Componentstruct Parent {@State count: number | undefined = undefined;build() {Column() {Text(`Parent count value: ${this.count}`).fontSize(20).margin(10)Child({ count: this.count })}}}@Componentstruct Child {@State count: number | undefined = 0;build() {Column() {Text(`Child count value: ${this.count}`).fontSize(20).margin(10)}}}
使用场景
装饰简单类型的变量
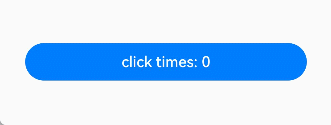
以下示例为@State装饰的简单类型,count被@State装饰成为状态变量,count的改变引起Button组件的刷新:
-
当状态变量count改变时,只能查询到Button组件与之关联。
-
执行Button组件的更新方法,实现按需刷新。
@Entry@Componentstruct MyComponent {@State count: number = 0; // 使用@State装饰简单类型变量build() {Row() {Column() {Button(`click times: ${this.count}`).onClick(() => {this.count += 1;}).width(300)}.width('100%')}.height('100%')}}
装饰class对象类型的变量
-
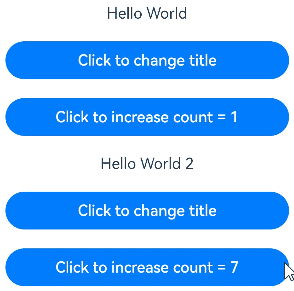
自定义组件MyComponent定义了被@State装饰的状态变量count和title,其中title的类型为自定义类Model。如果count或title的值发生变化,则查询MyComponent中使用该状态变量的UI组件,并进行重新渲染。
-
EntryComponent中有多个MyComponent组件实例,第一个MyComponent内部状态的更改不会影响第二个MyComponent。
class Model {public value: string;constructor(value: string) {this.value = value;}}@Entry@Componentstruct EntryComponent {build() {Column() {// 此处指定的参数都将在初始渲染时覆盖本地定义的默认值,并不是所有的参数都需要从父组件初始化MyComponent({ count: 1, increaseBy: 2 }).width(300)MyComponent({ title: new Model('Hello World 2'), count: 7 })}}}@Componentstruct MyComponent {@State title: Model = new Model('Hello World');@State count: number = 0;increaseBy: number = 1;build() {Column() {Text(`${this.title.value}`).margin(10)Button(`Click to change title`).onClick(() => {// @State变量的更新将触发上面的Text组件内容更新this.title.value = this.title.value === 'Hello ArkUI' ? 'Hello World' : 'Hello ArkUI';}).width(300).margin(10)Button(`Click to increase count = ${this.count}`).onClick(() => {// @State变量的更新将触发该Button组件的内容更新this.count += this.increaseBy;}).width(300).margin(10)}}}
从上述示例中,我们可以了解到@State变量的初始化机制:
-
上述示例中,在没有外部传入的情况下,使用默认的值进行本地初始化:
// title没有外部传入,使用本地的值new Model('Hello World')进行初始化MyComponent({ count: 1, increaseBy: 2 })// increaseBy没有外部传入,使用本地的值1进行初始化MyComponent({ title: new Model('Hello World 2'), count: 7 }) -
上述示例中,在有外部传入的情况下,使用外部传入的值进行初始化:
// count和increaseBy均有外部传入,分别使用传入的1和2进行初始化MyComponent({ count: 1, increaseBy: 2 })// title和count均有外部传入,分别使用传入的new Model('Hello World 2')和7进行初始化MyComponent({ title: new Model('Hello World 2'), count: 7 })
装饰Array类型变量
在下面的示例中,@State装饰的变量fruits的类型为Array<Fruit>,点击Button改变fruits的值,视图会随之刷新。
class Fruit {
  public name: string;

  constructor(name: string) {
    this.name = name;
  }
}

@Entry
@Component
struct ArraySample {
  @State fruits: Fruit[] = [new Fruit('apple'), new Fruit('banana')]; // 使用@State装饰Array类型变量

  build() {
    Row() {
      Column() {
        ForEach(this.fruits, (item: Fruit) => {
          Text(`${item.name}`)
            .fontSize(20)
            .margin(10)
        })
        // 对数组元素重新赋值,触发UI刷新
        Button('Set element at index 0')
          .onClick(() => {
            this.fruits[0] = new Fruit('orange');
          })
          .width(300)
          .margin(10)
        // 新增数组元素,触发UI刷新
        Button('Push element')
          .onClick(() => {
            this.fruits.push(new Fruit('cherry'));
          })
          .width(300)
          .margin(10)
        // 删除数组元素,触发UI刷新
        Button('Pop element')
          .onClick(() => {
            this.fruits.pop();
          })
          .width(300)
          .margin(10)
        // 对数组整体重新赋值,触发UI刷新
        Button('Reset array')
          .onClick(() => {
            this.fruits = [new Fruit('strawberry'), new Fruit('blueberry')];
          })
          .width(300)
          .margin(10)
        // 修改嵌套的属性,无法触发UI刷新
        Button('Modify element[0] property')
          .onClick(() => {
            this.fruits[0].name = 'pineapple';
          })
          .width(300)
          .margin(10)
      }
      .width('100%')
    }
    .height('100%')
  }
}

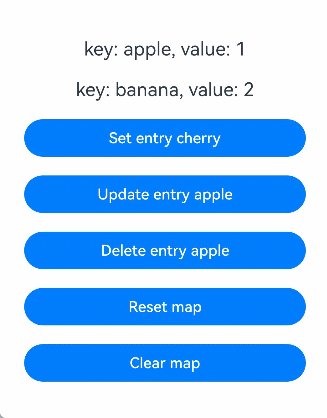
装饰Map类型变量
![]()
从API version 11开始,@State支持Map类型。
在下面的示例中,@State装饰的变量fruits的类型为Map<string, number>,点击Button改变fruits的值,视图会随之刷新。
@Entry
@Component
struct MapSample {
  @State fruits: Map<string, number> = new Map([['apple', 1], ['banana', 2]]); // 使用@State装饰Map类型变量

  build() {
    Row() {
      Column() {
        ForEach(Array.from(this.fruits.entries()), (item: [string, number]) => {
          Text(`key: ${item[0]}, value: ${item[1]}`)
            .fontSize(20)
            .margin(10)
        })
        // 新增键值对,触发UI刷新
        Button('Set entry cherry')
          .onClick(() => {
            this.fruits.set('cherry', 3);
          })
          .width(300)
          .margin(10)
        // 更新键值对,触发UI刷新
        Button('Update entry apple')
          .onClick(() => {
            this.fruits.set('apple', 4);
          })
          .width(300)
          .margin(10)
        // 删除键值对,触发UI刷新
        Button('Delete entry apple')
          .onClick(() => {
            this.fruits.delete('apple');
          })
          .width(300)
          .margin(10)
        // 对Map整体重新赋值,触发UI刷新
        Button('Reset map')
          .onClick(() => {
            this.fruits = new Map([['strawberry', 9], ['blueberry', 8]]);
          })
          .width(300)
          .margin(10)
        // 清空Map,触发UI刷新
        Button('Clear map')
          .onClick(() => {
            this.fruits.clear();
          })
          .width(300)
          .margin(10)
      }
      .width('100%')
    }
    .height('100%')
  }
}
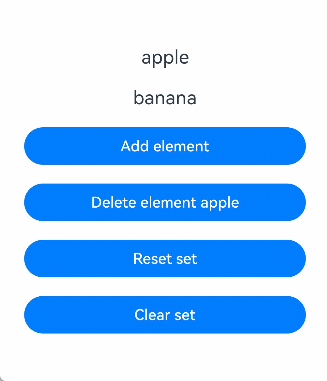
装饰Set类型变量
![]()
从API version 11开始,@State支持Set类型。
在下面的示例中,@State装饰的变量fruits的类型为Set<string>,点击Button改变fruits的值,视图会随之刷新。
@Entry
@Component
struct SetSample {
  @State fruits: Set<string> = new Set(['apple', 'banana']); // 使用@State装饰Set类型变量

  build() {
    Row() {
      Column() {
        ForEach(Array.from(this.fruits.entries()), (item: [string, string]) => {
          Text(`${item[0]}`)
            .fontSize(20)
            .margin(10)
        })
        // 新增元素,触发UI刷新
        Button('Add element')
          .onClick(() => {
            this.fruits.add('cherry');
          })
          .width(300)
          .margin(10)
        // 删除元素,触发UI刷新
        Button('Delete element apple')
          .onClick(() => {
            this.fruits.delete('apple');
          })
          .width(300)
          .margin(10)
        // 对Set整体重新赋值,触发UI刷新
        Button('Reset set')
          .onClick(() => {
            this.fruits = new Set(['strawberry', 'blueberry']);
          })
          .width(300)
          .margin(10)
        // 清空Set,触发UI刷新
        Button('Clear set')
          .onClick(() => {
            this.fruits.clear();
          })
          .width(300)
          .margin(10)
      }
      .width('100%')
    }
    .height('100%')
  }
}
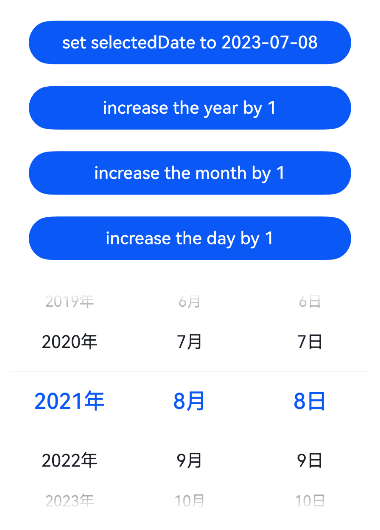
装饰Date类型变量
在下面的示例中,@State装饰的变量selectedDate的类型为Date,点击Button改变selectedDate的值,视图会随之刷新。
@Entry
@Component
struct DatePickerExample {
  @State selectedDate: Date = new Date('2021-08-08'); // 使用@State装饰Date类型变量

  build() {
    Row() {
      Column() {
        // 通过给selectedDate重新赋值新的Date实例,触发UI刷新
        Button('set selectedDate to 2023-07-08')
          .onClick(() => {
            this.selectedDate = new Date('2023-07-08');
          })
          .margin(10)
          .width(300)
        // 调用Date的setFullYear接口修改年份,触发UI刷新
        Button('increase the year by 1')
          .onClick(() => {
            this.selectedDate.setFullYear(this.selectedDate.getFullYear() + 1);
          })
          .margin(10)
          .width(300)
        // 调用Date的setMonth接口修改月份,触发UI刷新
        Button('increase the month by 1')
          .onClick(() => {
            this.selectedDate.setMonth(this.selectedDate.getMonth() + 1);
          })
          .margin(10)
          .width(300)
        // 调用Date的setDate接口修改日期,触发UI刷新
        Button('increase the day by 1')
          .onClick(() => {
            this.selectedDate.setDate(this.selectedDate.getDate() + 1);
          })
          .margin(10)
          .width(300)
        DatePicker({
          start: new Date('1970-1-1'),
          end: new Date('2100-1-1'),
          selected: this.selectedDate
        }).margin(20)
      }
      .width('100%')
    }
    .height('100%')
  }
}
State支持联合类型实例
@State支持联合类型和undefined和null,在下面的示例中,count类型为number | undefined,点击Button改变count的值,视图会随之刷新。
@Entry
@Component
struct UnionTypeSample {
  @State count: number | undefined = 0; // 使用@State装饰联合类型变量

  build() {
    Row() {
      Column() {
        Text(`count: ${this.count}`)
        // 将联合类型变量从number切换为undefined,触发UI刷新
        Button('change to undefined')
          .onClick(() => {
            this.count = undefined;
          })
          .width(300)
          .margin(10)
        // 将联合类型变量从undefined切换为number,触发UI刷新
        Button('change to number')
          .onClick(() => {
            this.count = 10;
          })
          .width(300)
          .margin(10)
      }
      .width('100%')
    }
    .height('100%')
  }
}
