相对布局 (RelativeContainer)
概述
在应用的开发过程中,经常需要设计复杂界面,此时涉及到多个相同或不同组件之间的嵌套。如果布局组件嵌套深度过深,或者嵌套组件数过多,会带来额外的开销。如果在布局的方式上进行优化,就可以有效的提升性能,减少时间开销。
RelativeContainer是一种采用相对布局的容器,支持容器内部的子元素设置相对位置关系,适用于处理界面复杂的场景,对多个子元素进行对齐和排列。子元素可以指定兄弟元素或父容器作为锚点,基于锚点进行相对位置布局。在使用锚点时,需注意子元素的相对位置关系,以避免出现错位或遮挡的情况。下图展示了一个 RelativeContainer的概念图,图中的虚线表示位置的依赖关系。
图1 相对布局示意图

子元素并不完全是上图中的依赖关系。比如,Item4可以以Item2为依赖锚点,也可以以RelativeContainer父容器为依赖锚点。
基本概念
- 参考边界:设置当前组件的哪个边界对齐到锚点。
- 锚点:通过锚点设置当前元素基于哪个元素确定位置。
- 对齐方式:通过对齐方式,设置当前元素是基于锚点的上中下对齐,还是基于锚点的左中右对齐。
- 链:将一系列组件以首尾相连的方式对齐,可以形成一条链。通过设置链的模式,可以指定链上元素的排列方式。
- 辅助线:辅助线是在容器内虚拟出的额外水平或垂直锚点,便于统一对齐至某个偏移位置。
- 屏障:屏障是指容器内一组指定组件在特定方向上的共同最远边界,例如,一组组件下方的屏障,是指这些组件底部边缘中最底部的那个边界。
设置依赖关系
设置参考边界
设置当前组件的哪个边界对齐到锚点。容器内子组件的参考边界区分水平方向和垂直方向。
-
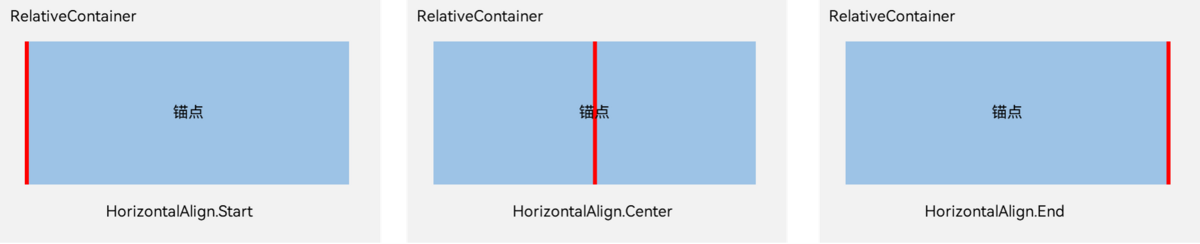
在水平方向上,可以按照起始(left)、居中(middle)或尾端(right)的组件边界与锚点对齐。当设置三个边界时,仅起始(left)和居中(middle)的边界设置生效。

-
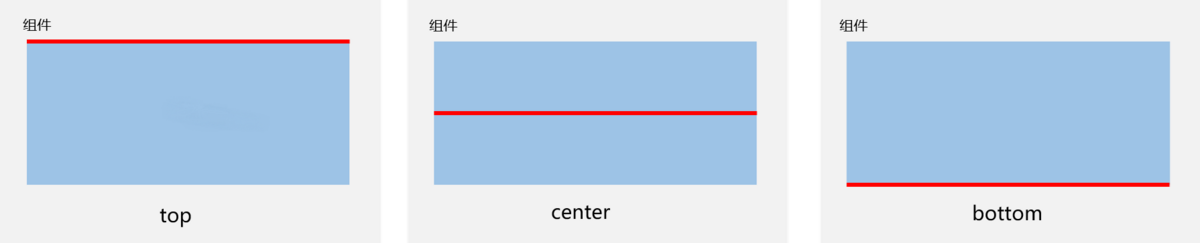
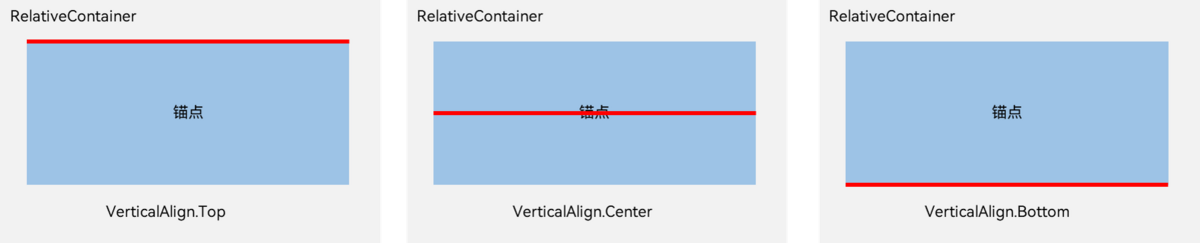
在垂直方向上,可以设置组件边界与锚点对齐,具体包括顶部(top)、居中(center)和底部(bottom)。当设置三个边界时,仅顶部(top)和居中(center)生效。
设置锚点
锚点设置涉及子元素相对于其父元素或兄弟元素的位置依赖关系。具体而言,子元素可以将其位置锚定到相对布局容器(RelativeContainer)、辅助线(guideline)、屏障(barrier)或其他子元素上。
为了准确定义锚点,RelativeContainer的子元素必须拥有唯一的组件标识(id),用于指定锚点信息。父元素RelativeContainer的标识默认为“__container__”,其他子元素的组件标识(id)则通过id属性设置。
![]()
-
未设置组件标识(id)的组件虽可显示,但无法被其他组件引用为锚点。相对布局容器会为其拼接组件标识,但组件标识(id)的规律无法被应用感知。辅助线(guideline)与屏障(barrier)的组件标识(id)需确保唯一,避免与任何组件冲突。若有重复,遵循组件 > guideline > barrier 的优先级。
-
组件间设置锚点时应避免形成依赖循环(组件之间设置链除外),依赖循环将导致子组件缺乏定位基准,最终无法绘制。
-
RelativeContainer父组件为锚点,__container__代表父容器的组件标识(id)。
let alignRus: Record<string, Record<string, string | VerticalAlign | HorizontalAlign>> = {'top': { 'anchor': '__container__', 'align': VerticalAlign.Top },'left': { 'anchor': '__container__', 'align': HorizontalAlign.Start }}let alignRue: Record<string, Record<string, string | VerticalAlign | HorizontalAlign>> = {'top': { 'anchor': '__container__', 'align': VerticalAlign.Top },'right': { 'anchor': '__container__', 'align': HorizontalAlign.End }}let marginLeft: Record<string, number> = { 'left': 20 }let bwc: Record<string, number | string> = { 'width': 2, 'color': '#6699FF' }@Entry@Componentstruct ParentRefRelativeContainer {build() {RelativeContainer() {Row() {Text('row1')}.justifyContent(FlexAlign.Center).width(100).height(100).backgroundColor('#a3cf62').alignRules(alignRus).id('row1')Row() {Text('row2')}.justifyContent(FlexAlign.Center).width(100).height(100).backgroundColor('#00ae9d').alignRules(alignRue).id('row2')}.width(300).height(300).margin(marginLeft).border(bwc)}}
-
以兄弟元素为锚点。
let alignRus001: Record<string, Record<string, string | VerticalAlign | HorizontalAlign>> = {'top': { 'anchor': '__container__', 'align': VerticalAlign.Top },'left': { 'anchor': '__container__', 'align': HorizontalAlign.Start }}let relConB: Record<string, Record<string, string | VerticalAlign | HorizontalAlign>> = {'top': { 'anchor': 'row1', 'align': VerticalAlign.Bottom },'left': { 'anchor': 'row1', 'align': HorizontalAlign.Start }}let marginLeft001: Record<string, number> = { 'left': 20 }let bwc001: Record<string, number | string> = { 'width': 2, 'color': '#6699FF' }@Entry@Componentstruct SiblingRefRelativeContainer {build() {RelativeContainer() {Row() {Text('row1')}.justifyContent(FlexAlign.Center).width(100).height(100).backgroundColor('#00ae9d').alignRules(alignRus001).id('row1')Row() {Text('row2')}.justifyContent(FlexAlign.Center).width(100).height(100).backgroundColor('#a3cf62').alignRules(relConB).id('row2')}.width(300).height(300).margin(marginLeft001).border(bwc001)}}
-
子组件锚点可以任意选择,但需注意不要相互依赖。
@Entry@Componentstruct ChildRefRelativeContainer {build() {Row() {RelativeContainer() {Row() {Text('row1')}.justifyContent(FlexAlign.Center).width(100).height(100).backgroundColor('#a3cf62').alignRules({top: { anchor: '__container__', align: VerticalAlign.Top },left: { anchor: '__container__', align: HorizontalAlign.Start }}).id('row1')Row() {Text('row2')}.justifyContent(FlexAlign.Center).width(100).backgroundColor('#00ae9d').alignRules({top: { anchor: '__container__', align: VerticalAlign.Top },right: { anchor: '__container__', align: HorizontalAlign.End },bottom: { anchor: 'row1', align: VerticalAlign.Center },}).id('row2')Row() {Text('row3')}.justifyContent(FlexAlign.Center).height(100).backgroundColor('#0a59f7').alignRules({top: { anchor: 'row1', align: VerticalAlign.Bottom },left: { anchor: 'row1', align: HorizontalAlign.Start },right: { anchor: 'row2', align: HorizontalAlign.Start }}).id('row3')Row() {Text('row4')}.justifyContent(FlexAlign.Center).backgroundColor('#2ca9e0').alignRules({top: { anchor: 'row3', align: VerticalAlign.Bottom },left: { anchor: 'row1', align: HorizontalAlign.Center },right: { anchor: 'row2', align: HorizontalAlign.End },bottom: { anchor: '__container__', align: VerticalAlign.Bottom }}).id('row4')}.width(300).height(300).margin({ left: 50 }).border({ width: 2, color: '#6699FF' })}.height('100%')}}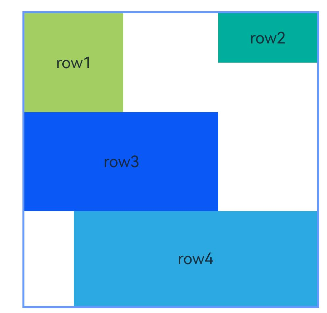
设置相对于锚点的对齐位置
设置了锚点之后,可以通过alignRules属性的align设置相对于锚点的对齐位置。
在水平方向上,对齐位置可以设置为HorizontalAlign.Start、HorizontalAlign.Center、HorizontalAlign.End。
在垂直方向上,对齐位置可以设置为VerticalAlign.Top、VerticalAlign.Center、VerticalAlign.Bottom。
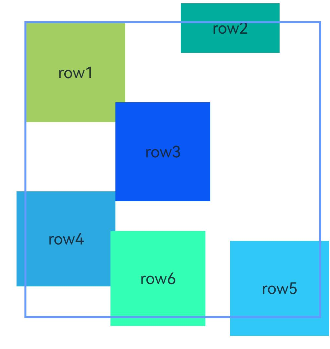
子组件位置偏移
子组件经过相对位置对齐后,可能尚未达到目标位置。开发者可根据需要设置额外偏移(offset)。当使用offset调整位置的组件作为锚点时,对齐位置为设置offset之前的位置。从API Version 11开始,新增了Bias对象,建议API Version 11及以后的版本使用bias来设置额外偏移。使用bias的示例可以参考示例4(设置偏移)。
@Entry
@Component
struct ChildComponentOffsetExample {
  build() {
    Row() {
      RelativeContainer() {
        Row() {
          Text('row1')
        }
        .justifyContent(FlexAlign.Center)
        .width(100)
        .height(100)
        .backgroundColor('#a3cf62')
        .alignRules({
          top: { anchor: '__container__', align: VerticalAlign.Top },
          left: { anchor: '__container__', align: HorizontalAlign.Start }
        })
        .id('row1')

        Row() {
          Text('row2')
        }
        .justifyContent(FlexAlign.Center)
        .width(100)
        .backgroundColor('#00ae9d')
        .alignRules({
          top: { anchor: '__container__', align: VerticalAlign.Top },
          right: { anchor: '__container__', align: HorizontalAlign.End },
          bottom: { anchor: 'row1', align: VerticalAlign.Center },
        })
        .offset({
          x: -40,
          y: -20
        })
        .id('row2')

        Row() {
          Text('row3')
        }
        .justifyContent(FlexAlign.Center)
        .height(100)
        .backgroundColor('#0a59f7')
        .alignRules({
          top: { anchor: 'row1', align: VerticalAlign.Bottom },
          left: { anchor: 'row1', align: HorizontalAlign.End },
          right: { anchor: 'row2', align: HorizontalAlign.Start }
        })
        .offset({
          x: -10,
          y: -20
        })
        .id('row3')

        Row() {
          Text('row4')
        }
        .justifyContent(FlexAlign.Center)
        .backgroundColor('#2ca9e0')
        .alignRules({
          top: { anchor: 'row3', align: VerticalAlign.Bottom },
          bottom: { anchor: '__container__', align: VerticalAlign.Bottom },
          left: { anchor: '__container__', align: HorizontalAlign.Start },
          right: { anchor: 'row1', align: HorizontalAlign.End }
        })
        .offset({
          x: -10,
          y: -30
        })
        .id('row4')

        Row() {
          Text('row5')
        }
        .justifyContent(FlexAlign.Center)
        .backgroundColor('#30c9f7')
        .alignRules({
          top: { anchor: 'row3', align: VerticalAlign.Bottom },
          bottom: { anchor: '__container__', align: VerticalAlign.Bottom },
          left: { anchor: 'row2', align: HorizontalAlign.Start },
          right: { anchor: 'row2', align: HorizontalAlign.End }
        })
        .offset({
          x: 10,
          y: 20
        })
        .id('row5')

        Row() {
          Text('row6')
        }
        .justifyContent(FlexAlign.Center)
        .backgroundColor('#ff33ffb5')
        .alignRules({
          top: { anchor: 'row3', align: VerticalAlign.Bottom },
          bottom: { anchor: 'row4', align: VerticalAlign.Bottom },
          left: { anchor: 'row3', align: HorizontalAlign.Start },
          right: { anchor: 'row3', align: HorizontalAlign.End }
        })
        .offset({
          x: -15,
          y: 10
        })
        .backgroundImagePosition(Alignment.Bottom)
        .backgroundImageSize(ImageSize.Cover)
        .id('row6')
      }
      .width(300).height(300)
      .margin({ left: 50 })
      .border({ width: 2, color: '#6699FF' })
    }
    .height('100%')
  }
}
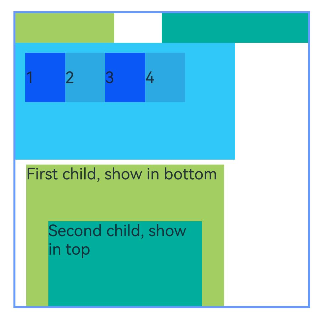
多种组件的对齐布局
Row、Column、Flex、Stack等多种布局组件,可按照RelativeContainer组件规则进行对齐排布。
@Entry
@Component
struct RelativeContainerExample {
  build() {
    Row() {

      RelativeContainer() {
        Row()
          .width(100)
          .height(100)
          .backgroundColor('#a3cf62')
          .alignRules({
            top: { anchor: '__container__', align: VerticalAlign.Top },
            left: { anchor: '__container__', align: HorizontalAlign.Start }
          })
          .id('row1')

        Column()
          .width('50%')
          .height(30)
          .backgroundColor('#00ae9d')
          .alignRules({
            top: { anchor: '__container__', align: VerticalAlign.Top },
            left: { anchor: '__container__', align: HorizontalAlign.Center }
          })
          .id('row2')

        Flex({ direction: FlexDirection.Row }) {
          Text('1').width('20%').height(50).backgroundColor('#0a59f7')
          Text('2').width('20%').height(50).backgroundColor('#2ca9e0')
          Text('3').width('20%').height(50).backgroundColor('#0a59f7')
          Text('4').width('20%').height(50).backgroundColor('#2ca9e0')
        }
        .padding(10)
        .backgroundColor('#30c9f7')
        .alignRules({
          top: { anchor: 'row2', align: VerticalAlign.Bottom },
          left: { anchor: '__container__', align: HorizontalAlign.Start },
          bottom: { anchor: '__container__', align: VerticalAlign.Center },
          right: { anchor: 'row2', align: HorizontalAlign.Center }
        })
        .id('row3')

        Stack({ alignContent: Alignment.Bottom }) {
          Text('First child, show in bottom')
            .width('90%')
            .height('100%')
            .backgroundColor('#a3cf62')
            .align(Alignment.Top)
          Text('Second child, show in top').width('70%').height('60%').backgroundColor('#00ae9d').align(Alignment.Top)
        }
        .margin({ top: 5 })
        .alignRules({
          top: { anchor: 'row3', align: VerticalAlign.Bottom },
          left: { anchor: '__container__', align: HorizontalAlign.Start },
          bottom: { anchor: '__container__', align: VerticalAlign.Bottom },
          right: { anchor: 'row3', align: HorizontalAlign.End }
        })
        .id('row4')

      }
      .width(300).height(300)
      .margin({ left: 50 })
      .border({ width: 2, color: '#6699FF' })
    }
    .height('100%')
  }
}
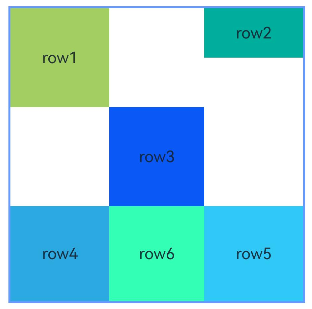
组件尺寸
当同时存在前端页面设置的子组件尺寸和相对布局规则时,子组件的绘制尺寸依据约束规则确定。从API Version 11开始,此规则有所变化,子组件自身设置的尺寸优先级高于相对布局规则中的对齐锚点尺寸。因此,若要使子组件与锚点严格对齐,应仅使用alignRules,避免使用尺寸设置。
![]()
- 根据约束条件和子组件自身的size属性无法确定子组件的大小,此时,不绘制该子组件。
- 在同一方向上设置两个或更多锚点时,若这些锚点的位置顺序有误,该子组件将被视为大小为0而不予绘制。
@Entry
@Component
struct RelativeAlignRulesExample {
  build() {
    Row() {
      RelativeContainer() {
        Row() {
          Text('row1')
        }
        .justifyContent(FlexAlign.Center)
        .width(100)
        .height(100)
        .backgroundColor('#a3cf62')
        .alignRules({
          top: { anchor: '__container__', align: VerticalAlign.Top },
          left: { anchor: '__container__', align: HorizontalAlign.Start }
        })
        .id('row1')

        Row() {
          Text('row2')
        }
        .justifyContent(FlexAlign.Center)
        .width(100)
        .backgroundColor('#00ae9d')
        .alignRules({
          top: { anchor: '__container__', align: VerticalAlign.Top },
          right: { anchor: '__container__', align: HorizontalAlign.End },
          bottom: { anchor: 'row1', align: VerticalAlign.Center },
        })
        .id('row2')

        Row() {
          Text('row3')
        }
        .justifyContent(FlexAlign.Center)
        .height(100)
        .backgroundColor('#0a59f7')
        .alignRules({
          top: { anchor: 'row1', align: VerticalAlign.Bottom },
          left: { anchor: 'row1', align: HorizontalAlign.End },
          right: { anchor: 'row2', align: HorizontalAlign.Start }
        })
        .id('row3')

        Row() {
          Text('row4')
        }.justifyContent(FlexAlign.Center)
        .backgroundColor('#2ca9e0')
        .alignRules({
          top: { anchor: 'row3', align: VerticalAlign.Bottom },
          bottom: { anchor: '__container__', align: VerticalAlign.Bottom },
          left: { anchor: '__container__', align: HorizontalAlign.Start },
          right: { anchor: 'row1', align: HorizontalAlign.End }
        })
        .id('row4')

        Row() {
          Text('row5')
        }.justifyContent(FlexAlign.Center)
        .backgroundColor('#30c9f7')
        .alignRules({
          top: { anchor: 'row3', align: VerticalAlign.Bottom },
          bottom: { anchor: '__container__', align: VerticalAlign.Bottom },
          left: { anchor: 'row2', align: HorizontalAlign.Start },
          right: { anchor: 'row2', align: HorizontalAlign.End }
        })
        .id('row5')

        Row() {
          Text('row6')
        }
        .justifyContent(FlexAlign.Center)
        .backgroundColor('#ff33ffb5')
        .alignRules({
          top: { anchor: 'row3', align: VerticalAlign.Bottom },
          bottom: { anchor: 'row4', align: VerticalAlign.Bottom },
          left: { anchor: 'row3', align: HorizontalAlign.Start },
          right: { anchor: 'row3', align: HorizontalAlign.End }
        })
        .id('row6')
        .backgroundImagePosition(Alignment.Bottom)
        .backgroundImageSize(ImageSize.Cover)
      }
      .width(300).height(300)
      .margin({ left: 50 })
      .border({ width: 2, color: '#6699FF' })
    }
    .height('100%')
  }
}
多个组件形成链
链的形成依赖于组件之间的关联关系。以组件A和组件B构成的最简水平链为例,其依赖关系为:锚点1 <-- 组件A <---> 组件B --> 锚点2,即A具有left锚点,B具有right锚点,同时A的right锚点与B的HorizontalAlign.Start对齐,B的left锚点与A的HorizontalAlign.End对齐。
- 链的方向和格式在链头组件的chainMode接口中声明;链内元素的bias属性全部失效,链头元素的bias属性作为整个链的bias生效。链头是指在满足成链规则时链的第一个组件(在水平方向上,从左边开始,镜像语言中从右边开始;在垂直方向上,从上边开始)。
- 如果链内所有元素的size超出链的锚点约束,超出部分将被均匀分配到链的两侧。在PACKED链中,可以通过Bias设置超出部分的分布。
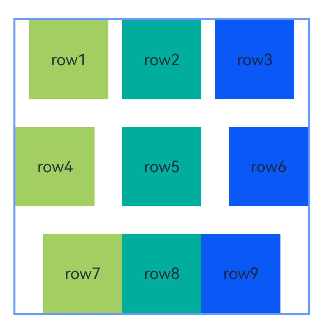
在以下示例代码中,通过alignRules和chainMode将九个在容器内的Row组件分为三组水平链式排列。组件row1、组件row2和组件row3顶部对齐,水平方向成SPREAD链,链内组件在锚点间均匀分布。组件row4、组件row5、组件row6垂直方向基于容器居中,水平方向成SPREAD_INSIDE链,链内除首尾2个组件对齐锚点外,其他组件在链中均匀分布。组件row7、组件row8、组件row9底部对齐,水平方向组成PACKED链,链内组件无间隙。
@Entry
@Component
struct RelativeChainModeExample {
  build() {
    Row() {
      RelativeContainer() {
        Row() {
          Text('row1')
        }
        .justifyContent(FlexAlign.Center)
        .width(80)
        .height(80)
        .backgroundColor('#a3cf62')
        .alignRules({
          left: { anchor: '__container__', align: HorizontalAlign.Start },
          right: { anchor: 'row2', align: HorizontalAlign.Start },
          top: { anchor: '__container__', align: VerticalAlign.Top }
        })
        .id('row1')
        .chainMode(Axis.Horizontal, ChainStyle.SPREAD)

        Row() {
          Text('row2')
        }
        .justifyContent(FlexAlign.Center)
        .width(80)
        .height(80)
        .backgroundColor('#00ae9d')
        .alignRules({
          left: { anchor: 'row1', align: HorizontalAlign.End },
          right: { anchor: 'row3', align: HorizontalAlign.Start },
          top: { anchor: 'row1', align: VerticalAlign.Top }
        })
        .id('row2')

        Row() {
          Text('row3')
        }
        .justifyContent(FlexAlign.Center)
        .width(80)
        .height(80)
        .backgroundColor('#0a59f7')
        .alignRules({
          left: { anchor: 'row2', align: HorizontalAlign.End },
          right: { anchor: '__container__', align: HorizontalAlign.End },
          top: { anchor: 'row1', align: VerticalAlign.Top }
        })
        .id('row3')

        Row() {
          Text('row4')
        }
        .justifyContent(FlexAlign.Center)
        .width(80)
        .height(80)
        .backgroundColor('#a3cf62')
        .alignRules({
          left: { anchor: '__container__', align: HorizontalAlign.Start },
          right: { anchor: 'row5', align: HorizontalAlign.Start },
          center: { anchor: '__container__', align: VerticalAlign.Center }
        })
        .id('row4')
        .chainMode(Axis.Horizontal, ChainStyle.SPREAD_INSIDE)

        Row() {
          Text('row5')
        }
        .justifyContent(FlexAlign.Center)
        .width(80)
        .height(80)
        .backgroundColor('#00ae9d')
        .alignRules({
          left: { anchor: 'row4', align: HorizontalAlign.End },
          right: { anchor: 'row6', align: HorizontalAlign.Start },
          top: { anchor: 'row4', align: VerticalAlign.Top }
        })
        .id('row5')

        Row() {
          Text('row6')
        }
        .justifyContent(FlexAlign.Center)
        .width(80)
        .height(80)
        .backgroundColor('#0a59f7')
        .alignRules({
          left: { anchor: 'row5', align: HorizontalAlign.End },
          right: { anchor: '__container__', align: HorizontalAlign.End },
          top: { anchor: 'row4', align: VerticalAlign.Top }
        })
        .id('row6')

        Row() {
          Text('row7')
        }
        .justifyContent(FlexAlign.Center)
        .width(80)
        .height(80)
        .backgroundColor('#a3cf62')
        .alignRules({
          left: { anchor: '__container__', align: HorizontalAlign.Start },
          right: { anchor: 'row8', align: HorizontalAlign.Start },
          bottom: { anchor: '__container__', align: VerticalAlign.Bottom }
        })
        .id('row7')
        .chainMode(Axis.Horizontal, ChainStyle.PACKED)

        Row() {
          Text('row8')
        }
        .justifyContent(FlexAlign.Center)
        .width(80)
        .height(80)
        .backgroundColor('#00ae9d')
        .alignRules({
          left: { anchor: 'row7', align: HorizontalAlign.End },
          right: { anchor: 'row9', align: HorizontalAlign.Start },
          top: { anchor: 'row7', align: VerticalAlign.Top }
        })
        .id('row8')

        Row() {
          Text('row9')
        }
        .justifyContent(FlexAlign.Center)
        .width(80)
        .height(80)
        .backgroundColor('#0a59f7')
        .alignRules({
          left: { anchor: 'row8', align: HorizontalAlign.End },
          right: { anchor: '__container__', align: HorizontalAlign.End },
          top: { anchor: 'row7', align: VerticalAlign.Top }
        })
        .id('row9')
      }
      .width(300).height(300)
      .margin({ left: 50 })
      .border({ width: 2, color: '#6699FF' })
    }
    .height('100%')
  }
}
使用辅助线辅助定位子组件
辅助线(guideLine)是在容器内虚拟出的额外水平或垂直锚点,便于统一对齐到特定偏移位置,从而避免为每个组件单独编写重复的偏移设置。
辅助线分为垂直(Vertical)和水平(Horizontal)两种:垂直辅助线通过start和end属性指定其距离容器左侧和右侧的距离;水平辅助线通过start和end属性指定其距离容器顶部和底部的距离。
- 如果同时设置了start和end,当两者规则冲突时,仅start属性生效。
- 若容器在某个方向的尺寸被声明为"auto",则该方向上的guideLine位置只能使用start属性声明(不允许使用百分比)。
在以下示例代码中,定义了一条垂直辅助线guideline1,距离容器左侧50vp,以及另一条水平辅助线guideline2,距离容器顶部50vp。组件row1通过这两条辅助线来定位自身位置,无需设置bias。
@Entry
@Component
struct RelativeGuideLineExample {
  build() {
    Row() {
      RelativeContainer() {
        Row()
          .width(100)
          .height(100)
          .backgroundColor('#a3cf62')
          .alignRules({
            left: { anchor: 'guideline1', align: HorizontalAlign.End },
            top: { anchor: 'guideline2', align: VerticalAlign.Top }
          })
          .id('row1')
      }
      .width(300)
      .height(300)
      .margin({ left: 50 })
      .border({ width: 2, color: '#6699FF' })
      .guideLine([{ id: 'guideline1', direction: Axis.Vertical, position: { start: 50 } },
        { id: 'guideline2', direction: Axis.Horizontal, position: { start: 50 } }])
    }
    .height('100%')
  }
}

多个组件的屏障
屏障(barrier)是容器的一种动态参考边界,它基于一组指定组件的实际位置,计算出它们在特定方向上的公共最远边界。当需要让某个组件参照多个组件的集体边界时使用,例如实现“位于这些组件右侧”或“不与其他任何组件重叠”等效果。
屏障可以有上下左右四个方向。垂直方向(TOP,BOTTOM)的屏障仅能作为组件的水平方向锚点,用作垂直方向锚点时值为0;水平方向(LEFT,RIGHT)的屏障仅能作为组件的垂直方向锚点,用作水平方向锚点时值为0。
与静态的guideline不同,barrier会随参照组件位置变化而自动更新,只需定义实际需要的方向即可。
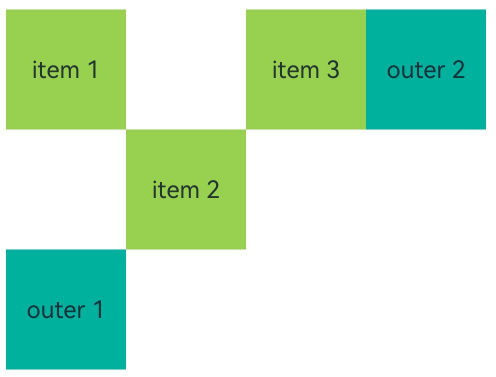
在下列示例代码中,item1,item2,item3三个组件可以视为由一个隐形的矩形区域包围着,outer1基于这个“隐形区域”的底部边界进行布局,位于该区域的下方;outer2基于这个“隐形区域”的右侧边界进行布局,位于该区域的右侧。
@Entry
@Component
struct Index {
  build() {
    RelativeContainer() {
      Text('item 1')
        .width(80)
        .height(80)
        .textAlign(TextAlign.Center)
        .backgroundColor('#a3cf62')
        .id('item1')
        .alignRules({
          top: {
            anchor: '__container__',
            align: VerticalAlign.Top
          },
          left: {
            anchor: '__container__',
            align: HorizontalAlign.Start
          }
        })
      Text('item 2')
        .width(80)
        .height(80)
        .textAlign(TextAlign.Center)
        .backgroundColor('#a3cf62')
        .id('item2')
        .alignRules({
          top: {
            anchor: 'item1',
            align: VerticalAlign.Bottom
          },
          left: {
            anchor: 'item1',
            align: HorizontalAlign.End
          }
        })
      Text('item 3')
        .width(80)
        .height(80)
        .textAlign(TextAlign.Center)
        .backgroundColor('#a3cf62')
        .id('item3')
        .alignRules({
          bottom: {
            anchor: 'item2',
            align: VerticalAlign.Top
          },
          left: {
            anchor: 'item2',
            align: HorizontalAlign.End
          }
        })
      Text('outer 1')
        .width(80)
        .height(80)
        .textAlign(TextAlign.Center)
        .backgroundColor('#00ae9d')
        // 定义其位置
        .alignRules({
          top: {
            anchor: 'barrier_bottom',
            align: VerticalAlign.Top
          },
          left: {
            anchor: 'barrier_left',
            align: HorizontalAlign.Start
          }
        })

      Text('outer 2')
        .width(80)
        .height(80)
        .textAlign(TextAlign.Center)
        .backgroundColor('#00ae9d')
        // 定义其位置
        .alignRules({
          top: {
            anchor: 'barrier_top',
            align: VerticalAlign.Top
          },
          left: {
            anchor: 'barrier_right',
            align: HorizontalAlign.Start
          }
        })
    }
    .width('100%')
    .padding(10)
    .barrier([
      {
        id: 'barrier_left',
        direction: BarrierDirection.LEFT,
        referencedId: ['item1', 'item2', 'item3']
      },
      {
        id: 'barrier_right',
        direction: BarrierDirection.RIGHT,
        referencedId: ['item1', 'item2', 'item3']
      },
      {
        id: 'barrier_top',
        direction: BarrierDirection.TOP,
        referencedId: ['item1', 'item2', 'item3']
      },
      {
        id: 'barrier_bottom',
        direction: BarrierDirection.BOTTOM,
        referencedId: ['item1', 'item2', 'item3']
      },
    ])
  }
}