ArkGraphics 3D场景搭建以及管理
一个3D场景通常由光源、相机、模型三个关键部分组成。
- 光源:为整个3D场景提供光照,使得3D场景中的模型变得可见。与真实物理场景一致,没有光源场景将变得一片漆黑,得到的渲染结果也就是全黑色。
- 相机:为3D场景提供一个观察者。3D渲染本质上是从一个角度观察3D场景并投影到2D图片上。没有相机就没有3D场景的观察者,也就不会得到渲染结果。
- 模型:3D场景中的模型用于描述对象的形状、结构和外观,一般具有网格、材质、纹理、动画等属性。一些常见的3D模型格式有OBJ、FBX、glTF等。
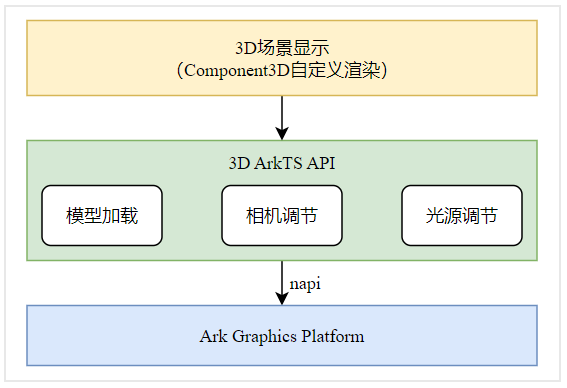
模型加载后,可以通过ArkUI的Component3D渲染组件呈现给用户,Component3D负责将ArkGraphics 3D场景渲染到界面中。在自定义场景模式下,开发者可以使用ArkTS API创建并管理相机和光源节点,从而设置合适的观察角度和光照效果;在自动场景模式下,框架会根据模型自动创建基础相机和光照。ArkTS API可通过napi调用AGP中由C++实现的相应能力。
模型的加载及呈现
模型的格式多种多样,目前ArkGraphics 3D仅支持glTF模型的加载,glTF是一种对于3D场景描述的格式,glTF作为一种开源3D场景格式在业界被广泛采用。关于glTF的介绍可以参照glTF-2.0。
一个glTF模型可以包含光源、相机、模型等3D场景关键要素,如果一个glTF模型中包含相机,使用ArkGraphics 3D提供的接口加载glTF就可以直接完成该相机视角下3D场景的渲染。如果不包含相机,也可以利用ArkGraphics 3D创建一个相机完成渲染。由于3D模型往往数据量很大,通常采用异步方式进行加载,加载成功后将返回一个scene对象,通过该对象可对整个3D场景进行编辑。
-
导入相关模块。
在页面脚本中导入ArkGraphics 3D提供的核心类型,用于创建和管理3D场景与相机。
import { Camera, Scene, SceneResourceFactory } from '@kit.ArkGraphics3D'; -
加载场景资源。
ArkGraphics 3D提供Scene.load()接口用于加载glTF模型文件,模型加载成功后会返回一个Scene实例,可通过它继续创建相机或光照等组件。模型文件支持.gltf与.glb格式,其中.glb为二进制封装形式,与.gltf内容等价但更便于加载与使用。模型加载支持相对路径和绝对路径两种方式:相对路径加载使用$rawfile(),从应用的resources/rawfile/目录读取内置资源文件;绝对路径加载需从应用沙箱目录读取文件,Scene.load()仅支持访问应用自身创建或写入的沙箱文件,具体示例可参见load()。
以下示例展示通过相对路径加载.glb模型:
if (this.scene == null) {// Load the model and place the gltf file in the related path. Use the actual path during loading.// Switched from .gltf to .glb; same content, different formatScene.load($rawfile('gltf/DamagedHelmet/glTF/DamagedHelmet.glb')).then(async (result: Scene) => {this.scene = result;let rf: SceneResourceFactory = this.scene.getResourceFactory();// ...}).catch((error: string) => {console.error('Scene load failed: ' + error);});} -
创建相机并设置场景渲染参数。
使用SceneResourceFactory.createCamera()创建相机,并设置相机启用状态与观察位置。通过调整相机的z轴位置,可控制观察距离。随后将加载完成的Scene封装为SceneOptions,并指定渲染类型为ModelType.SURFACE,用于Component3D渲染显示。
// Create a Camera.this.cam = await rf.createCamera({ 'name': 'Camera' });// Set proper camera parameters.this.cam.enabled = true;this.cam.position.z = 5;this.sceneOpt = { scene: this.scene, modelType: ModelType.SURFACE } as SceneOptions; -
渲染3D模型。
通过Component3D渲染加载完成的3D场景。若模型尚未加载完成,则显示提示文本。Component3D会根据传入的SceneOptions自动进行渲染。
if (this.sceneOpt) {// Use Component3D to display the 3D scenario.Component3D(this.sceneOpt);} else {Text('Loading···');}
相机的创建及管理
相机作为3D场景中的重要部分,决定了整个3D场景向2D图片的投影过程,相机的近远平面、FoV角等关键参数也会对整个3D渲染产生重要的影响。开发者可以通过设置相机参数,控制这个渲染过程,得到开发者想要的渲染效果。
ArkGraphics 3D提供了灵活的相机接口,开发者可根据需要动态创建、配置与控制相机。
-
导入相关模块。
在页面脚本中导入ArkGraphics 3D提供的核心类型,用于加载场景、创建相机及资源管理。
import { Camera, Scene, SceneNodeParameters, SceneResourceFactory } from '@kit.ArkGraphics3D'; -
加载场景资源。
使用Scene.load()从应用的resources/rawfile/目录加载.glb模型文件,.glb为glTF的二进制封装格式,与.gltf内容等价但更便于加载与使用。模型加载成功后返回Scene对象,可通过它获取SceneResourceFactory用于后续创建相机。
let scene: Promise<Scene> = Scene.load($rawfile('gltf/CubeWithFloor/glTF/AnimatedCube.glb'));scene.then(async (result: Scene) => {// ...let sceneFactory: SceneResourceFactory = result.getResourceFactory();let sceneCameraParameter: SceneNodeParameters = { name: 'camera' };// ...}).catch((error: string) => {console.error('Scene load failed: ' + error);reject(error);}); -
创建相机并配置相机参数。
调用 SceneResourceFactory.createCamera()创建相机,并配置相机的启用状态、位置、视场角(FoV)等参数。相机位置影响场景的观察距离,FoV决定画面透视范围。
let camera: Promise<Camera> = sceneFactory.createCamera(sceneCameraParameter);camera.then(async (cameraEntity: Camera) => {// Enable the camera node.cameraEntity.enabled = true;// Set the camera position.cameraEntity.position.z = 5;// Set the FoV.cameraEntity.fov = 60 * Math.PI / 180;// Set other camera parameters.// ...// ...}).catch((error: string) => {console.error('Camera create failed: ' + error + '.');// ...}); -
初始化与渲染绑定。
完成相机初始化后,将加载好的场景与相机绑定,并设置场景渲染参数。通过构建SceneOptions对象,即可将场景交由Component3D渲染显示,具体渲染方式可参考模型加载示例。
this.camera = await createCameraPromise();if (globalScene && this.camera) {this.scene = globalScene;this.positionX = this.camera.position.x;this.positionY = this.camera.position.y;this.positionZ = this.camera.position.z;this.sceneOpt = { scene: this.scene, modelType: ModelType.SURFACE } as SceneOptions;} -
相机交互。
开发者可通过设置相机的位置、旋转、缩放、FoV等参数,以实现交互式视角控制。以下示例以Z轴控制为例,X/Y轴逻辑与此类似。
Slider({value: this.positionZ,min: 5,max: 10,step: 0.1,style: SliderStyle.OutSet}).showTips(false).onChange((value: number, mode: SliderChangeMode) => {this.positionZ = value;if (mode === SliderChangeMode.End) {if (!this.scene || !this.camera) {return;}this.camera.position.z = value;}}).width('100%')
光源的创建及管理
3D场景的光源是对于物理世界中光源的一种数据建模,模拟物理世界的光源对于3D场景中的物体产生影响。
光源具有多种类型,例如平行光、锥形光。平行光用于模拟生活中的太阳光照,其光线平行且强度均匀。锥形光类似于手电筒,从一个点向扇形区域发射光线,光线强度随距离衰减。光源的颜色会影响场景中物体的最终着色,渲染时依据物理规律计算光源与物体表面颜色的交互,使光照效果更加真实。
ArkGraphics 3D提供创建光源及修改光源参数的功能,支持开发者通过设置光源属性调整3D场景,以实现预期的渲染效果。
-
导入相关模块。
在页面脚本中导入ArkGraphics 3D提供的核心类型,用于加载场景、创建相机与灯光。
import { Camera, Light, LightType, Scene, SceneNodeParameters, SceneResourceFactory } from '@kit.ArkGraphics3D'; -
加载场景资源。
使用Scene.load()从应用的resources/rawfile/目录加载.glb模型文件,.glb为glTF的二进制封装格式,与.gltf内容等价但更便于加载与使用。模型加载成功后返回Scene对象,可通过它获取SceneResourceFactory用于后续创建灯光。
let scene: Promise<Scene> = Scene.load($rawfile('gltf/CubeWithFloor/glTF/AnimatedCube.glb'));scene.then(async (result: Scene) => {// ...let sceneFactory: SceneResourceFactory = result.getResourceFactory();let lightParameter: SceneNodeParameters = { name: 'light' };// ...}).catch((error: string) => {console.error('Scene load failed: ' + error);// ...}); -
创建灯光并配置灯光参数。
调用 SceneResourceFactory.createLight()创建灯光,并配置灯光的类型、位置、颜色等参数。灯光类型决定了光线的方向,位置决定了光线的位置,颜色决定了光线的颜色。
let light: Promise<Light> = sceneFactory.createLight(lightParameter, LightType.DIRECTIONAL);light.then(async (lightEntity: Light) => {// Set the color of the directional light.lightEntity.color = { r: 0.8, g: 0.1, b: 0.2, a: 1.0 };// Set other light parameters.// ...// ...}).catch((err: string) => {console.error('Light create failed: ' + err + '.');// ...}); -
初始化与渲染绑定。
完成灯光初始化后,将加载好的场景与灯光进行绑定,并设置场景渲染参数。通过构建SceneOptions对象,即可将场景交由Component3D渲染显示。同时创建相机并设置观察位置,用于控制场景显示效果。
this.light = await createLightPromise();if (globalScene && this.light) {this.scene = globalScene;this.sceneOpt = { scene: this.scene, modelType: ModelType.SURFACE } as SceneOptions;this.rf = this.scene.getResourceFactory();this.cam = await this.rf.createCamera({ 'name': 'Camera1' });this.cam.enabled = true;this.cam.position.z = 5;// Initialize color valuethis.red = this.light.color.r;this.green = this.light.color.g;this.blue = this.light.color.b;} -
灯光交互。
开发者可通过调整灯光的颜色、位置或方向等参数,实现交互式光照控制。以下示例展示了基于颜色分量(R/G/B)的交互逻辑,其余参数的控制方式与此类似。
Slider({value: this.red,min: 0,max: 1,step: 0.01,style: SliderStyle.OutSet}).showTips(false).onChange((value: number, mode: SliderChangeMode) => {this.red = value;if (mode === SliderChangeMode.End) {if (!this.scene || !this.light) {return;}this.light.color = {r: this.red,g: this.green,b: this.blue,a: 1.0}}}).width('100%')